Related Blogs
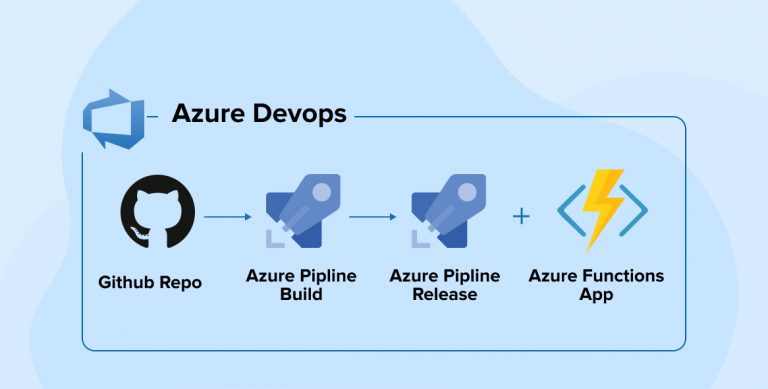
Technology ingestion happens now and then. The main reason for discovering a new way or method to work is to decrease human efforts. As humans, our efforts are always driven towards excellence that would increase productivity and make the process simpler than ever before. Various tools, software, and apps we use in day to day life to keep our things managed. But even custom software development and deployment needs some toolchain that keeps your source code in a private repository on the cloud, keep track of Task-list, generate reports, can do agile planning, provides an integrated testing solution that would help in the deployment process and that’s where Azure DevOps – Software as a Service (SaaS) platform from Microsoft comes to into picture. The launch of Azure DevOps was around 2018 and hence it is not a newbie in the world of technology. Its origin can be traced using the Visual Studio Team system launched in 2006.
1. What is Azure DevOps?
Azure DevOps is an all-inclusive package offering a wide-ranging service that covers the entire SDLC or Application development life cycle. Let’s see some substantial features of the Azure DevOps:
- Azure Boards: Allows Work item tracking, Agile planning, Power BI visualization, and similar other reporting tools.
- Azure Pipelines: Defines CI/CD- Continuous Integration and Continuous deployment process with support for containers and Kubernetes.
- Azure Repos: Provides full-support for cloud-hosted private repositories.
- Azure Artifacts: Package management Support for Maven, npm, NuGet and Python package feeds from private or public sources.
- Azure Test Plans: Provides integrated planning and investigation of testing solutions.
Azure DevOps is the feature-rich mature model offered by Microsoft for businesses to simultaneously manage multiple tasks.
2. What is the Azure Pipeline?
Azure Pipeline is an automated set of processes that helps developers to compile, build, and deploy codes on other computation platforms. It is a continuous delivery tool similar to open source Jenkins or CodeShip. The sole goal of this pipeline is that there is no manual intervention, all the changes are automatically executed in the project. Whenever humans are handling the process, there is a possibility of human errors while doing the same repetitive boring tasks, but with automation, it works seamlessly once it’s configured.
A pipeline is normally broken down into the following categories:
- Source Control
- Build Tools
- Package creation
- Configuration management
- Monitoring
This Pipeline can be used with many application types such as Java, Go, Python, JavaScript, Node.js, .NET, C++ and XCode. To use it , you will need a source control to attach with it. Moreover, it supports various source controls such as GitHub, Azure Repos, Bitbucket, Subversion, etc.
This pipeline is based on the strong foundations of CI/CD pipelines which consistently test, build and deploy. They also perform constant deliveries automatically by continuous testing and deploying the codes to the desired targets in the project.
2.1 Continuous Integration (CI)
Continuous Integration helps to catch the bugs and issues in the early stage of the development cycle when fixing errors is simpler and fast. Developers can check their codes in version-controlled repositories, check-in their code to test and locate errors. The main benefits are:
- Minor changes are easier to merge in large codes.
- Easier for big teams to see what each one has been working on.
- Locate bugs and make them easier to fix.
- Continuous code compilation and testing.
- Making the integration process smooth thus improves productivity.
2.2 Continuous Delivery (CD)
Continuous Delivery is the process of integrating code with infrastructure, ensuring that all tests are performed and policies are followed, and finally deploying the code into the desired environment.CD helps developers to deliver new features, fix bugs and configure changes reliably and quickly. CD pipeline provides routine deliveries as per configuration or can also be called on-demand. The key benefits are:
- Decreases risks in releases.
- Faster delivery of bug fixes and issues.
- Delivery can be feasible at any scale.
Azure Pipelines provides YAML syntax and a classic interface to setup CI-CD pipelines.
3. Advantages of Using Azure DevOps Pipeline
Azure pipeline includes a variety of elements and when implied with Azure DevOps CI/CD practice, Azure DevOps Pipeline offers many benefits to the user. Some of them are as mentioned below:
- Version Control Systems – The first thing you need to do to create an Azure CI/CD pipeline is to put your code in a version control system. Any kind of Git repository including GitHub, Github Enterprise, Subversion, Bitbucket Cloud, and more can help you manage your source code. Developers are also known to leverage it to support Team Foundation Version Control (TFVC).
- Programming Languages and types of Application – With the Azure DevOps pipeline, you can use it with most application types and various kinds of programming languages including Javascript, Python, Java, Ruby, PHP, C, C++, and so on. It can be used with any platform like Linux, Windows, and macOS.
- Deployment Targets – You can deploy Azure CI/CD pipelines with apps on environments with multiple targets like any On-prem or cloud platform, virtual machines, container registries, Azure services, containers, etc.
- Pricing – If you are working on a public project then the Azure DevOps pipeline comes free of charge but in the case of private projects you have to subscribe to its services not before you run up to 1800 minutes of pipeline jobs for free every month.
- Progressive Deployment – During the development and testing phase, the Azure DevOps pipeline allows you to set as many stages as you want to control the quality of the project before you have to move on to the next stage. This helps you in accurately pinpointing the bugs and understanding the problems, where they are occurring, and how to solve them. The completely customized deployment controls of the Azure DevOps pipeline not only keep you in the controlling position for your project but also enable you to make deliberate delivery of CI/CD solutions to the client.
4. Define Pipelines Using YAML Syntax

The pipeline depends on the versioning of the code, similar codes will have a similar branching structure. You can set triggers to start the process when any pull request is accepted. You can trigger the build process and identify issues in integration with your existing codebase.
azure-pipelines.yml can be used to add your pipeline in a YAML file with your application.
These are the high-level steps:
- Configure Azure Pipeline to use your repository.
- Edit the YAML file to specify your build.
- Push your code in a specific branch to trigger the process.
5. Define Pipelines Using Classic Interface
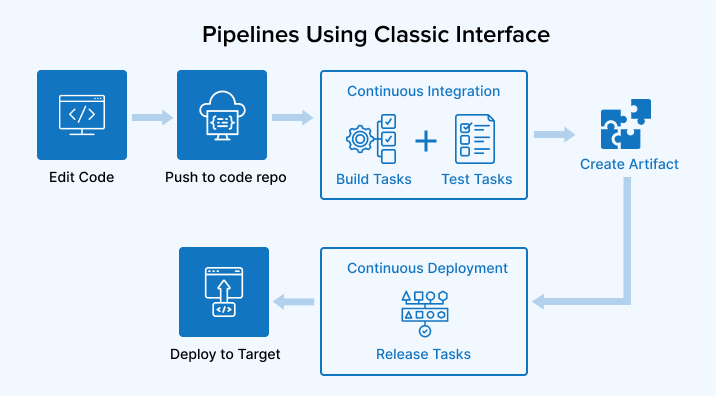
Users can define the pipeline in the Azure DevOps portal with the classic editor. They can also define a “Build Pipeline” for such activities as to build and test your code, and then publish artifacts. Additionally, they can also define the “Release Pipeline” to consume these artifacts and deploy them in targets.
These are the high-level steps:
- Configure Azure DevOps Pipeline to use your repository.
- Define build and release pipelines using the Azure DevOps web portal.
- Push your code to a specific branch to trigger the process.
Here, we saw high levels of steps to define pipelines in both ways. Let see a few terms to be used in Azure DevOps Pipelines before we jump to create a new pipeline.
6. Key Components of Azure DevOps Pipeline
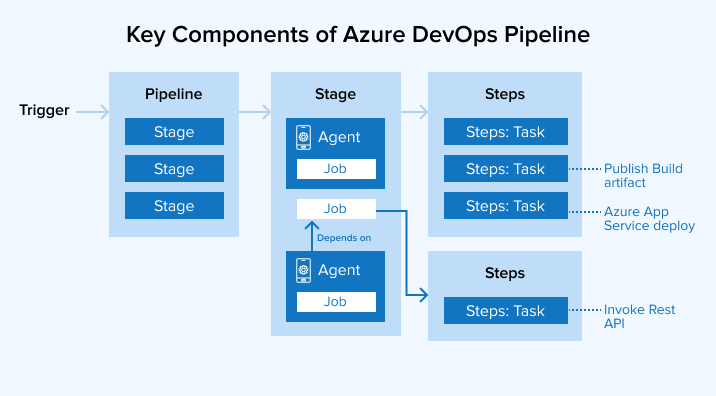
- A triggerinitiates an Azure DevOps Pipeline to run.
- A pipeline can have many stages. A pipeline can deploy to single or multiple environments.
- A stage can be specified to manage jobs in a pipeline and each stage has various jobs.
- Each job runs on one agent. It’s also possible that a job doesn’t have an agent.
- Each agent runs a job that may have various steps.
- A step can be anything like a script or task and it is the compact part of a pipeline.
- A task is a pre-bundled script that acts like to publish a build artifact or to call a REST API.
- A run publishes a bunch of files or bundles called an artifact.
Agents and Agent Pools
An Agent is a computing architecture with installed agent software that runs a set of steps when a job attached to the agent runs. Rather than handling each agent separately, you group them into agent pools. For detailed information on this component check- Build and release agents.
Approvals
It specifies a set of validations needed before a deployment can be executed. It is used to manage deployments to production environments. Once checks are configured, the pipelines will pause and stop before starting the deployment process. They will only restart the process once all the uncheck options are checked and completed successfully. For any information, visit Define Approvals and checks.
Artifacts
Artifacts are a bundle of packages or files published by build pipelines. They let the team quickly collect the dependencies and other artifacts required for the application development. Also, you can utilize diverse artifacts like Build Artifacts, Maven, Nuget, PyPI, Universal Packages, etc. Learn more about Artifacts in Azure Pipelines.
Trigger
A trigger is considered as a setup for letting the pipeline know when to operate. Experts can configure a pipeline to work against a force to the repository or at scheduled times. Therefore, these mentioned operations are perceived as triggers. For further information, explore build triggers and release triggers.
Deployment Group
It is a series of target machines that have agents installed. Setting a deployment target for pipelines in machines is easy with the deployment group. See more about deployment groups.
Environment
When a bundle of different resources comes together and deploys the application then it is called an environment. It can be a collection of various resources such as virtual machines, containers, web apps or any services.
Job
The stage consists of many jobs, each job is run by an agent. Job defines an execution boundary for a set of steps to be performed.
Pipeline
The Pipeline is a part of the CI/CD process where there are numerous stages. You can imagine it as a workflow in a sequential form where you run tests, build and deploy your app.
Run
A run command is used to implement any function in a pipeline. It gathers the logs linked with the steps currently running and the results of the tests are currently implemented. In the course of a run, pipelines will first evaluate the pipeline and then transfer the run to various agents. Jobs will be executed by each agent. See more about the pipeline run sequence.
Script
A script can be a Bash, command line or PowerShell that runs code in your pipeline.
Stage
In a pipeline, there is a logical perimeter for monitoring performance which is called Stage.
Task
A task is a bundled script or method that has been engrossed with a pair of inputs.
7. Steps to Implement CI/CD for a .NET Core
Let’s deploy this application in 2 different environments:
- Azure App services
- On-premise /Self-Hosted server
Before we start with building a new project, please check below prerequisite points and make sure you have all things available:
- Microsoft Azure account with DevOps. You can start it free from here
- Visual Studio 2019
- Azure Repos
- On-premise server
- Internet connection
the whole process is divided into 4 parts:
- Setup project in source control
- Configure Azure CI/CD pipelines to deploy the application in Azure Services
- Configure Release pipeline to deploy same application parallelly in on-premise/Self-Hosted server
- Run Azure DevOps Pipeline to deploy the application in 2 environments
7.1 Setup Project in Source Control
Sign into the Microsoft Azure portal. I have used Azure Repos as source control for demo projects. Azure DevOps supports a vast range of source controls available in the market. You can use any of them.
- Let’s create a new .NET Core Project in Visual Studio 2019. You can also use your existing project. Here, I’m using a template project with basic coding for example and demo purposes.

- Commit the source code in Azure Repository that is already configured with Visual Studio. [Some steps are skipped to make this article smaller.]
7.2 Configure Azure CI/CD Pipelines to Deploy The Application in Azure Services
- Visual studio 2019 provides a default feature for configuring CI-CD in any project. You can find this feature by right-clicking on the project solution file and selecting Configure continues delivery to azure. Other than this you can also find this feature under Team Explorer as images are given below.


- By following previous steps, one popup for Setup Azure Pipeline will open in which you can select the appropriate branch and App Service.
- You can also change the advanced setting for App service by clicking on the Edit button given besides an App service drop-down. After all necessary steps click the OK button, it will run some background processes to create Azure Pipeline.
- You can track this ongoing background process in the Output window as shown in the below image.

- Open Azure DevOps portal and navigate to the Azure Pipelines section to see the newly created Azure pipeline by Visual Studio. Follow the steps shown as per below image to edit the pipeline.

- Follow the below steps to see a newly created Release Pipeline (CD) by Azure DevOps Project and also edit as per your need.

- After this in the next screen, follow the steps as per below screen to go to the edit task.

- Here you can add/edit tasks or phases in the release pipeline.

- After this in the next screen, follow the steps as per below screen to go to the edit task.
- You can see the edit pipeline screen where you can edit the configuration of the build pipeline in the future as you wish.
- In the task tab, you will be able to add/edit tasks and agent jobs as per your requirement for your new project as per below image. These task tabs are created automatically as we have setup the pipeline from Visual Studio. You can create such tasks manually also.

- You can add/edit variables or variable groups to be used in various tasks in the Variables tab.

- In the Triggers tab, you can set the trigger to indicate when to run the build pipeline. You can also set specific branches from the CI process, path filters and schedules for the pipeline to run, etc.

Now, we can deploy a .NET Core application in Azure App Services using the Azure CI/CD process. Let’s see the steps to deploy the same application on a local server.
7.3 Configure Release Pipeline to Deploy Same Application Parallelly in On-Premise/Self-Hosted Server
Before we start configuring the pipeline, you will have to perform a few tasks in your on-premise server to add it to the deployment group of Azure DevOps. And then you can add the same stage/phase in the release pipeline to deploy a build-in IIS server.
- Go to the deployment group in Azure DevOps. And click on add a deployment group to add a new one.
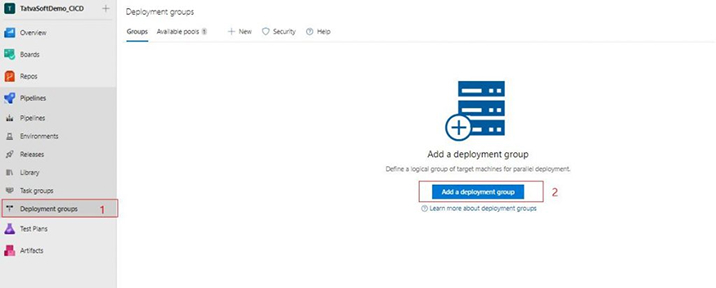
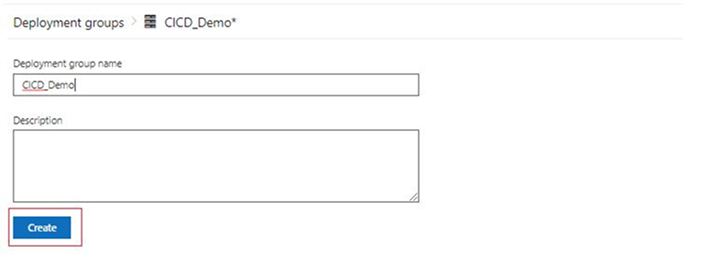
- Add an appropriate name and description then click on the Create button to create a new one.
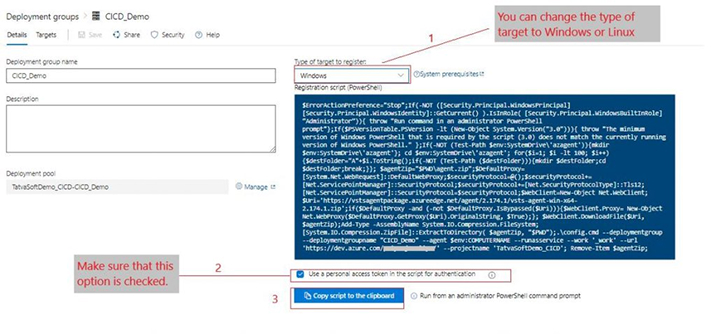
- It will open the screen to register your on-premises server, so select the type of machine which you are targeting, check the checkbox and click on the Copy to Clipboard button as suggested in the image. It will copy the power shell command in the clipboard.
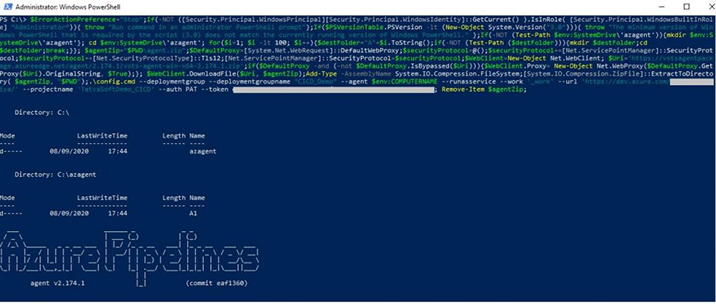
- Open PowerShell console as an Administrator and paste the script copied in the previous step.
- Run the script and wait for some time to execute it completely.
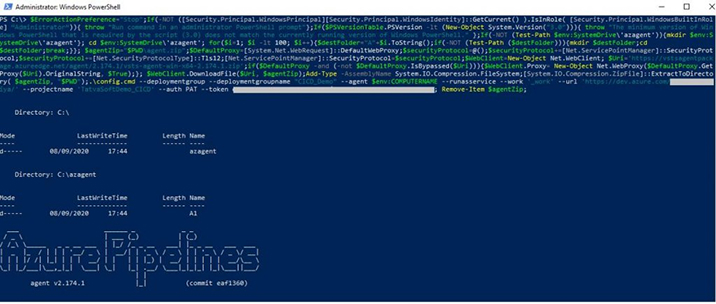
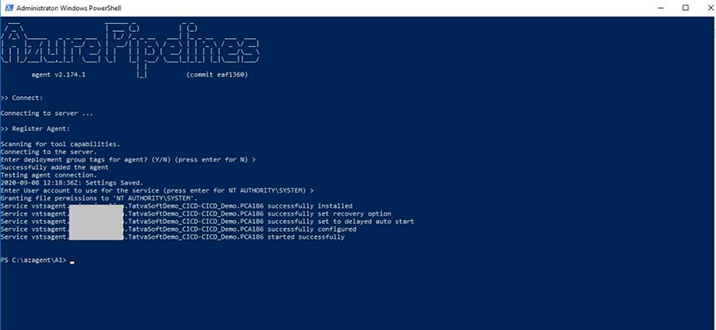
- So now, it’s registered successfully. You can verify it in the Azure DevOps deployment group section where you can find the target status is Online. See the below image for reference.
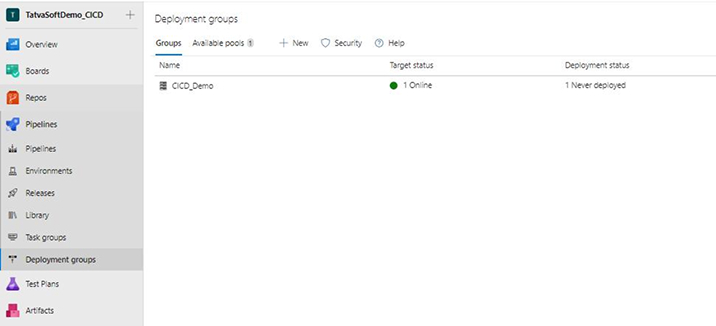
- Add an appropriate name and description then click on the Create button to create a new one.
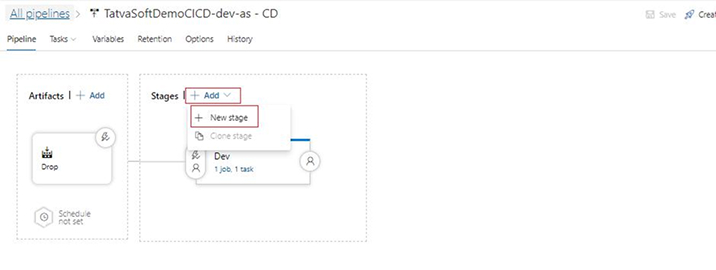
- Now, add a new stage in the release pipeline to deploy the build in this server. For that go back to the release pipeline section and click on the Edit button to edit a pipeline. Then follow the steps shown as per image to add a new stage in the pipeline.
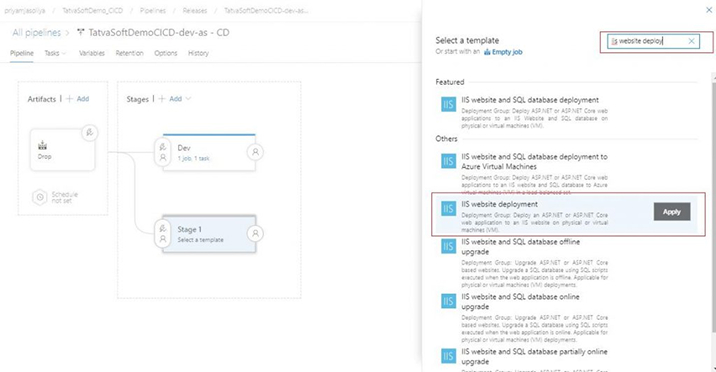
- Select the template for IIS Website Deployment as we are going to publish build on IIS server of self-hosted server.
- After this, it will open a new popup, give the appropriate name to the newly created stage.
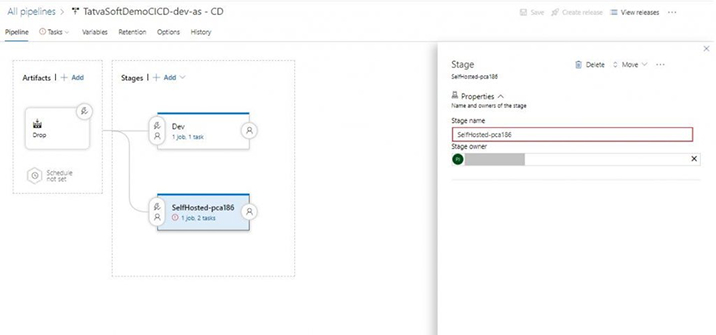
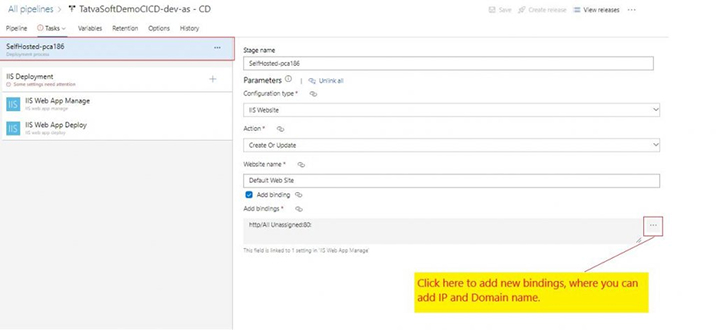
- Go to the Tasks tab to edit the template as shown in the image. Change the bindings and website name as you require.
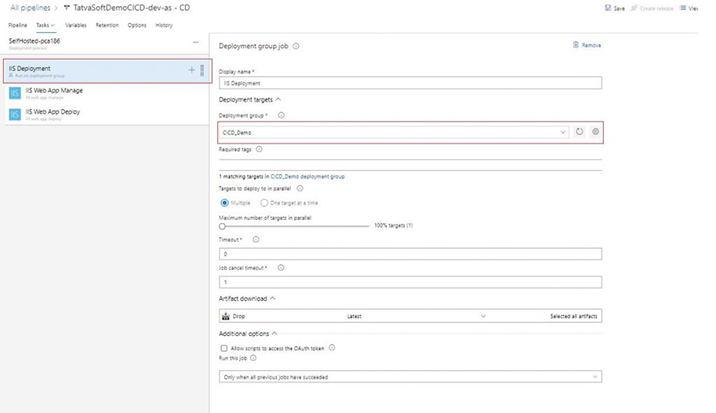
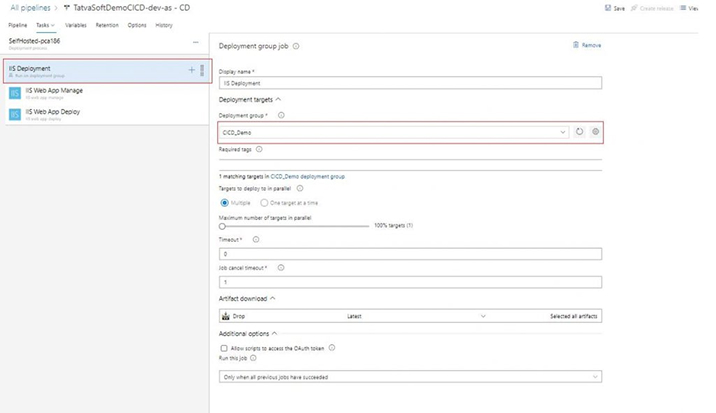
- Edit the IIS Deployment agent, here you have to set the deployment group to what we have created in previous steps.
- Go to task IIS Web App Manage, change the physical path where you want to deploy your build. Fields that are not editable are already set in previous steps.
- Select task IIS Web App Deploy, browse the path where the build is placed and set it to Package or folder field, check the option of Remove additional files at destinations.
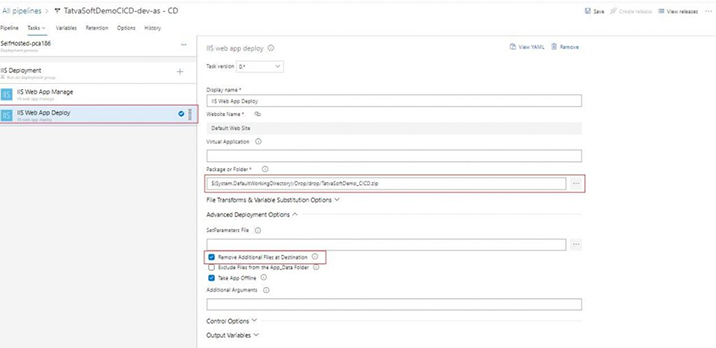
- Select the template for IIS Website Deployment as we are going to publish build on IIS server of self-hosted server.
After following all the above steps, don’t forget to click on the Save button. That’s it, you are all set to deploy applications on a self-hosted server using Azure Pipelines.
Let see how you can run your pipeline and where you can see the status of these pipelines in the Azure DevOps portal.
7.4 Run Azure Pipeline to Deploy The Application in 2 Environments
- You can set up your Pipeline to be run when any changes are committed in a particular branch in the repository as shown earlier in this article.
- You can also manually run this pipeline from the Azure DevOps portal. Follow the below steps to run it.
- Open Azure DevOps Portal, navigate to your project.
- Click on “Pipelines” to open the window.
- Find your pipeline from Recent or All.
- Click on ellipsis as shown in the below image and then click on “Run Pipeline”.
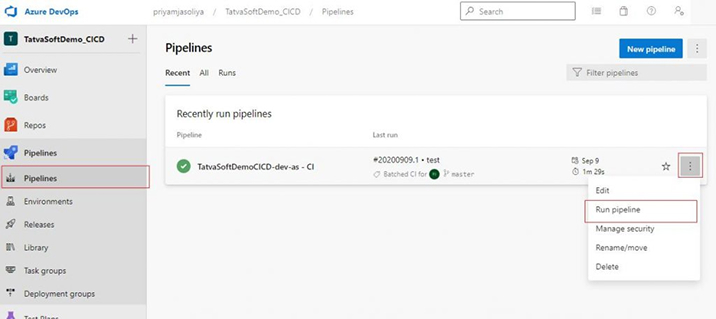
- Click on the title of your Pipeline to open it where you will see all your runs in descending order – latest run on top.
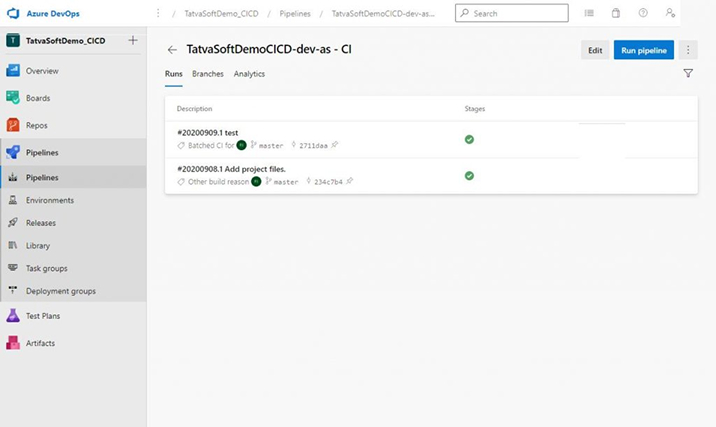
- Select any of the runs to see details of that run.
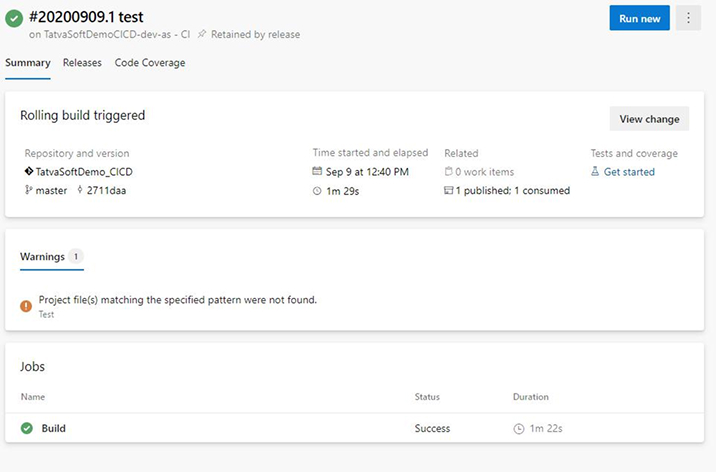
- In the Releases tab, you will find a release pipeline run for this instance.

- Further going deeper by clicking on the release title, you will finally reach your release summary, where you can see all executed jobs. You can also find errors if they occurred during deployment.
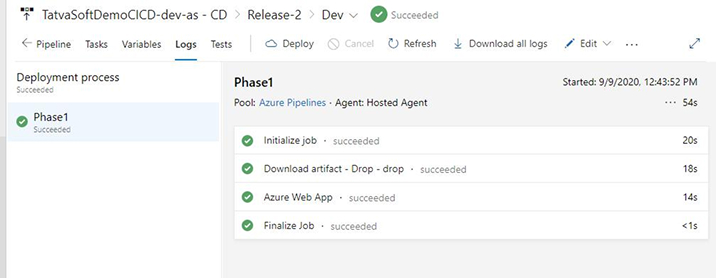
- Clicking on each job will get you a console to see all steps executed.
You have seen simple steps for deploying an application in 2 different environments. There are many other factors involved that I haven’t covered and you will find when you deploy an application in a production environment.
8. Conclusion
In the entire discussion of Azure DevOps Pipelines, we understood the variety of services that they are capable of offering to streamline overall business operations and optimize each process. This process will equally divide all the workflows into manageable formats using a robust and scalable Azure platform to deploy solutions in pipelines using continuous integration and continuous deployment methods.
The best thing about this is that you have been doing all this manually by now which was very time-consuming with high possibilities for errors. But now you can automate your release activities on a vast range of environments supported in Azure DevOps as well as Azure Pipelines and avoid the same boring work of deployment.

Vishal Shah
Vishal Shah has an extensive understanding of multiple application development frameworks and holds an upper hand with newer trends in order to strive and thrive in the dynamic market. He has nurtured his managerial growth in both technical and business aspects and gives his expertise through his blog posts.
Related Service
Custom Software Development
Know more about our Custom Software Development Service
Learn MoreSubscribe to our Newsletter
Signup for our newsletter and join 2700+ global business executives and technology experts to receive handpicked industry insights and latest news
Build your Team
Want to Hire Skilled Developers?



Comments
Leave a message...