Related Blogs

1. Introduction to MQTT and Broker
MQTT stands for Message Queuing Telemetry Transport. MQTT is a lightweight framework for posting and subscribing, where you can post and accept messages as a customer.
MQTT offers a standardized messaging system with an open OASIS platform. It is an extremely lightweight, publish-subscribe network communication protocol designed for constrained devices with low bandwidth, making it the perfect fit for Internet of Things (IoT) applications. MQTT enables you to send commands in order to control outputs, read and manage sensor-based nodes and messaging systems and more.
Nowadays, we can see the exponential growth of MQTT in a variety of industries such as automotive, manufacturing, telecommunication, oil and gas, retail, etc.

The role of an MQTT broker is to fundamentally manage all the messages, filtering them, understanding the potential clients and then later manage all the interested people and publish their messages to all the subscribed clients.
2. Why Eclipse Mosquitto?
First of all, we will start with what is Eclipse Mosquitto? so, Eclipse Mosquitto is an open-source message broker licensed in EPL/EDL with protocol versions 5.0,3.1.1 and 3.1. This is a compatible, scalable platform that allows multiple devices as well as low-power single-board computers to full servers.
This Mosquitto project also has a set of C library functions to implement MQTT clients and
one of the most popular and effective command lines are mosquitto_pub and mosquitto_sub for specific clients.
3. Prerequisites
Before setting up an MQTT broker, we’ll need the following things.
- Docker hub account
- Docker Desktop in a temporary system (to create Docker image – one-time operation)
- Azure Container instance
- Azure storage account
- Azure File Share (Inside of Azure storage account)
- Azure CLI (Cloud shell)
- Azure Resource Group
4. Step by Step Process of Setup MQTT Broker on Azure
To set up an MQTT broker on Azure, we’ll need a few base elements to be ready.
- Mosquitto Broker Image
- Creating volumes for the container to mount
- Creating Azure container instance
4.1 Mosquitto Broker Image
The first thing needed here is the mosquito broker’s docker image “eclipse-mosquito” which is available inside the docker hub.

Docker is required to be installed in a machine from where the docker image we are willing to create. If not installed then download and install Docker using the link below
After a successful installation pulls the eclipse-mosquito image from the docker hub with the “docker pull eclipse-mosquito” command in your command prompt.

Login to your docker hub account in command prompt with the “docker login” command or log in with Docker desktop, if you do not have an account you can create one on Dockerhub


Tag the “eclipse-mosquito” image as “<your-docker-acoount-id>/<docker-image-name>”, here we named it as “pca31/testsystem1” with the command “docker tag eclipse-mosquito pca31/testsystem1”.
You can see newly created images by the “docker image ls” command.

Now push this image to docker hub with command “docker push <your-image-name>”, here we performed “docker push pca31/testsystem1”.

You can now see this image on your docker hub account.

Now we can pull this image and create a container.
4.2 Creating Volumes for the Container to Mount
As mentioned in eclipse-mosquito’s description we can mount three directories on mosquito containers, we will be using only mosquito/config for this setup.

We will be putting the necessary files such as mosquitto configuration file (mosquitto.conf), files for authentication and authorization (password.txt, roles.txt) and files for SSL/TLS configurations (RootCA.crt, server.crt, server.key) inside the azure file share and will mount that on our azure container instance.
You can initiate your Azure storage account if there are no accounts. You can also use the existing storage accounts. Go to the Storage accounts section on the Azure portal and click on “Add”.

Select the resource group and give the appropriate storage account name then click the “Review+Create” button, here we give “testsystem1” as the storage account name.

Verify all the details and click the “Create” button.

Once the deployment process is completed, you can click on the “Go to the resource” section to tap and see all the resources.


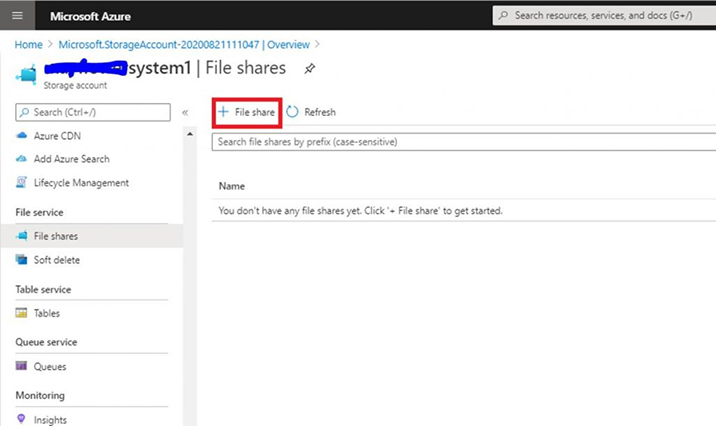
Click on the “File shares” option to create a new file share inside our storage account.

Give the name for file share and quota for that file share then click the “Create” button.

Click on the MQTT file share.

Click on the upload button to upload the MQTT configuration files.

You can tap on the file icon, choose the files from your internal system and then click “Upload”.


Now, you can go to select account storage screen and click on “Access keys”

Copy any one of the keys, we will need this while creating the azure container instance.

4.3 Creating Azure Container Instance
Now we will create an Azure container instance using our docker image “pca31/testsystem1” with azure CLI.
Tap on the Cloud shell Options by opting for the cloud shell icon as shown below.


Now you can execute the following commands with specific commands.
az container create --resource-group $YOUR_RESOURCE_GROUP_NAME --name $CONTAINER_NAME --dns-name-label $DNS_NAME --image $DOCKER_IMAGE_PATH --ports 8883 --azure-file-volume-account-name $AZURE_STORAGE_ACCOUNT_NAME --azure-file-volume-account-key $AZURE_STORAGE_ACCOUNT_KEY --azure-file-volume-share-name $FILE_SHARE_NAME --azure-file-volume-mount-path /mosquitto/config/ |
Below is the sample command we ran for our Dev MQTT broker setup (Take it as a reference)
az container create --resource-group Test_Test_Lab-BOServer-251818 --name testsystem1 --dns-name-label testsystem1 --image pca31/testsystem1:latest --ports 8883 --azure-file-volume-account-name testsystem1 --azure-file-volume-account-key I2S6Z3AluZSyQjqePqA+UgpVlG10qDqfGOql0cuF0p130TdR7KhvvPwspfFlnwusFNg0N5 bGMdas3NNrf9xLOw== --azure-file-volume-share-name mqtt --azure-file-volume-mount-path /mosquitto/config/ |

Above script will create an Azure instance. Now go to the azure container instance to see this resource.


Use this DNS name as an MQTT server in your MQTT client application.

Go to the Container tab to see the events, properties and logs of our container instance.


5. Connect to Sample MQTT Broker
To be able to connect to the MQTT broker, the following things are required and that can be obtained from Sample Client.
- MQTT broker URL
- Certificate file
- Key file
- Credentials
Steps for Connecting to Sample MQTT broker
Get the following files from Sample Project
- Client Certificate file (.crt)
- Client Key file (.key)
Following is the code example to create an MQTT client with C# .Net language.


6. Conclusion
MQTT broker has made it simpler to establish a publisher-subscriber-based system. It is quite simple to use and works well with the Internet of things and home automation projects. This document will help you utilize all your tools using the MQTT function and give clarity on how it works.
Here are some of the exciting MQTT 5 features that can be explored:
- Custom Headers and User Properties Voicemails
- Payload Format and Content Types Call queues
- Connect Options
- Message Expiry
- Subscription Identifier

Vishal Shah
Vishal Shah has an extensive understanding of multiple application development frameworks and holds an upper hand with newer trends in order to strive and thrive in the dynamic market. He has nurtured his managerial growth in both technical and business aspects and gives his expertise through his blog posts.
Want to Hire Skilled Developers?


Comments
Leave a message...