Related Blogs
Table of Content
- What is a Serverless Web Application?
- Why Create a Serverless Application?
- What are Azure Functions?
- How Do I Create an SQL Database in Azure?
- How Do I Create an Azure Function in Visual Studio?
- How Do I Deploy the Function on the Azure Portal?
- How Do I Create a New .NET Core Website Using Azure Function Inside?
- Final Words
In this article, we will learn about how to build a web application without managing web servers in Azure. We will also understand how to create serverless web applications using .NET core. Core Website (front end) and with Azure Functions (as an API). This blog will focus on the steps of building your first serverless web application architecture with Azure.
Now let’s start to understand the term “serverless”.
1. What is a Serverless Web Application?
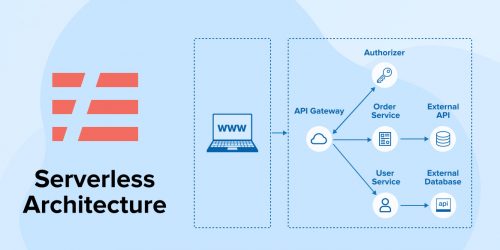
In the Software and technology sector, Serverless means the machine does not demand any space on the server. Serverless as a whole is an interconnected entity and so its types have two distinct terms but with similar meanings.
Read more about Serverless Architecture
Backend as a service (BaaS)
The Back-end cloud services is a popular type of database and storage platform that enables users to connect API directly to the services of client applications.
Functions as a service (FaaS)
For Function as a service, there is a piece of code that is deployed on the cloud and then the same code is executed. This is implemented in a hosting environment that runs the code to abstract data from servers.
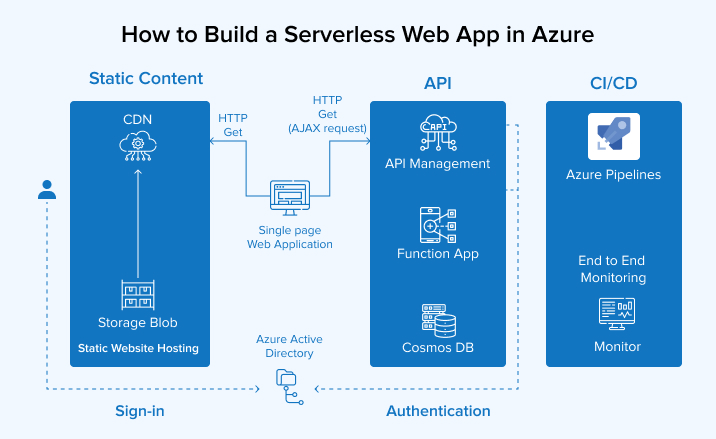
2. Why Create a Serverless Application?
Developing a serverless application enables you to concentrate on your application code rather than maintaining and running infrastructure. Also, there is no need for you to consider provisioning or configuring servers as AWS manages these functions for you. Serverless apps are preferred over typical server-hosted apps for several reasons. Let us look at a few of those:
- Low maintenance
- Low cost
- Easy to scale
- No infrastructure management
3. What are Azure Functions?
The Azure function is a compute-on-demand experience that is driven by events to extend the legacy Azure application platform. It is capable of implementing codes that are triggered through events that occur in Azure apps or any other third-party apps located on the cloud or on-premise systems.
By using Azure functions, the Software developers can now easily perform connection of data at different sources. They can also perform messaging solutions that make the process simpler and take action to the events. Using Azure Functions, developers can easily build HTTP-based API endpoints for easy accessibility to a wide range of apps on mobile devices and IoT-based devices. It is an on-demand and scale-based application that takes up pay as you go. This enables you to pay for what you have consumed and no extra amount is expected to be paid.
4. How Do I Create an SQL Database in Azure?
Microsoft Powered Azure SQL database is a cloud-computing based service which is also known as Database as a service. This unique and innovative platform allows clients to host relational databases on the cloud and use them without any special hardware or software installation. It also enables various modern features that benefit the business in the long run. Enlisted below are some of the advantages of Azure SQL database that will change the functioning of your business.
- Consistent backup & Retention– It allows users to track their database records for up to 10 years.
- Replication of data– This function enables the readability of secondary databases at any global location.
- Auto-Tuning- It is enabled with AI to rightly perform performance tuning which fixes the concerns automatically.
- Consistency in Business
- Improved Data Availability
- Scalable database- This is the most powerful feature that upscales the database as per the need.
- Automatic Smart backups
For the creation of the Azure SQL database, we will have to migrate data to the Azure Management Portal. The data inserted in the SQL database is displayed in the dashboard form where you can select and write SQL keywords in the search bar by clicking on the SQL database option.


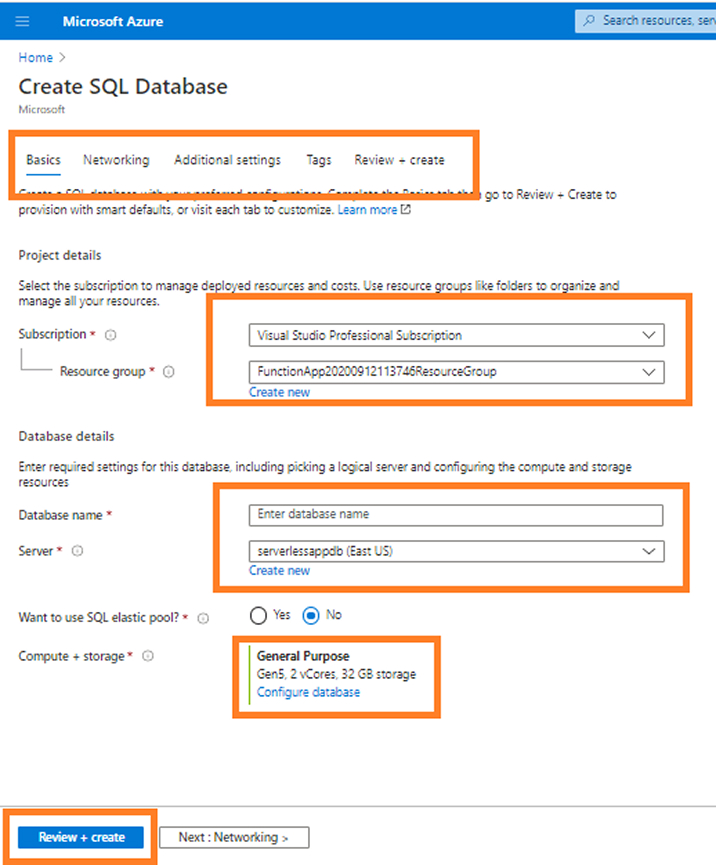
Now, we will click the Add link on the SQL databases page. It will open the Create SQL Database page.
You can now click on Add link option available on the SQL databases page. This gives an option to Create SQL Databases.
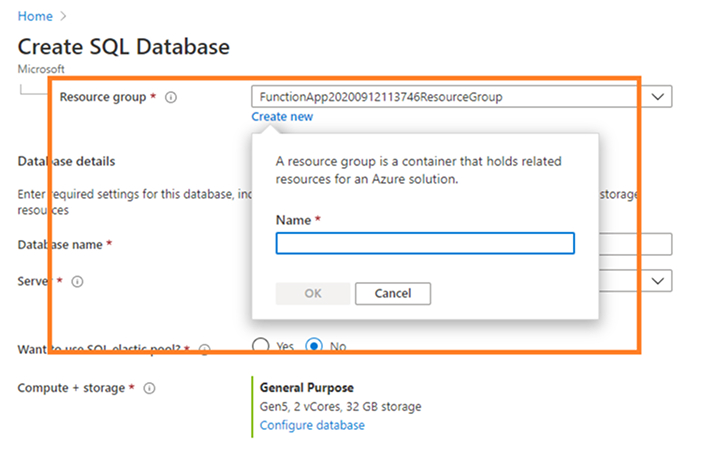
- To create a new resource group, click on the Create New button.
- You can now give a name to the created resource group.
- Click OK to finalize the creation of this group.
This database is not allowed to use special characters.
Say for Example XYZ??DB or XYZDB – this is not allowed as the name of the database. So make sure that you enter a unique name for the database.
After this, when you click on the Create New link, the New Server page will be initiated on the right side of the page. From the screen, you can define the primary details such as server name, admin login password, and location of the server.
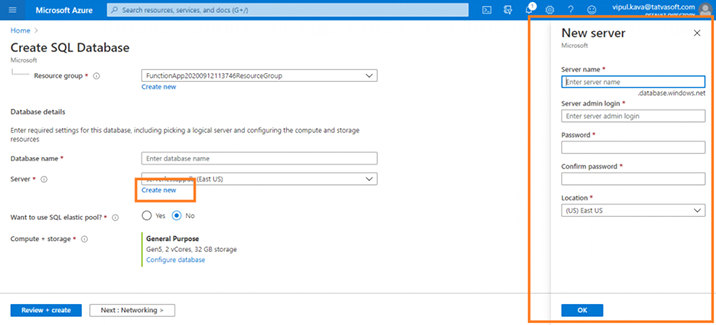
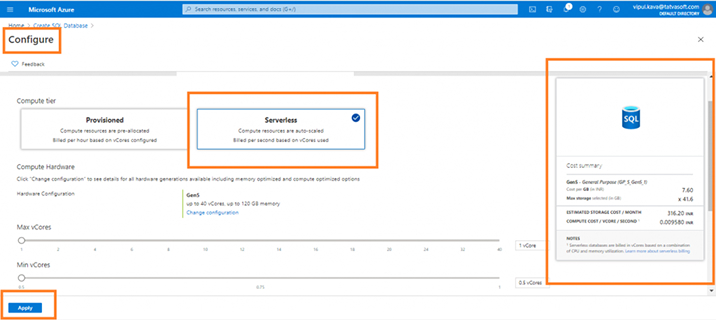
We can now pick another purchase model to customize the database option. As we assess the output of the database on this screen, this is the most important choice when building a database. We can alter the number of vCores for the vCore-based purchase model so that we can increase or decrease the database performance. Here we just make one change like select the serverless and click on the button Apply.
After we configure the database we click on the Review + Create button.
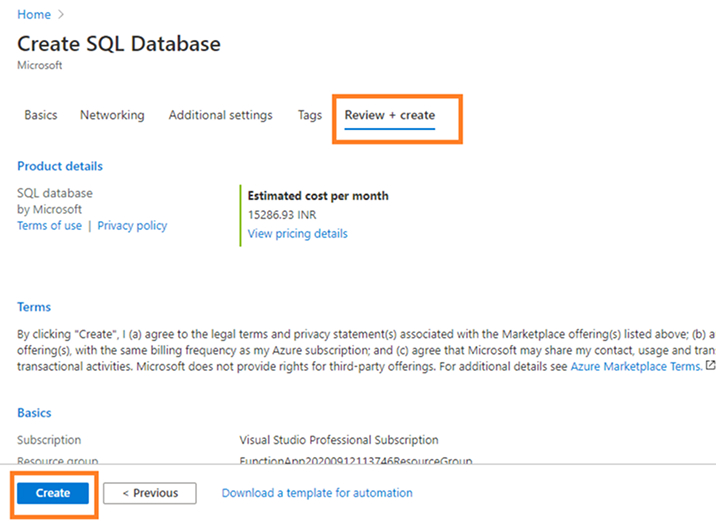
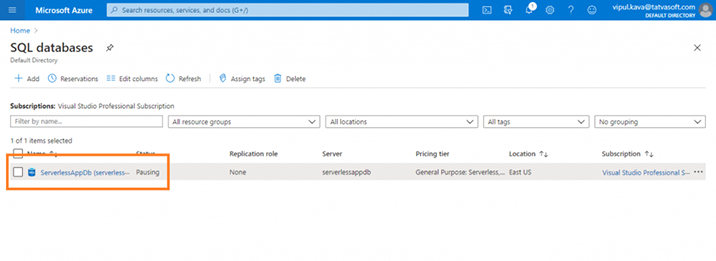
Review the information/ configuration that was selected for the database and by clicking on the create button it creates the database, it will take 3-4 minutes to deploy and ready to use.
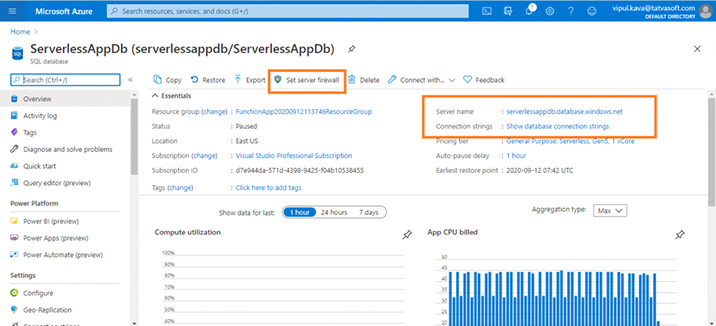
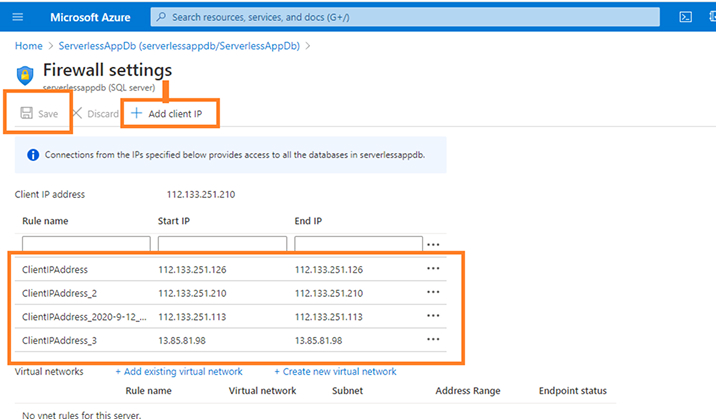
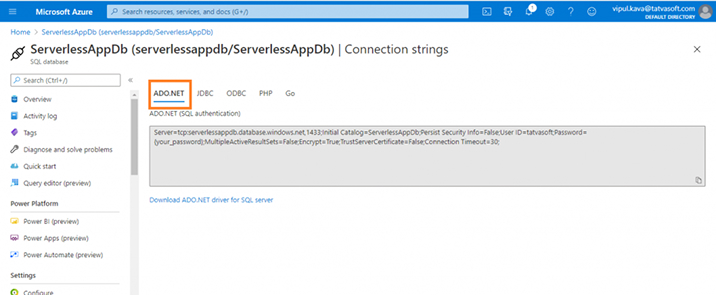
You need to follow the following images in order to know more about the azure database:
5. How do I Create an Azure Function in Visual Studio?
Prerequisites:
To complete this tutorial, we are using Visual Studio 2017. Ensure you select the Azure development workload during installation and you must install the latest Azure Functions tools.
If you don’t have an Azure subscription, create a free account before you begin.
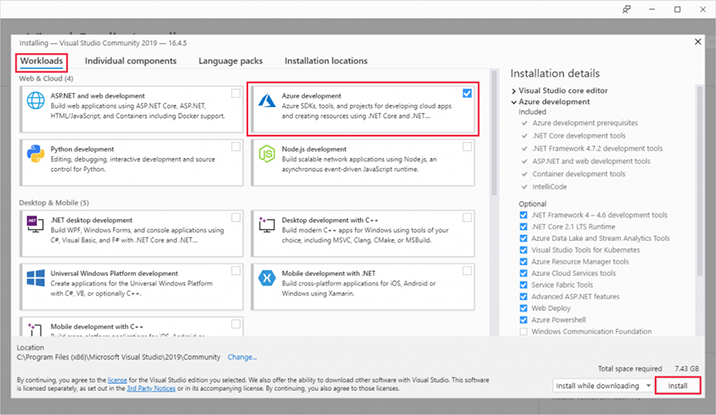
In order to create an Azure function app, open the Visual Studio and go to the menu, then select File > New > Project. Also make sure all of the values are up to date before running the command to construct the Azure function app. After creating the function app, update the Cross-Origin Resource Sharing Configuration. CORS is an HTTP feature that will allow a web application hosted on one domain to access the resources hosted on another domain.
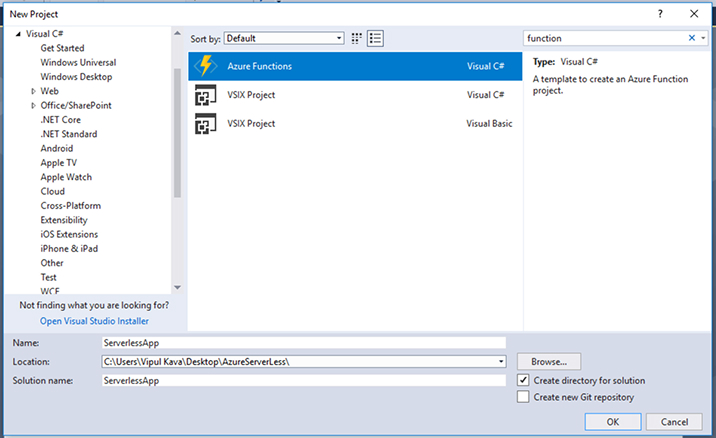
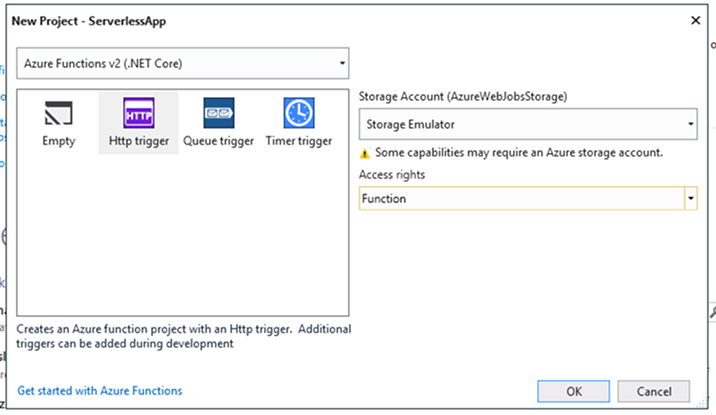
Select Create in order to create the function project of the HTTP trigger function.
Initially, the Visual studio starts with creating the project and the class for HTTP trigger function type with boilerplate code. Later this code will send an HTTP response with a value from the query string appearing in the body part of the request. This is used because the HTTPTrigger attribute specifies that you have requested this HTTP request using that function.
By default, Visual studio is given the function name like Function1 let change it like in good name like HttpExample, so for that:
- In File Explorer, right-click the Function1.cs file and rename it to HttpExample.cs.
- In the code, rename the Function1 class to HttpExample.
- In the HttpTrigger method named Run, rename the FunctionName method attribute to HttpExample.
To check the functioning of the renaming attribute, you need to press the F5 key on the keyboard and to terminate the process press SHIFT+F5.
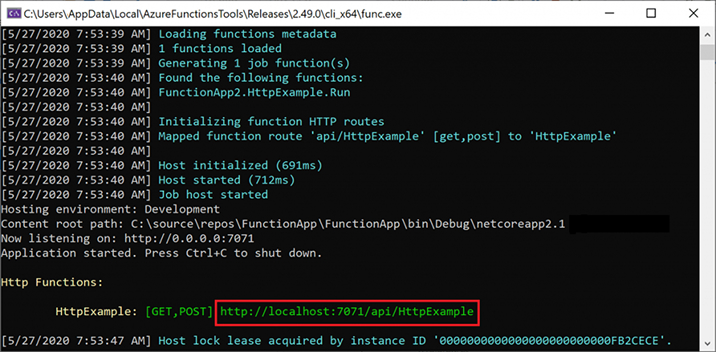
you need to select the URL present on the image and then paste it in the HTTP request section of your address bar. The next step is to append the query string using ?name=<YOUR_NAME> and run the request.
As you can see in the browser it’s working fine and it writes your name as a result.
Now, let us create a function which calls the database, follow the images to create the new function GetUsers.cs
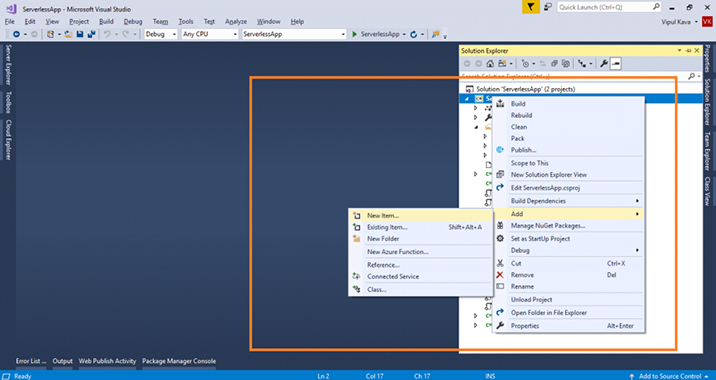
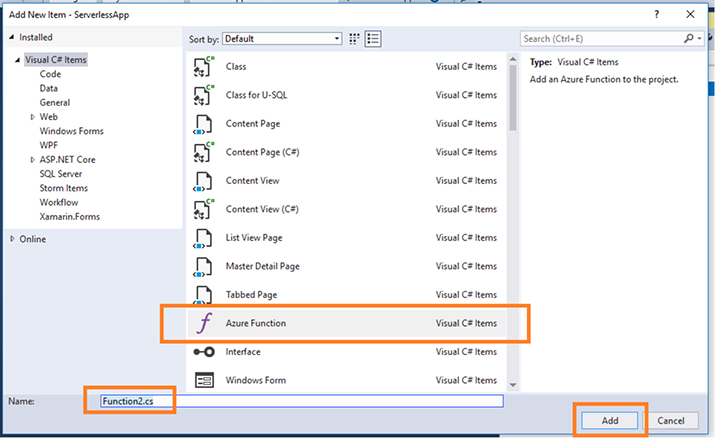
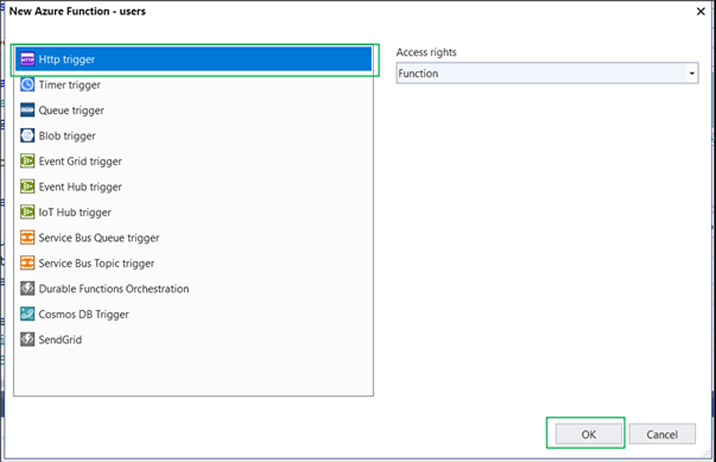
After that, set the connection string to the local.settings.json.

Make a change in the new function file which we created with the following code: GetUsers.cs
public static class GetUsers { [FunctionName("GetUsers")] public static async Task<IActionResult> Run([HttpTrigger(AuthorizationLevel.Function, "get", "post", Route = null)]HttpRequest req, TraceWriter log) { try { string requestBody = await new StreamReader(req.Body).ReadToEndAsync(); dynamic data = JsonConvert.DeserializeObject(requestBody); // int userId = data?.user; List<UserModel> oLst = new List<UserModel>(); DbConnect dbConnect = new DbConnect(); DataSet dsTables = dbConnect.GetDataSet("Users", "GetAllUsers"); using (DataTable dtUser = dsTables.Tables["Users"]) { if (dtUser != null & dtUser.Rows.Count > 0) { for (int i = 0; i <= dtUser.Rows.Count - 1; i++) { UserModel um = new UserModel() { UserId = Convert.ToInt32(dtUser.Rows[i]["UserId"].ToString()), UserName = dtUser.Rows[i]["UserName"].ToString(), Email = dtUser.Rows[i]["Email"].ToString() }; oLst.Add(um); } } } return (ActionResult)new OkObjectResult(oLst); } catch (Exception ex) { return new BadRequestObjectResult(ex.Message); } } } |
public static class GetUsers { [FunctionName("GetUsers")] public static async Task<IActionResult> Run([HttpTrigger(AuthorizationLevel.Function, "get", "post", Route = null)]HttpRequest req, TraceWriter log) { try { string requestBody = await new StreamReader(req.Body).ReadToEndAsync(); dynamic data = JsonConvert.DeserializeObject(requestBody); // int userId = data?.user; List<UserModel> oLst = new List<UserModel>(); DbConnect dbConnect = new DbConnect(); DataSet dsTables = dbConnect.GetDataSet("Users", "GetAllUsers"); using (DataTable dtUser = dsTables.Tables["Users"]) { if (dtUser != null & dtUser.Rows.Count > 0) { for (int i = 0; i <= dtUser.Rows.Count - 1; i++) { UserModel um = new UserModel() { UserId = Convert.ToInt32(dtUser.Rows[i]["UserId"].ToString()), UserName = dtUser.Rows[i]["UserName"].ToString(), Email = dtUser.Rows[i]["Email"].ToString() }; oLst.Add(um); } } } return (ActionResult)new OkObjectResult(oLst); } catch (Exception ex) { return new BadRequestObjectResult(ex.Message); } } }
Create another file that calls the database called: dbConnect.cs
public class DbConnect { public DataSet GetDataSet(string dstTable, string dstSQL) { DataSet dst = new DataSet(); DataSet dstReturn; SqlConnection SQLConn = new SqlConnection(); SqlDataAdapter SQLdad; var connectionString = Environment.GetEnvironmentVariable("SqlConnection"); try { SQLConn.ConnectionString = connectionString; SQLdad = new SqlDataAdapter(dstSQL, SQLConn); SQLdad.Fill(dst); string[] arrTable = dstTable.Split(','); int iPos; if (dst.Tables.Count > 0) { for (iPos = 0; iPos <= arrTable.Length - 1; iPos++) { dst.Tables[iPos].TableName = arrTable[iPos]; } } } catch (Exception ex) { throw ex; } finally { SQLdad = null; if ((SQLConn != null)) SQLConn.Close(); dstReturn = dst; dst.Dispose(); dst = null; } return dstReturn; } } |
public class DbConnect { public DataSet GetDataSet(string dstTable, string dstSQL) { DataSet dst = new DataSet(); DataSet dstReturn; SqlConnection SQLConn = new SqlConnection(); SqlDataAdapter SQLdad; var connectionString = Environment.GetEnvironmentVariable("SqlConnection"); try { SQLConn.ConnectionString = connectionString; SQLdad = new SqlDataAdapter(dstSQL, SQLConn); SQLdad.Fill(dst); string[] arrTable = dstTable.Split(','); int iPos; if (dst.Tables.Count > 0) { for (iPos = 0; iPos <= arrTable.Length - 1; iPos++) { dst.Tables[iPos].TableName = arrTable[iPos]; } } } catch (Exception ex) { throw ex; } finally { SQLdad = null; if ((SQLConn != null)) SQLConn.Close(); dstReturn = dst; dst.Dispose(); dst = null; } return dstReturn; } }
After creating new files you will receive an error for System.Data.SqlClient, to resolve that click on Manage NuGet Packages and install the 4.4.0 version of the SQL client.
if you still face any issue/error – check the .csproj file if the below code is written over there, highlighted stuff you need to update accordingly your program environment.
<ItemGroup> <None Include="$(USERPROFILE)\.nuget\packages\\microsoft.data.sqlclient\2.1.0\runtimes\win\lib\netcoreapp2.1\microsoft.Data.SqlClient.dll"> <CopyToOutputDirectory>Always</CopyToOutputDirectory> </None> </ItemGroup> <Target Name="CopyToBin" BeforeTargets="Build"> <Copy SourceFiles="$(USERPROFILE)\.nuget\packages\microsoft.data.sqlclient\2.1.0\runtimes\win\lib\netcoreapp2.1\microsoft.Data.SqlClient.dll" DestinationFolder="$(OutputPath)\bin" /> </Target> |
<ItemGroup> <None Include="$(USERPROFILE)\.nuget\packages\\microsoft.data.sqlclient\2.1.0\runtimes\win\lib\netcoreapp2.1\microsoft.Data.SqlClient.dll"> <CopyToOutputDirectory>Always</CopyToOutputDirectory> </None> </ItemGroup> <Target Name="CopyToBin" BeforeTargets="Build"> <Copy SourceFiles="$(USERPROFILE)\.nuget\packages\microsoft.data.sqlclient\2.1.0\runtimes\win\lib\netcoreapp2.1\microsoft.Data.SqlClient.dll" DestinationFolder="$(OutputPath)\bin" /> </Target>
Once all setup and errors are fixed, you can run this function the same as the first function and receive such data.
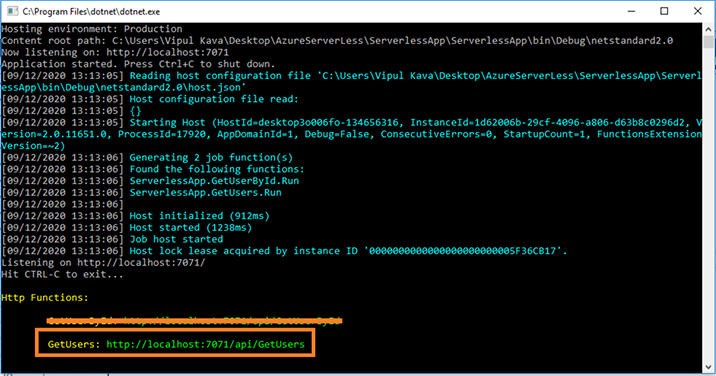

Now with this, you will observe that this is working fine and we can get some results from this database.
6. How Do I Deploy the Function on the Azure Portal?
To deploy the function on the azure portal follows the following steps:
Right-click on Project and then click on publish:
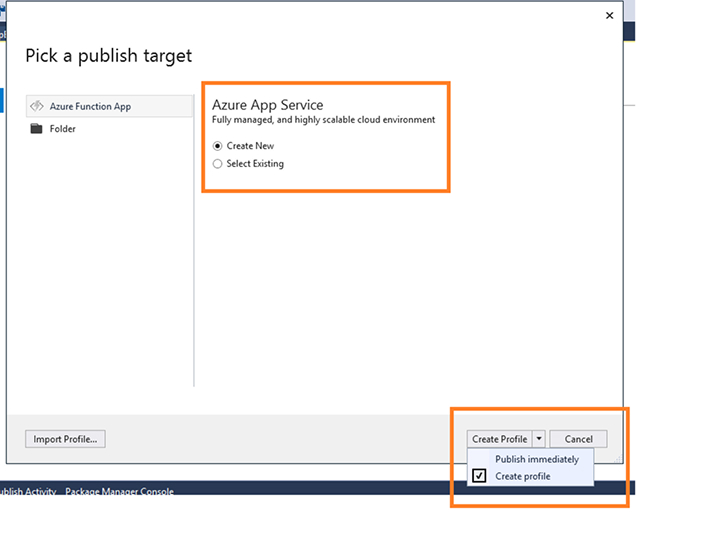
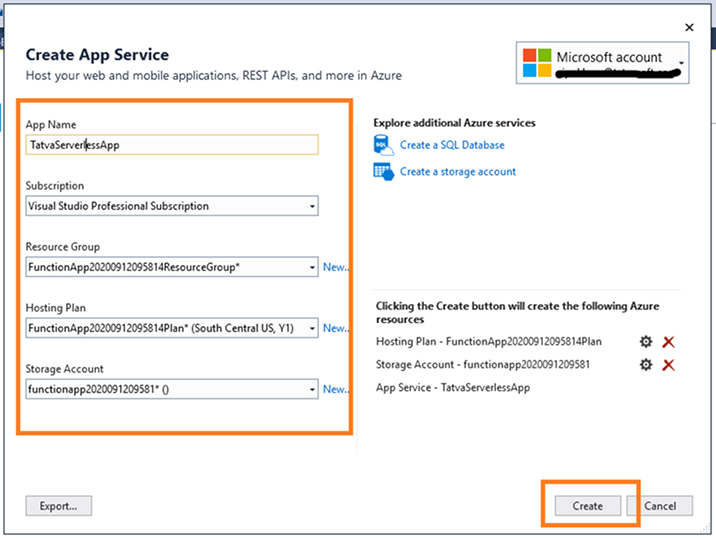
Create a new profile with your azure account and set the proper App Name for the function.
All you need to do is select the relevant details required about the Subscription, Resource Group, Hosting Plan and Storage Account. Do not forget to enable static website hosting after you create a storage account. Before that ensure you are using a globally unique DNS-compliant name for the storage account. It’s also worth noting that only GPv2 storage accounts enable you to provide static information such as (front end) HTML, CSS, JavaScript, and images. Then you can press the Create button to add the details.

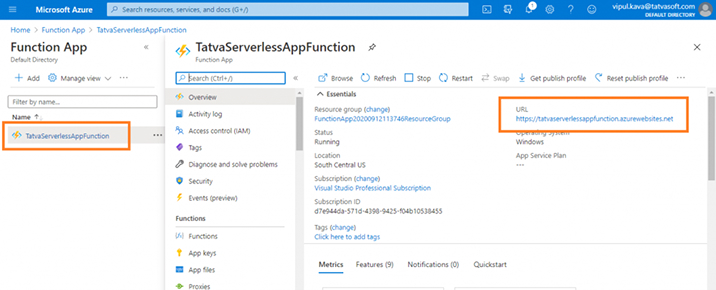
After the Creation of the profile needs to publish the project by pressing the publish button. Once it gets deployed correctly it will show in your Azure portal like this and using URL we can access the Azure Function.

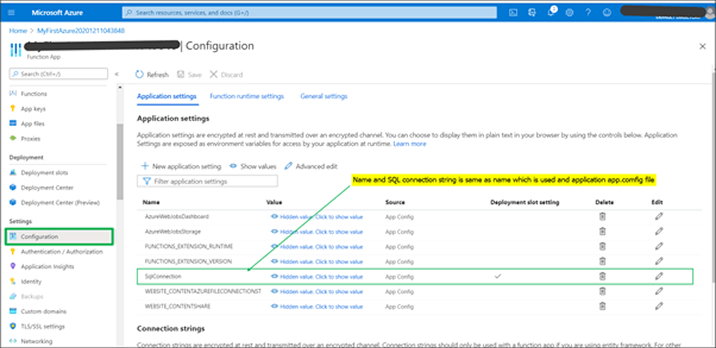
Add connection string in Configuration >> Application Setting, If the connection string is not available.

Now as you can from the screenshots, this has started working fine and we are getting records from the Azure SQL database using the Azure function.
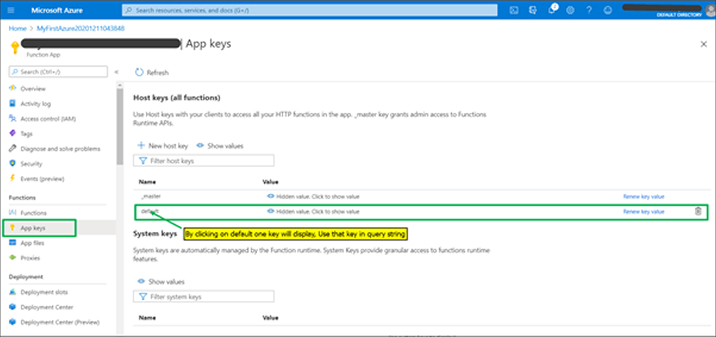
If you are unable to get records to add a key in a query string like below

Now let’s create a new website application that uses the azure function and displays the records on the website.
7. How Do I Create a New .NET Core Website Using Azure Function Inside?
To create a new website application follow the following images:
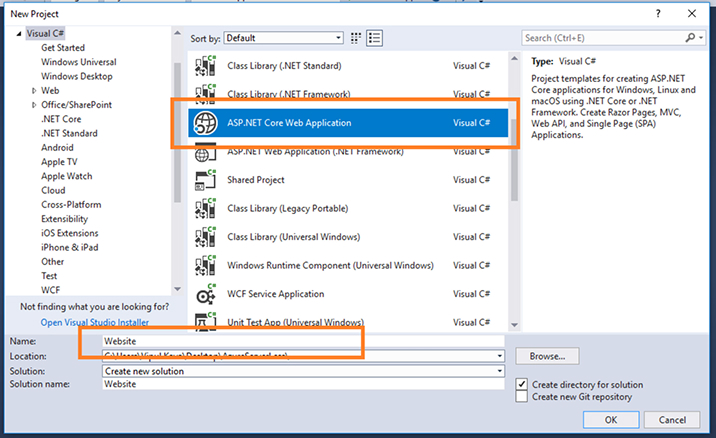
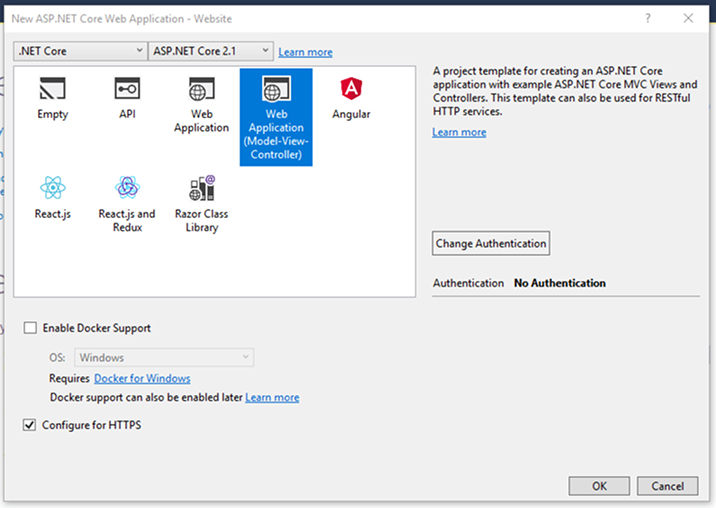
Now to connect the Azure SQL database, let’s add the connection string inside the: appSetting.json
{ "Logging": { "LogLevel": { "Default": "Warning" } }, "AllowedHosts": "*", "AzureFunction": "https://<YOUR APP NAME>.azurewebsites.net/api/", "AzureFunctionKey": "<YOUR KEY>", "AzureFunction_GetUsers": "GetUsers?", "AzureFunction_GetUserById": "GetUserById?" } To read the appSetting.json file let create another file called AppSettings.cs public class AppSettings { public static IConfigurationRoot Configuration { get; set; } public static string AzureFunction { get { return Configuration["AzureFunction"].ToString(); } } public static string AzureFunctionKey { get { return Configuration["AzureFunctionKey"].ToString(); } } public static string AzureFunction_GetUsers { get { return AppSettings.AzureFunction + Configuration["AzureFunction_GetUsers"].ToString() + AppSettings.AzureFunctionKey; } } public static string AzureFunction_GetUserById { get { return AppSettings.AzureFunction + Configuration["AzureFunction_GetUserById"].ToString() + AppSettings.AzureFunctionKey; } } } |
{ "Logging": { "LogLevel": { "Default": "Warning" } }, "AllowedHosts": "*", "AzureFunction": "https://<YOUR APP NAME>.azurewebsites.net/api/", "AzureFunctionKey": "<YOUR KEY>", "AzureFunction_GetUsers": "GetUsers?", "AzureFunction_GetUserById": "GetUserById?" } To read the appSetting.json file let create another file called AppSettings.cs public class AppSettings { public static IConfigurationRoot Configuration { get; set; } public static string AzureFunction { get { return Configuration["AzureFunction"].ToString(); } } public static string AzureFunctionKey { get { return Configuration["AzureFunctionKey"].ToString(); } } public static string AzureFunction_GetUsers { get { return AppSettings.AzureFunction + Configuration["AzureFunction_GetUsers"].ToString() + AppSettings.AzureFunctionKey; } } public static string AzureFunction_GetUserById { get { return AppSettings.AzureFunction + Configuration["AzureFunction_GetUserById"].ToString() + AppSettings.AzureFunctionKey; } } }
Also, we need to configure the Startup.cs file like the following, here are changing to read data from appSetting.js file and setting up Hosting Environment:
public class Startup { public Startup(IHostingEnvironment env, IServiceProvider serviceProvider) { try { var builder = new ConfigurationBuilder() .SetBasePath(env.ContentRootPath) .AddJsonFile("appsettings.json", optional: true, reloadOnChange: true) .AddJsonFile($"appsettings.{env.EnvironmentName}.json", optional: true) .AddEnvironmentVariables(); Configuration = builder.Build(); AppSettings.Configuration = Configuration; } catch (Exception) { } } public IConfigurationRoot Configuration { get; } // This method gets called by the runtime. Use this method to add services to the container. public void ConfigureServices(IServiceCollection services) { services.Configure<CookiePolicyOptions>(options => { // This lambda determines whether user consent for non-essential cookies is needed for a given request. options.CheckConsentNeeded = context => true; options.MinimumSameSitePolicy = SameSiteMode.None; }); services.AddSingleton<IConfigurationRoot>(Configuration); services.AddSingleton<IConfiguration>(Configuration); services.AddMvc().SetCompatibilityVersion(CompatibilityVersion.Version_2_1); } // This method gets called by the runtime. Use this method to configure the HTTP request pipeline. public void Configure(IApplicationBuilder app, IHostingEnvironment env) { if (env.IsDevelopment()) { app.UseDeveloperExceptionPage(); } else { app.UseExceptionHandler("/Home/Error"); app.UseHsts(); } app.UseHttpsRedirection(); app.UseStaticFiles(); app.UseCookiePolicy(); app.UseMvc(routes => { routes.MapRoute( name: "default", template: "{controller=Home}/{action=Index}/{id?}"); }); } } |
public class Startup { public Startup(IHostingEnvironment env, IServiceProvider serviceProvider) { try { var builder = new ConfigurationBuilder() .SetBasePath(env.ContentRootPath) .AddJsonFile("appsettings.json", optional: true, reloadOnChange: true) .AddJsonFile($"appsettings.{env.EnvironmentName}.json", optional: true) .AddEnvironmentVariables(); Configuration = builder.Build(); AppSettings.Configuration = Configuration; } catch (Exception) { } } public IConfigurationRoot Configuration { get; } // This method gets called by the runtime. Use this method to add services to the container. public void ConfigureServices(IServiceCollection services) { services.Configure<CookiePolicyOptions>(options => { // This lambda determines whether user consent for non-essential cookies is needed for a given request. options.CheckConsentNeeded = context => true; options.MinimumSameSitePolicy = SameSiteMode.None; }); services.AddSingleton<IConfigurationRoot>(Configuration); services.AddSingleton<IConfiguration>(Configuration); services.AddMvc().SetCompatibilityVersion(CompatibilityVersion.Version_2_1); } // This method gets called by the runtime. Use this method to configure the HTTP request pipeline. public void Configure(IApplicationBuilder app, IHostingEnvironment env) { if (env.IsDevelopment()) { app.UseDeveloperExceptionPage(); } else { app.UseExceptionHandler("/Home/Error"); app.UseHsts(); } app.UseHttpsRedirection(); app.UseStaticFiles(); app.UseCookiePolicy(); app.UseMvc(routes => { routes.MapRoute( name: "default", template: "{controller=Home}/{action=Index}/{id?}"); }); } }
Then let’s create a new model file: UserModel.cs
public class UserModel { public int UserId { get; set; } public string UserName { get; set; } public string Email { get; set; } } Then after inside the controller folder let’s create a new controller called: BaseController.cs public class BaseController : Controller { public static void SerializeJsonIntoStream(object value, Stream stream) { using (var sw = new StreamWriter(stream, new UTF8Encoding(false), 1024, true)) using (var jtw = new JsonTextWriter(sw) { Formatting = Formatting.None }) { var js = new JsonSerializer(); js.Serialize(jtw, value); jtw.Flush(); } } public static HttpContent CreateHttpContent(object content) { HttpContent httpContent = null; if (content != null) { var ms = new MemoryStream(); SerializeJsonIntoStream(content, ms); ms.Seek(0, SeekOrigin.Begin); httpContent = new StreamContent(ms); httpContent.Headers.ContentType = new MediaTypeHeaderValue("application/json"); } return httpContent; } public static async Task<T> CallFunc<T>(string afUrl) { try { dynamic content = null; CancellationToken cancellationToken; using (var client = new HttpClient()) using (var request = new HttpRequestMessage(HttpMethod.Post, afUrl)) using (var httpContent = CreateHttpContent(content)) { request.Content = httpContent; using (var response = await client.SendAsync(request, HttpCompletionOption.ResponseHeadersRead, cancellationToken).ConfigureAwait(false)) { // response.EnsureSuccessStatusCode(); var resualtList = response.Content.ReadAsAsync<T>(); return resualtList.Result; } } } catch (Exception ex) { throw ex; } } } |
public class UserModel { public int UserId { get; set; } public string UserName { get; set; } public string Email { get; set; } } Then after inside the controller folder let’s create a new controller called: BaseController.cs public class BaseController : Controller { public static void SerializeJsonIntoStream(object value, Stream stream) { using (var sw = new StreamWriter(stream, new UTF8Encoding(false), 1024, true)) using (var jtw = new JsonTextWriter(sw) { Formatting = Formatting.None }) { var js = new JsonSerializer(); js.Serialize(jtw, value); jtw.Flush(); } } public static HttpContent CreateHttpContent(object content) { HttpContent httpContent = null; if (content != null) { var ms = new MemoryStream(); SerializeJsonIntoStream(content, ms); ms.Seek(0, SeekOrigin.Begin); httpContent = new StreamContent(ms); httpContent.Headers.ContentType = new MediaTypeHeaderValue("application/json"); } return httpContent; } public static async Task<T> CallFunc<T>(string afUrl) { try { dynamic content = null; CancellationToken cancellationToken; using (var client = new HttpClient()) using (var request = new HttpRequestMessage(HttpMethod.Post, afUrl)) using (var httpContent = CreateHttpContent(content)) { request.Content = httpContent; using (var response = await client.SendAsync(request, HttpCompletionOption.ResponseHeadersRead, cancellationToken).ConfigureAwait(false)) { // response.EnsureSuccessStatusCode(); var resualtList = response.Content.ReadAsAsync<T>(); return resualtList.Result; } } } catch (Exception ex) { throw ex; } } }
After that let’s modified the HomeController to get the records from the database
HomeController.cspublic class HomeController : BaseController { public async Task<IActionResult> Index() { List<UserModel> model = new List<UserModel>(); try { var AfUrl = AppSettings.AzureFunction_GetUsers; var response = await CallFunc<List<UserModel>>(AfUrl); if (response != null) { model = response; } return View(model); } catch (Exception) { return View(model); } } public async Task<IActionResult> ViewUser(int user) { UserModel model = new UserModel(); try { var AfUrl = AppSettings.AzureFunction_GetUserById + "&user=" + user; var response = await CallFunc<UserModel>(AfUrl); if (response != null) { model = response; } return View(model); } catch (Exception) { return View(model); } } [ResponseCache(Duration = 0, Location = ResponseCacheLocation.None, NoStore = true)] public IActionResult Error() { return View(new ErrorViewModel { RequestId = Activity.Current?.Id ?? HttpContext.TraceIdentifier }); } } |
    public class HomeController : BaseController
    {
        public async Task<IActionResult> Index()
        {
            List<UserModel> model = new List<UserModel>();

            try
            {
                var AfUrl = AppSettings.AzureFunction_GetUsers;

                var response = await CallFunc<List<UserModel>>(AfUrl);
                if (response != null)
                {
                    model = response;
                }

                return View(model);
            }
            catch (Exception)
            {
                return View(model);
            }
        }

        public async Task<IActionResult> ViewUser(int user)
        {
            UserModel model = new UserModel();

            try
            {
                var AfUrl = AppSettings.AzureFunction_GetUserById + "&user=" + user;

                var response = await CallFunc<UserModel>(AfUrl);
                if (response != null)
                {
                    model = response;
                }

                return View(model);
            }
            catch (Exception)
            {
                return View(model);
            }
        }

        [ResponseCache(Duration = 0, Location = ResponseCacheLocation.None, NoStore = true)]
        public IActionResult Error()
        {
            return View(new ErrorViewModel { RequestId = Activity.Current?.Id ?? HttpContext.TraceIdentifier });
        }
    }
Add the respective view files inside the View > Home folder
Index.cshtml@model List<ServerlessWebsite.Models.UserModel> @{ ViewData["Title"] = "User List Page"; } <table class="table table-responsive"> <tr> <th>User Name</th> <th>Email</th> </tr> @if (Model != null && Model.Count() > 0) { foreach (var item in Model) { <tr> <td>@item.UserName</td> <td>@item.Email</td> <td><a href="@Url.Action("ViewUser", "Home", new { user = item.UserId })">View</a></td> </tr> } } else { <tr> <td colspan="2"> No record found.</td> </tr> } </table> |
@model List<ServerlessWebsite.Models.UserModel>
@{
    ViewData["Title"] = "User List Page";
}

<table class="table table-responsive">
    <tr>
        <th>User Name</th>
        <th>Email</th>
    </tr>
    @if (Model != null && Model.Count() > 0)
    {
        foreach (var item in Model)
        {
            <tr>
                <td>@item.UserName</td>
                <td>@item.Email</td>
                <td><a href="@Url.Action("ViewUser", "Home", new { user = item.UserId })">View</a></td>
            </tr>
        }
    }
    else
    {
        <tr>
            <td colspan="2"> No record found.</td>
        </tr>
    }
</table>
@model ServerlessWebsite.Models.UserModel @{ ViewData["Title"] = "User List Page"; } <table class="table table-responsive"> <tr> <th>User Name</th> <th>Email</th> </tr> @if (Model != null) { <tr> <td>@Model.UserName</td> <td>@Model.Email</td> </tr> } else { <tr> <td colspan="2"> No record found.</td> </tr> } </table> |
@model ServerlessWebsite.Models.UserModel @{ ViewData["Title"] = "User List Page"; } <table class="table table-responsive"> <tr> <th>User Name</th> <th>Email</th> </tr> @if (Model != null) { <tr> <td>@Model.UserName</td> <td>@Model.Email</td> </tr> } else { <tr> <td colspan="2"> No record found.</td> </tr> } </table>
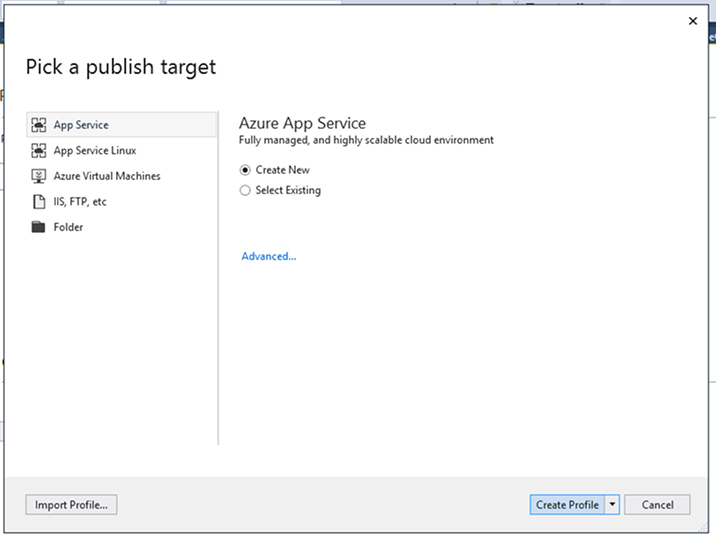
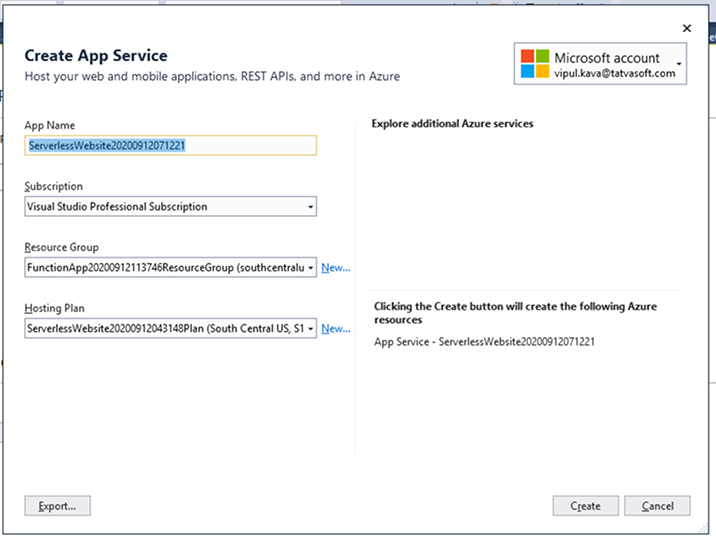
Once all the above changes are made we need to deploy it on the Azure portal for that follow the following image:

8. Final Words
Our extensive researched blog is to provide clarity to all developers and business analysts on how to set up a serverless web application. Using this definite method, you can have detailed information on all types of necessary data such as the name of the App, Subscription details, Resource Group, and Hosting Plan. After this, you can click on the create button then click on the publish button to deploy it. Once it is deployed, it automatically opens the website in the browser and displays it.
Useful Resources:
Safely consume an Azure Function through Microsoft Flow
CLR Function in SQL Server & Time Zone in SQL Server using CLR function
How to compare two SQL Server Databases using SQL Server Data Tools

Vishal Shah
Vishal Shah has an extensive understanding of multiple application development frameworks and holds an upper hand with newer trends in order to strive and thrive in the dynamic market. He has nurtured his managerial growth in both technical and business aspects and gives his expertise through his blog posts.
Subscribe to our Newsletter
Signup for our newsletter and join 2700+ global business executives and technology experts to receive handpicked industry insights and latest news
Build your Team
Want to Hire Skilled Developers?



Comments
Leave a message...