Related Blogs
Apple has introduced two notification extensions through which as an iOS developer can customize local and remote push notification. These two extensions are,
- UNNotificationContent Extension
- UNNotificationService Extension
Now, Let’s discuss each in detail below:
1. UNNotificationContent Extension
The protocol UNNotificationContentExtension provides the entry point for a Notification Content app extension, which displays a custom interface for your app’s notifications. You can implement this protocol in the custom UIViewController subclass that you use to present your interface. By having this type of extension, you can improve the way your notifications are presented, possibly by adding custom colors and branding or by incorporating media and other dynamic content into your notification interface.
To integrate a Notification Content app extension, add a Notification Content extension target to the Xcode project containing your app. Extension’s Info.plist file comes mostly configured. Identifically, the NSExtensionPointIdentifier key is set to the value com.apple.usernotifications.content-extension and the NSExtensionMainStoryboard key is set to the name of the project’s storyboard file. However, the NSExtensionAttribute key contains a dictionary of additional keys and values, some of which you must configure manually:
- UNNotificationExtensionCategory. (Required Key) The value of this key is a string or an array of strings. Every string contains the identifier of a category declared by the app using the UNNotificationCategory class.
- UNNotificationExtensionInitialContentSizeRatio. (Required) The value of this key is a floating-point number that represents the initial size of your view controller’s view expressed as a ratio of its height to its width. This value is used by the system to set the initial size of the view controller while your extension is loading. E.g., a value of 0.5 results in a view controller whose height is half its width. After your extension loads, you can change the size of your view controller.
- UNNotificationExtensionDefaultContentHidden. (Optional) This key has a Boolean value. When you set to true, the system displays only your custom view controller in the notification interface. When you set to false, the system displays the default notification content in addition to your view controller’s content. The Dismiss button and Custom action buttons are always displayed, regardless of this setting. The default value of this key is false.
- UNNotificationExtensionOverridesDefaultTitle. (Optional) This key has a Boolean value. When you set to true, the system uses the title property of your view controller as the title of the notification. When you set to false, the system sets the notification’s title to the name of your app. The default value of this key is false.
You can include multiple Notification Content extensions in your app’s bundle. When a notification arrives, the system checks the UNNotificationExtensionCategory key of each extension’s Info.plist file and launches the extension that supports the notification’s category. At that time, the system loads your extension, instantiates and configures your view controller, and calls the view controller’s didReceive(_:) method. You must implement that method and use it to configure your notification interface. The method may be called multiple times if new notifications arrive while your view controller is visible.
If the notification category includes custom actions, the system automatically adds action buttons to your notification interface; do not create those buttons yourself. If you implement the optional didReceive(_:completionHandler:) method, the system calls that method to respond to any selected actions. If your view controller does not implement that method, the system delivers the selected action to your app for handling.
Media Interface
To support the playback of audio or video from your interface, implement the mediaPlayPauseButtonType property and return the type of button you want. You must also implement the mediaPlayPauseButtonFrame property and provide a frame rectangle for your button. The system draws the button for you and handles all user interactions with it, calling the mediaPlay() and mediaPause() methods of this protocol at appropriate times so that you can start and stop playback.
If you start or stop playback of your media file programmatically, call the mediaPlayingStarted() and mediaPlayingPaused() methods of the current NSExtensionContext object. The extensionContext property of your view controller object contains a reference to the extension context object.
Methods, Constants and Variables of UNNotificationContent Extension
- func didReceive(_ notification: UNNotification)
This method will be called to deliver notifications to your Notification Content app extension. Using this method you can configure the contents of your view controller or incorporate content from a new notification. This method can be called multiple times while your view controller is visible. Identically, it is called again when a new notification arrives whose threadIdentifier value matches the thread identifier of the notification already being displayed. You can adjust the size of your view controller’s view after it is onscreen to accommodate new content. When changing the size, change only the height. (Values for width are ignored.) You can then add subviews to fill the additional space with your content. - optional func didReceive(_ response: UNNotificationResponse, completionHandler completion: @escaping (UNNotificationContentExtensionResponseOption) -> Void) Use this method when you want your view controller to handle actions selected by the user. Use your implementation to perform the associated task and then execute the completion block. If you go with this method, you must handle all actions defined in all categories managed by your Notification Content app extension. If you do not implement this method, the system notifies your app when the user selects an action.
- optional var mediaPlayPauseButtonType: UNNotificationContentExtensionMediaPlayPauseButtonType { get } Use this property when you want the system to display a media playback button in your notification interface. Return a constant indicating the type of button you want. The system assumes the value none for this property if you do not implement this property.
- optional var mediaPlayPauseButtonFrame: CGRect { get }
If you give support to the playback of media directly from your notification interface, implement this property and use it to return a non-empty rectangle specified in the coordinate system of your view controller’s view. A button is drawn by the system in the provided rectangle that lets the user play and pauses your media content. The system does the drawing of the button for you and calls the mediaPlay() and mediaPause() methods in response to user interactions. You can put this button anywhere in your view controller’s view. If you do not implement this property, the system does not draw a media playback button. - NSCopying optional var mediaPlayPauseButtonTintColor: UIColor { get } If you use the mediaPlayPauseButtonFrame property, you can also implement this property and use it to specify the tint color to apply to the button. If you do not implement this property, the system uses a default color for the tint color.
- optional func mediaPlay() If you implement the mediaPlayPauseButtonFrame property, implement this method and use it to begin the playback of your media. Do not call this method yourself. The system calls it in response to user interactions with the media playback button.
- optional func mediaPause() If you implement the mediaPlayPauseButtonFrame property, implement this method and use it to stop the playback of your media. Do not call this method yourself. The system calls it in response to user interactions with the media playback button.
- UNNotificationContentExtensionMediaPlayPauseButtonType
- UNNotificationContentExtensionMediaPlayPauseButtonTypeNone
No media button. Specify this option when you do not want a media button. This is the default option. - UNNotificationContentExtensionMediaPlayPauseButtonTypeDefault
A standard play/pause button. This button is always visible. When this button is tapped, its appearance changes between the play and pause icons and triggers the appropriate play and pause actions. - UNNotificationContentExtensionMediaPlayPauseButtonTypeOverlay
A play/pause button with partially transparent that is layered on top of your media content. When playback begins, the button disappears. Tapping the button again pauses playback and displays the play button again.
- UNNotificationContentExtensionMediaPlayPauseButtonTypeNone
- UNNotificationContentExtensionResponseOption
- UNNotificationContentExtensionResponseOptionDoNotDismiss
Do not dismiss the notification interface. The content extension handles the selected action. - UNNotificationContentExtensionResponseOptionDismiss
This will dismiss the notification interface. The content extension handles the selected action. - UNNotificationContentExtensionResponseOptionDismissAndForwardAction
In this, dismiss the notification interface and forward the notification to the app. Select this option when you want the app to respond to the action or handle it.
- UNNotificationContentExtensionResponseOptionDoNotDismiss
Let’s have a look on example.
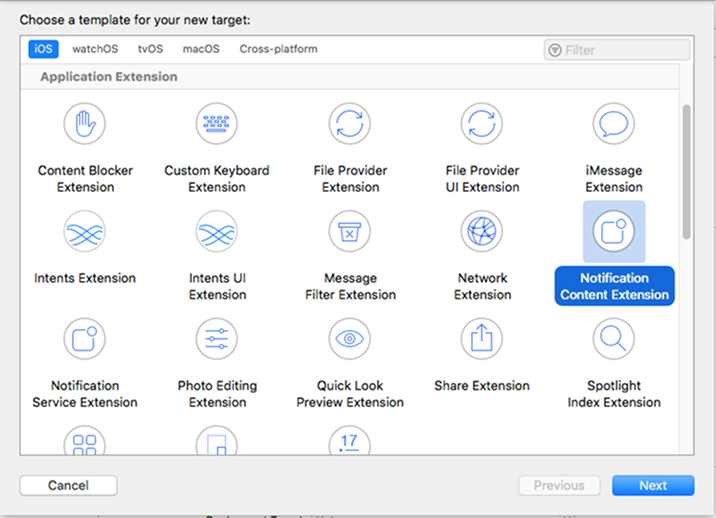
With the new project open in Xcode, navigate to File > New > Target in the menu bar. From the dialog that appears, select the iOS > Application Extension > Notification Content extension type:
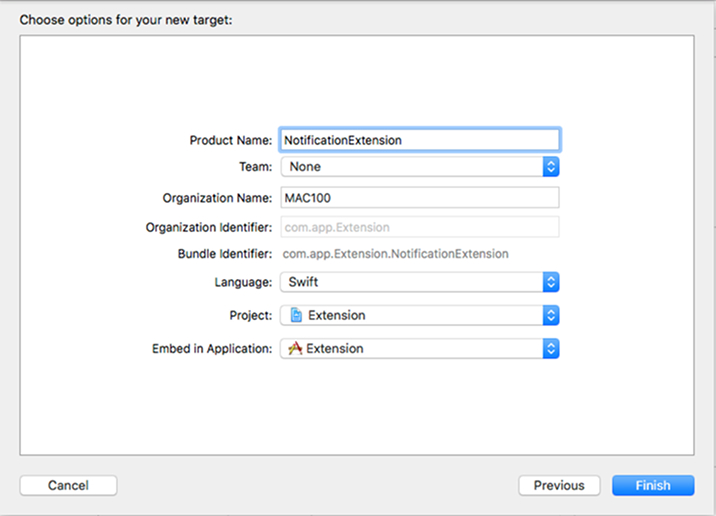
Name your extension whatever you require and click Finish:
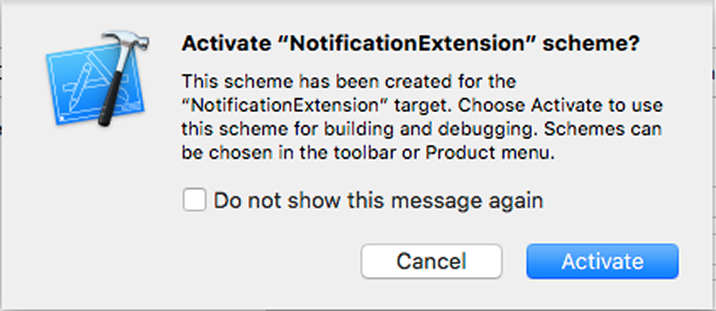
If a popup appears requesting you to initiate your new scheme, click the Activate button to set it up for debugging:
You will now have a new folder with the name of your extension in the Xcode File Navigator for your project. This folder contains the following files:
- NotificationViewController.swift, this contains the NotificationViewController class (a UIViewController subclass) for your custom interface. Initially , Xcode also automatically makes this class conform to the required protocol from the UserNotificationUI framework.
- MainInterface.storyboard, this is a storyboard file containing a single view controller. This interface will be shown when a user interacts with your notification. By Default , Xcode automatically links this interface up to the NotificationViewController class so that does not have to be done manually.
- Info.plist, this contains many important details about your extension. By opening up this file, you will see it contains a lot of items. The only one you need to worry about, however, is the NSExtensiondictionary which contains the following:

- You can see that Xcode automatically links your notification content extension to the correct system extension point, com.apple.usernotifications.content-extension, and storyboard interface file, MainInterface. Inside the NSExtensionAttributes sub-dictionary, there are two attributes you must define:
- UNNotificationExtensionCategory, this is a string value identical to the notification category you want to display the custom interface for. In your Info.plist file, change this value to name which you are going to use in notification payload.
- UNNotificationExtensionInitialContentSizeRatio, this is a number between 0 and 1 defining the aspect ratio of your custom interface. The value 1, which is default, tells the system that your interface has a total height equal to its width. With 0.5 value, for example, would result in an interface with a height equal to half of its total width. It is required to note that the height of your interface can be changed dynamically when it is loaded. The value defined in the Info.plist is just an estimate number so that the system can display a better-looking animation.
To create the interface, open up your MainInterface.storyboard file. First thing to do is, select the view controller and in the Attributes inspector, change its height to be equal to its width.
Secondly, change the background colour of the main view to white. At last, change the existing label’s text colour property to black and the text size to 96.
Now write the code to fire local notification in your app delegate as below. Make sure it’s category is same you defined Info.plist file.
{ "aps":{ "alert":{ "title":"Imagica", "body":"Let’s feel thrill on ride." }, "badge":42, "sound":"default", "category":"imagica.category", "mutable-content":1 }, "rides":["Amusement Park", "Family Theme Park"], "subtitle":"Your ride is ready", } // Update this property as you manipulate the content var bestAttemptContent: UNMutableNotificationContent? override func didReceive(_ request: UNNotificationRequest , withContentHandler contentHandler: @escaping (UNNotificationContent) -> Void) { if let copy = request.content.mutableCopy() as? UNMutableNotificationContent { bestAttemptContent = copy // Edit properties of copy let userInfo = bestAttemptContent.userInfo as! [String:Any] //change the content to the rides if let rideEntry = userInfo["rides"] { let rides = rideEntry as! [String] var body = "" for item in rides { body += item + "\n " } bestAttemptContent.body = body } contentHandler(bestAttemptContent) } } |
{ "aps":{ "alert":{ "title":"Imagica", "body":"Let’s feel thrill on ride." }, "badge":42, "sound":"default", "category":"imagica.category", "mutable-content":1 }, "rides":["Amusement Park", "Family Theme Park"], "subtitle":"Your ride is ready", } // Update this property as you manipulate the content var bestAttemptContent: UNMutableNotificationContent? override func didReceive(_ request: UNNotificationRequest , withContentHandler contentHandler: @escaping (UNNotificationContent) -> Void) { if let copy = request.content.mutableCopy() as? UNMutableNotificationContent { bestAttemptContent = copy // Edit properties of copy let userInfo = bestAttemptContent.userInfo as! [String:Any] //change the content to the rides if let rideEntry = userInfo["rides"] { let rides = rideEntry as! [String] var body = "" for item in rides { body += item + "\n " } bestAttemptContent.body = body } contentHandler(bestAttemptContent) } }
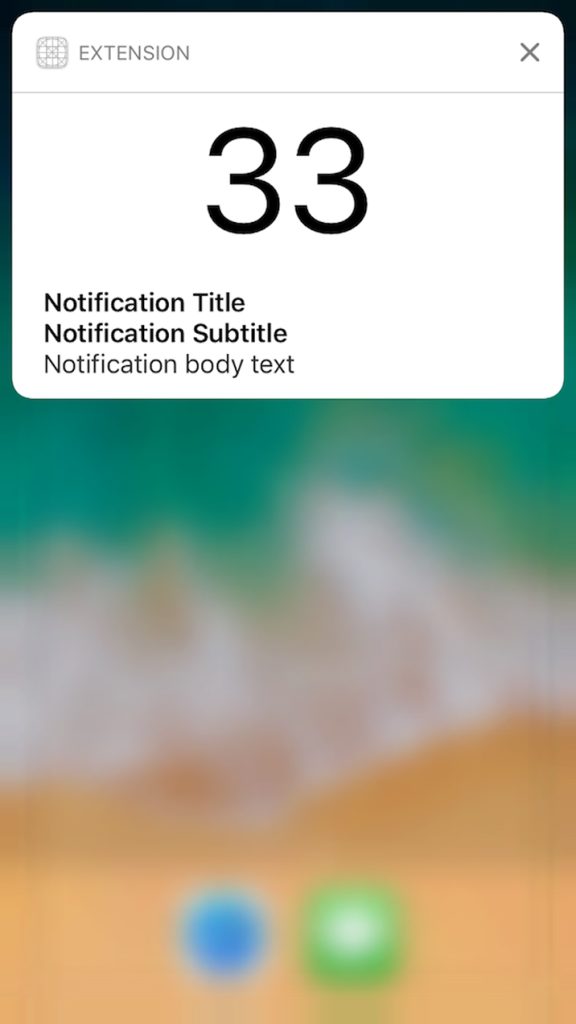
The local notification that created by the starter project includes a custom number in the notification’s userInfo property, and this is what we are going to display in the custom interface. For this, replace your NotificationViewController class’s didReceive(_:) method with the following:
func didReceive(_ notification: UNNotification) { if let number = notification.request.content.userInfo["customNumber"] as? Int { label?.text = "\(number)" } } |
func didReceive(_ notification: UNNotification) { if let number = notification.request.content.userInfo["customNumber"] as? Int { label?.text = "\(number)" } }
Now run the project and move app to background once launched. After 30 sec you will get notification and drag that notification and you will get below interface.
2. UNNotificationService Extension
This UNNotificationServiceExtension class provides the entry point for a Notification Service app extension, which lets you customize the content of a remote notification before it is delivered to the user. This Notification Service app extension does not present any UI of its own. Instead of, it is launched on demand when a notification of the appropriate type is delivered to the user’s device. You can use this extension to modify the notification’s content or download content related to the extension. E.g., you could use the extension to decrypt an encrypted data block or to download images associated with the notification.
You do not create instances of the UNNotificationServiceExtension class yourself. Instead of, the Xcode template for a Notification Service Extension target contains a subclass for you to modify. By using this methods of that subclass you can implement your app extension’s behavior. Once remote notification for your app is received, the system loads your extension and calls its didReceive(_:withContentHandler:) method only when both of the following conditions are met:
- The remote notification is configured to display an alert.
- The remote notification’s payload includes the mutable-content key with the value set to 1.
Note: Silent notifications or those that only play a sound or badge the app’s icon, cannot be modified.
The didReceive(_:withContentHandler:) method is used to performs the main work of your extension. You can use that method to make any changes to the notification’s content. This method has a limited amount of time to perform its task and execute the provided completion block. If your method fail to do in time, the system calls the serviceExtensionTimeWillExpire() method to give you one last chance to submit your changes. If you do not update the notification content before time expires, the system displays the original content.
For any of your app extension, you deliver a Notification Service app extension class as a bundle inside your app. By using the template provided by Xcode configures the Info.plist file automatically for this app extension type. Specifically, it sets the value of the NSExtensionPointIdentifier key to com.apple.usernotifications.service and sets the value of the NSExtensionPrincipalClass key to the name of your UNNotificationServiceExtension subclass.
Methods of UNNotificationService Extension
- func didReceive(_ request: UNNotificationRequest, withContentHandler contentHandler: @escaping (UNNotificationContent) -> Void)
You must need to Override this method and use it to modify the UNNotificationContent object that was delivered with the notification. At some point during your integration, execute the contentHandler block and pass it your modified content. If you do not want to modify the content, call the contentHandler block with the original content from the request parameter.
If you want to modify any of the content , you can do it from the original request. You can customize the content for the current user or replace it altogether. By using this method you can download images or movies and add them as attachments to the content. You can also modify the alert text as long as you do not remove it. The system ignores your modifications and delivers the original notification content, If the content object does not contain any alert text.
This extension has a limited amount of time (no more than 30 seconds) to modify the content and execute the contentHandler block. If your block is not executed in a timely manner, the system calls your extension’s serviceExtensionTimeWillExpire() method to give you one last chance to execute the block. If you fail to do that, the system presents the notification’s original content to the user.
Check below code that shows an example implementation of this method:
Suppose the payload of aps is as below.
{
  "aps":{
          "alert":{
                    "title":"Imagica",
                    "body":"Let’s feel thrill on ride."
           },
           "badge":42,
           "sound":"default",
           "category":"imagica.category",
           "mutable-content":1
        },
          "rides":["Amusement Park", "Family Theme Park"],
          "subtitle":"Your ride is ready",
}

// Update this property as you manipulate the content

var bestAttemptContent: UNMutableNotificationContent?

override func didReceive(_ request: UNNotificationRequest
, withContentHandler contentHandler: @escaping (UNNotificationContent) -> Void) {
  if let copy = request.content.mutableCopy() as? UNMutableNotificationContent {
    bestAttemptContent = copy

    // Edit properties of copy
    let userInfo = bestAttemptContent.userInfo as! [String:Any]

    //change the content to the rides
    if let rideEntry = userInfo["rides"] {
      let rides = rideEntry as! [String]
      var body = ""
      for item in rides {
        body += item + "\n "
      }
      bestAttemptContent.body = body
    }
    contentHandler(bestAttemptContent)
    }
}
{ "aps":{ "alert":{ "title":"Imagica", "body":"Let’s feel thrill on ride." }, "badge":42, "sound":"default", "category":"imagica.category", "mutable-content":1 }, "rides":["Amusement Park", "Family Theme Park"], "subtitle":"Your ride is ready", } // Update this property as you manipulate the content var bestAttemptContent: UNMutableNotificationContent? override func didReceive(_ request: UNNotificationRequest , withContentHandler contentHandler: @escaping (UNNotificationContent) -> Void) { if let copy = request.content.mutableCopy() as? UNMutableNotificationContent { bestAttemptContent = copy // Edit properties of copy let userInfo = bestAttemptContent.userInfo as! [String:Any] //change the content to the rides if let rideEntry = userInfo["rides"] { let rides = rideEntry as! [String] var body = "" for item in rides { body += item + "\n " } bestAttemptContent.body = body } contentHandler(bestAttemptContent) } }
-
func serviceExtensionTimeWillExpire()
If your didReceive(_:withContentHandler:) method takes to long to execute its completion block, the system calls this method on a separate thread to give you one last chance to execute the block. This method is used to execute the block as quickly as possible. Doing so might mean providing some fallback content. E.g., if your extension is still downloading an image file with the intent of attaching it to the notification’s content, you might update the notification’s alert text to indicate that an image is being downloaded. The system displays the notification’s original content,if you fail to execute the completion block from the didReceive(_:withContentHandler:) method in time.
var contentHandler: ((UNNotificationContent) -> Void)?

// Update this property as you manipulate the content
var bestAttemptContent: UNMutableNotificationContent?

override func serviceExtensionTimeWillExpire() {
    if let contentHandlerObj = contentHandler, let bestAttemptContent =  bestAttemptContent {
        contentHandlerObj (bestAttemptContent)
    }
}
var contentHandler: ((UNNotificationContent) -> Void)? // Update this property as you manipulate the content var bestAttemptContent: UNMutableNotificationContent? override func serviceExtensionTimeWillExpire() { if let contentHandlerObj = contentHandler, let bestAttemptContent = bestAttemptContent { contentHandlerObj (bestAttemptContent) } }
Limitation
The important thing to consider when using a notification service extension is the conditions under which the extension will operate.
First one, your extension will only be launched for notifications which are configured to show on-screen alerts to the user. It means that any silent notifications (like the ones used to update app badges) will not trigger your extension.
Secondly, the incoming notification’s aps dictionary within its payload must include the mutable-contentkey with a value of 1.

Vishal Shah
Vishal Shah has an extensive understanding of multiple application development frameworks and holds an upper hand with newer trends in order to strive and thrive in the dynamic market. He has nurtured his managerial growth in both technical and business aspects and gives his expertise through his blog posts.
Subscribe to our Newsletter
Signup for our newsletter and join 2700+ global business executives and technology experts to receive handpicked industry insights and latest news
Build your Team
Want to Hire Skilled Developers?




Comments
Leave a message...