Related Blogs
Microsoft is probably the most renowned and rewarding company that builds tools and techniques for businesses to optimize their processes and gain profitable business results. One of its less common methods is Microsoft Azure Webjobs. For businesses who aren’t aware of Microsoft Azure webjobs, so let me bring it to the limelight.
What is Microsoft Azure WebJobs?
WebJobs is an Azure App Service feature that provides an easy way for SharePoint developers to run code or script as a background process in the same context as an app service web app, API app or mobile app. WebJobs support C#, PowerShell, JavaScript, PHP, TypeScript, Bash, Python, Bash, .bat, .cmd and more which means that a WebJob can run any code or script that can execute in the App Service sandbox. It supports NPM and NuGet. There is no extra cost to use WebJobs.
Note: WebJobs is not yet supported for App Service on Linux.
SharePoint developers can use Azure WebJobs to develop timer job functionality or Windows Task Scheduler to carry out tasks in SharePoint Online for overall SharePoint development.
For instance, you may require a schedule timer job to retrieve data that is added to the database of the SharePoint list. It is important to note that SharePoint Online does not provide luxury to deploy farm solutions and timer jobs to iteratively perform scheduled tasks. To schedule a similar timer job in SharePoint Online, you are required to implement a console application as an Azure WebJob. The console application uses the client-side object model (CSOM) to access SharePoint Online resources.
If a SharePoint development Company requires to fill the need for a custom background process, Azure WebJobs is what you require.
Types of WebJobs
There are two types of Azure WebJobs: Continuous and Triggered. Refer to the below table for the differences between them.
| Continuous | Triggered |
|---|---|
| It starts as soon as the WebJob is configured. The job keeps on running in an endless loop to avoid itself from ending. In case, if the job ends, you can restart it. | Starts on a manual trigger or a schedule. |
| Runs on all the instances that a web app runs on. | Runs on a single instance that Azure chooses for load balancing. |
| Provides support for remote debugging. | Doesn’t provide support for remote debugging. |
File Types Supported for scripts or code
- .ps1 (PowerShell)
- .js (Node.js)
- .cmd, .bat, .exe (Windows cmd)
- .php (PHP)
- .sh (Bash)
- .jar (Java)
- .py (Python)
What is Microsoft Flow?
Microsoft Flow is the top choice for SharePoint development companies to do any automated task in Office 365. It is an online workflow service that automates activities over the most widely recognized apps and services. It is regularly used to automate work processes between your preferred applications and services, synchronize records, get notifications, gather data, and significantly more.
When you sign up, you can interface with, more than 220 services and can manage data either in the on-premises or in cloud sources like SharePoint and Microsoft SQL Server. The list of applications you can use with Microsoft Flow grows constantly.
For instance, SharePoint developers can automate the below type of tasks:
- Instantly react to high-need warnings or messages.
- Capture, track, and catch up with new sales customers.
- Copy all email attachments to your OneDrive for Business account.
- Collect information about your business, and share that data with your group.
- Automate approval work processes.
For reference Please follow this blog to know more about MS Flow.
Let’s call a Triggered Azure WebJob (manual/scheduled WebJob) through MS Flow. But before that one must have active Azure and Office 365 subscriptions.
Azure WebJobs for Office 365 Sites
Here, the basic concepts for building a custom job for Office 365 sites and Azure WebJob act like a scheduled job for Office 365 SharePoint sites.
All SharePoint developers require is to build a new WebJob is to create a console application.
Setup and run console application as Azure WebJob
To configure a console application to run as an Azure WebJob, perform the below steps:
- Select New Project > Visual C# > Console Application > Name: WebJobSample > OK in Visual Studio. Also, make sure to select the .NET Framework 4.5 or later.
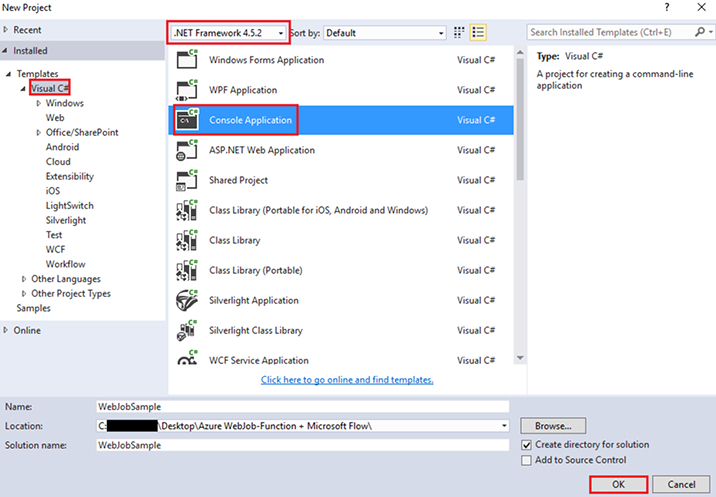
Note: Before the SharePoint developer starts to implement a console application, make sure to add required assemblies in the Visual Studio.
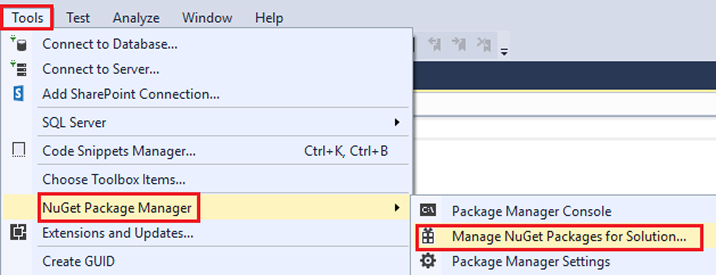
- Install SharePoint specific assemblies from NuGet. Navigate to Tools > NuGet Package Manager > Manage NuGet Packages for Solution
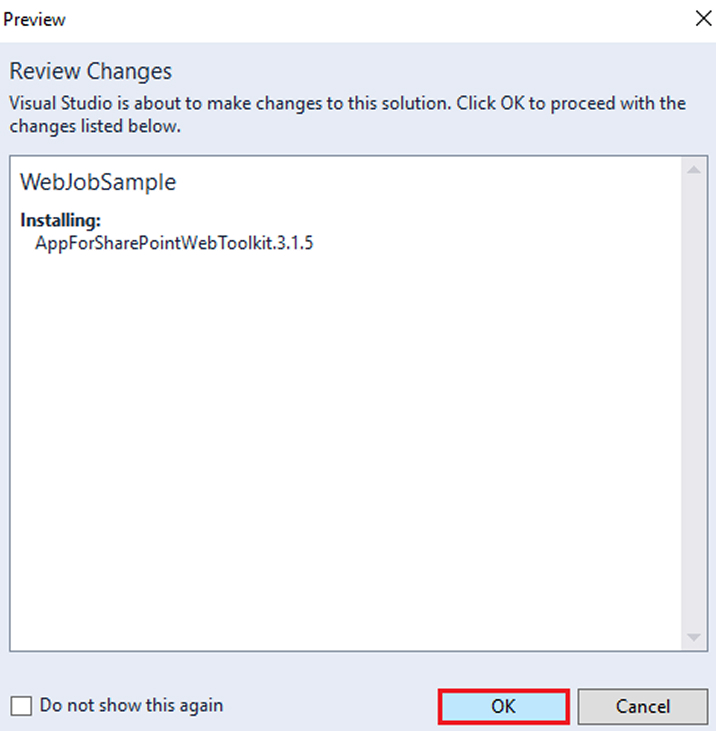
- Browse for App for SharePoint > Select package called AppForSharePointWebToolkit > Click Install.

- Select OK to install dependencies and required helper classes.
- Verify that the NuGet package was successfully installed by checking below the new helper class created in the console application.

- Open App.config file and store your Office 365 account credentials by adding appSettings element as shown below to fetch them easily inside your code. Add SPOAccount and SPOPassword keys inside the appSettings element to store the username and password of your tenant account.
App.config<br><br><configuration><br> <startup><br> <supportedruntime version="v4.0" sku=".NETFramework,Version=v4.5.2"><br> </supportedruntime></startup><br> <appsettings><br> <add key="SPOAccount" value=" "><br> <add key="SPOPassword" value=" "><br> </add></add></appsettings><br></configuration><br>
App.config<br><br><configuration><br> <startup><br> <supportedruntime version="v4.0" sku=".NETFramework,Version=v4.5.2"><br> </supportedruntime></startup><br> <appsettings><br> <add key="SPOAccount" value=" "><br> <add key="SPOPassword" value=" "><br> </add></add></appsettings><br></configuration><br>
Note: Here, the config file stores the organization’s username and password in clear text. It depends upon your project requirements for where and how to store authentication details and encrypting the passwords for production deployments.
- Add below code inside the Program.cs file of the created console application.
- Import using statements
Program.cs
using Microsoft.SharePoint.Client;
using System.Security;
using System.Configuration;
using System;
Program.cs using Microsoft.SharePoint.Client; using System.Security; using System.Configuration; using System;
- Configure the following methods inside your class:
- Main: This method is used to authenticate your SharePoint site and execute CSOM requests to carry out tasks inside your site. SharePoint consultants will get a SharePoint library using CSOM and then get the total number of documents inside that library as an output.
Program.cs
static void Main(string[] args)
        {
            using (ClientContext context = new ClientContext(" "))
            {
                // Use default authentication mode.
                context.AuthenticationMode = ClientAuthenticationMode.Default;
                context.Credentials = new SharePointOnlineCredentials(GetSPOAccountName(), GetSPOSecureStringPassword());

                // Add your CSOM code to perform tasks on your sites and content.
                try
                {
                    List objList = context.Web.Lists.GetByTitle("Docs");
                    context.Load(objList);
                    context.ExecuteQuery();

                    if (objList != null && objList.ItemCount > 0)
	                {
                        Console.WriteLine(objList.Title.ToString() + " has " + objList.ItemCount + " items.");
                    }

                }
                catch (Exception ex)
                {
                    Console.WriteLine("ERROR: " + ex.Message);
                    Console.WriteLine("ERROR: " + ex.Source);
                    Console.WriteLine("ERROR: " + ex.StackTrace);
                    Console.WriteLine("ERROR: " + ex.InnerException);

                }
            }
        }
Program.cs static void Main(string[] args) { using (ClientContext context = new ClientContext(" ")) { // Use default authentication mode. context.AuthenticationMode = ClientAuthenticationMode.Default; context.Credentials = new SharePointOnlineCredentials(GetSPOAccountName(), GetSPOSecureStringPassword()); // Add your CSOM code to perform tasks on your sites and content. try { List objList = context.Web.Lists.GetByTitle("Docs"); context.Load(objList); context.ExecuteQuery(); if (objList != null && objList.ItemCount > 0) { Console.WriteLine(objList.Title.ToString() + " has " + objList.ItemCount + " items."); } } catch (Exception ex) { Console.WriteLine("ERROR: " + ex.Message); Console.WriteLine("ERROR: " + ex.Source); Console.WriteLine("ERROR: " + ex.StackTrace); Console.WriteLine("ERROR: " + ex.InnerException); } } }
	// Add your CSOM code to perform tasks on your sites and content.
try
{
List objList = context.Web.Lists.GetByTitle(“Docs”);
context.Load(objList);
context.ExecuteQuery();


if (objList != null && objList.ItemCount > 0)
{
Console.WriteLine(objList.Title.ToString() + ” has ” + objList.ItemCount + ” items.”);
}


}
catch (Exception ex)
{
Console.WriteLine(“ERROR: ” + ex.Message);
Console.WriteLine(“ERROR: ” + ex.Source);
Console.WriteLine(“ERROR: ” + ex.StackTrace);
Console.WriteLine(“ERROR: ” + ex.InnerException);


}
}
}
// Add your CSOM code to perform tasks on your sites and content. try { List objList = context.Web.Lists.GetByTitle(“Docs”); context.Load(objList); context.ExecuteQuery(); if (objList != null && objList.ItemCount > 0) { Console.WriteLine(objList.Title.ToString() + ” has ” + objList.ItemCount + ” items.”); } } catch (Exception ex) { Console.WriteLine(“ERROR: ” + ex.Message); Console.WriteLine(“ERROR: ” + ex.Source); Console.WriteLine(“ERROR: ” + ex.StackTrace); Console.WriteLine(“ERROR: ” + ex.InnerException); } } }
- GetSPOAccountName: Create this method to read a username from the config file.
Program.cs
private static string GetSPOAccountName()
        {
            try
            {
                Console.WriteLine("Entered GetSPOAccountName.");
                return ConfigurationManager.AppSettings["SPOAccount"];
            }
            catch
            {
                throw;
            }
        }
Program.cs private static string GetSPOAccountName() { try { Console.WriteLine("Entered GetSPOAccountName."); return ConfigurationManager.AppSettings["SPOAccount"]; } catch { throw; } }
- GetSPOSecureStringPassword: Create this method to read a password from the config file.
Program.cs
private static SecureString GetSPOSecureStringPassword()
        {
            try
            {
                Console.WriteLine("Entered GetSPOSecureStringPassword.");
                var secureString = new SecureString();
                foreach (char c in ConfigurationManager.AppSettings["SPOPassword"])
                {
                    secureString.AppendChar(c);
                }
                Console.WriteLine("Constructed the secure password.");

                return secureString;
            }
            catch
            {
                throw;
            }
        }
        return secureString;
}
catch
{
throw;
}
}
Program.cs private static SecureString GetSPOSecureStringPassword() { try { Console.WriteLine("Entered GetSPOSecureStringPassword."); var secureString = new SecureString(); foreach (char c in ConfigurationManager.AppSettings["SPOPassword"]) { secureString.AppendChar(c); } Console.WriteLine("Constructed the secure password."); return secureString; } catch { throw; } } return secureString; } catch { throw; } }
Publish Your Console Application as an Azure WebJob
If the user has once completed implementing a console application, SharePoint consultants need to publish their console application as an Azure WebJob.
To publish your console application as an Azure WebJob, you can configure on-demand or triggered Azure WebJob.
Create WebJob binaries zip file to upload as Azure WebJob
You can upload a zip file containing output files from Visual Studio build (files in bin/Debug or bin/Release folder). This is a simple way of compiling and shipping your code.

Compress all the output files that are resulted from the building of the process to create a zip file for your WebJob.

Create an on-demand or manually triggered WebJob
- Select App Services from left blade content and navigate to the App Service page of your App Service web app in the Azure portal.
Note: You can use any sample app service to schedule your WebJob.
- Click WebJobs.

- On the WebJobs page, click Add.

- Provide Add WebJob settings as needed and click OK.
- Name: A unique name, say “triggeredWebJob”, within the App service app. Make sure that the name must start with a letter or a number and should not contain special characters except “-” and “_”.
- File Upload: Here upload the .zip file created earlier that contains the executable output files.
- Type: Triggered
- Triggers: Manual

- After a few seconds, the newly created WebJob appears on the WebJobs page of the App service.

Trigger Azure WebJob through Microsoft Flow
We have a WebJob that counts the number of items inside a library. Such a job works perfectly for a scheduled job. Though, it can be ideal to trigger the web job automatically when a new document item is added instead of waiting for the scheduled job to run. You can carry out the process by triggering Azure WebJob through Microsoft Flow.
Users are required to fetch authentication tokens of the app service containing WebJob.
- Retrieve authentication token for the app service where WebJob is running. Select Get publish profile from the ribbon on the app service overview page.

- It will download a file that has the PublishSettings extension. Browse for the publishProfile element with publishMethod=”MSDeploy“. Note the userName “$spWebJob” and password i.e userPWD in the file that will be used later while configuring a flow.

- Fetch the Web Hook URL by selecting your WebJob Properties.

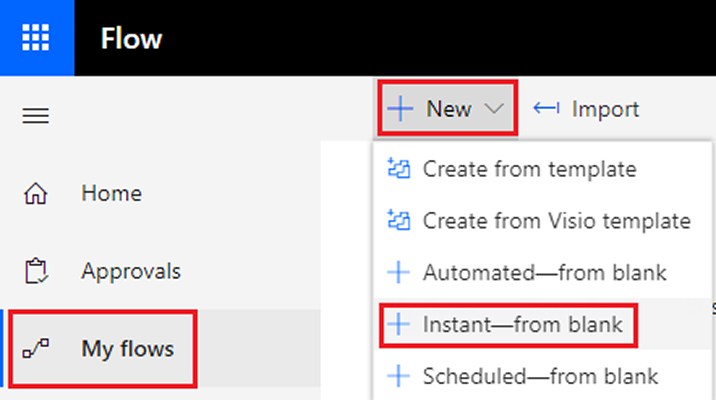
- Visit the MS Flow via https://flow.microsoft.com, select My flows and click New > Instant-from blank.
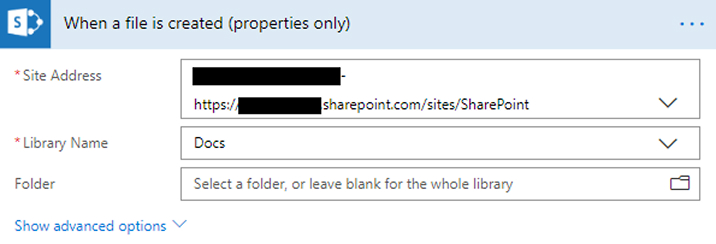
- Add when a file is created (properties only) SharePoint trigger. Select Site Address and required Library Name as “Docs”.
- Add HTTP-HTTP action step. Rename the action to Trigger Azure WebJob. Change Method to “POST” for URI https://spwebjob.scm.azurewebsites.net/api/triggeredwebjobs/triggeredWebJob/run, which is the web hook URL retrieved earlier. No need to set Header and Body.
- To view the advanced settings options, click on Show advanced options. Set Authentication to “Basic”, enter your Username and Password copied earlier.
- Provide a flow name as Call Azure WebJob and click Save. The final flow would look like the one below.
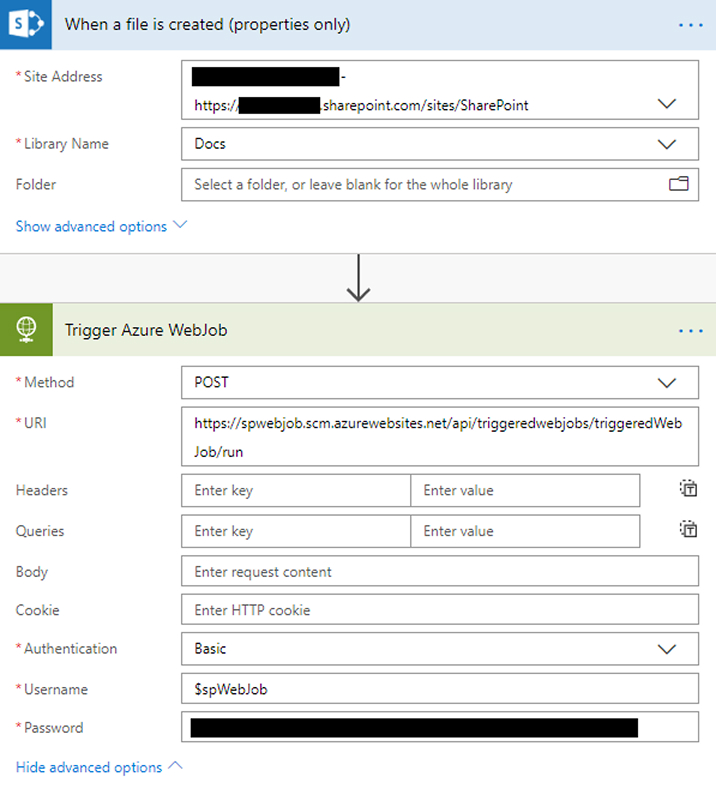
- In addition to a document inside the library, your flow will start running.

- Check the Flow run.

View the WebJob history
Once MS Flow runs successfully, you need to verify whether WebJob has been triggered successfully or not.
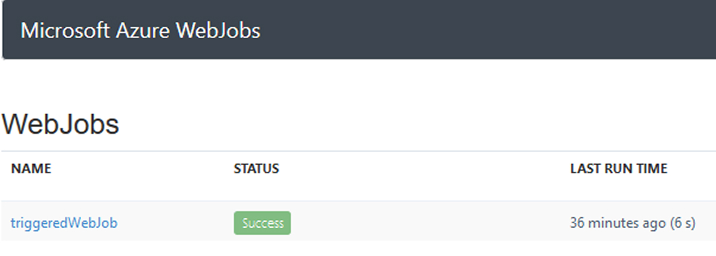
- In the Azure Portal, navigate to the WebJobs page for your app service.
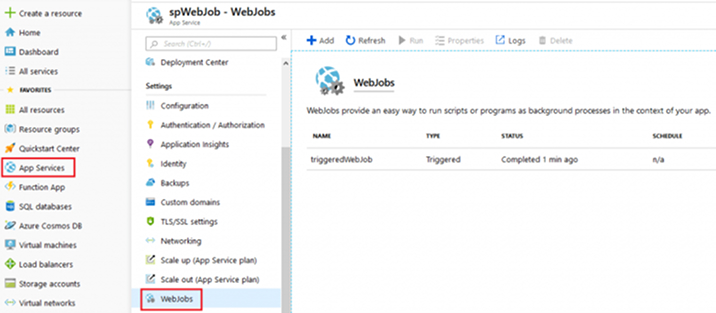
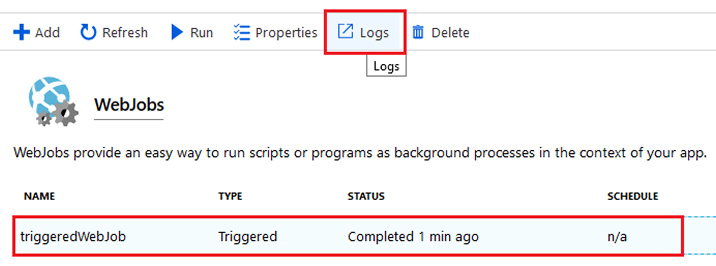
- Select triggeredWebJob WebJob under your app service for which you want to view job history and click the Logs button in the top ribbon.
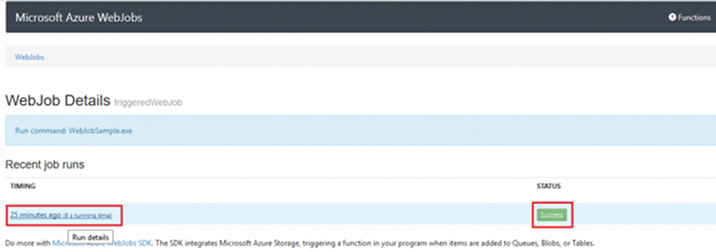
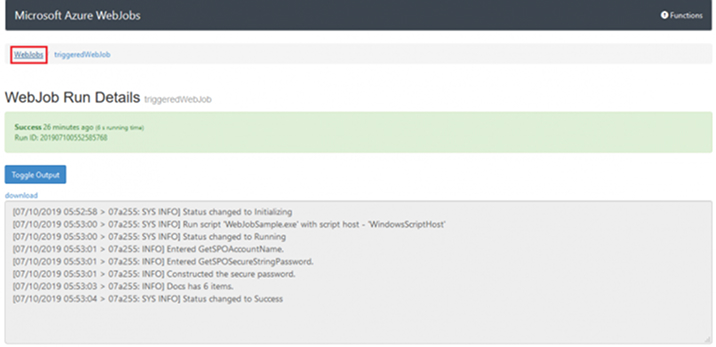
- It will open the WebJob Details page in a new browser tab. Choose the time for your job run to check details. Note the status of the job run to verify a successful run.
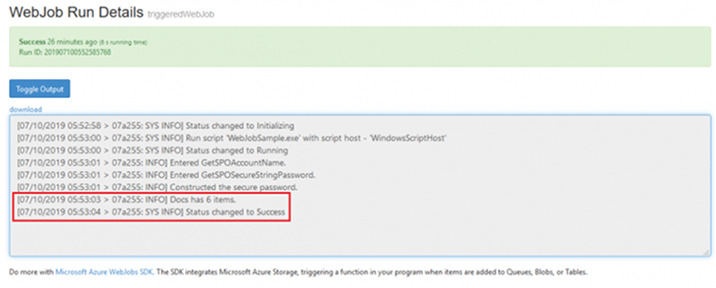
- View the text of log contents on the WebJob Run Details page to verify the job run based on your console application. It will return the number of documents inside the “Docs” library.
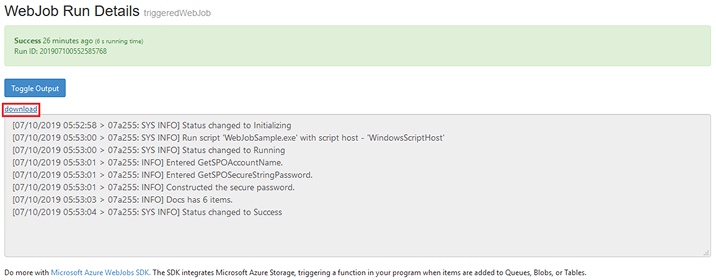
You can also view output details in a separate window by clicking the download link. SharePoint consultant can also download the output text itself by right-clicking the download link and using browser options to save the output text of the job run.
- You can navigate back to the list of WebJobs by clicking WebJobs breadcrumb link at the top.
Conclusion
If a WebJob has the Web Hook endpoint, try not to hold on to it at a single attempt. SharePoint consultants can provoke a triggered Azure WebJob automatically without hanging tight for its manual input/scheduled start time through MS Flow. MS Flow provisions us with different triggering actions like “When an item is created or modified”, “Item is deleted”, “When a record is selected”, etc. and furthermore provide other services like Dynamics 365, Salesforce, OneDrive, Dropbox, etc. to work around them alongside Azure WebJob.
Alludes to our next blog showcasing the use of an Azure Function through the remarkable MS Flow.

Shital Patel
Shital Patel is VP at TatvaSoft with a high-level of proficiency and technical precision in SharePoint Development. His experience of the last two decades has helped businesses to solve complex challenges resulting in growth and performance of Startups to Fortune 500 companies.
Subscribe to our Newsletter
Signup for our newsletter and join 2700+ global business executives and technology experts to receive handpicked industry insights and latest news
Build your Team
Want to Hire Skilled Developers?



Comments
Leave a message...