Related Blogs
Table of Content
- What is Microsoft Forms?
- Platforms and Versions Supported by Microsoft Forms
- How to Get Started with Microsoft Forms?
- Ways to Create a New Microsoft Form
- When and How to Use Microsoft Forms?
- How to Share Microsoft Forms?
- How to see Responses and Results?
- Integrating MS Forms with Power Automate and Power BI
- Integrating MS forms with One Drive
- Advantages of Microsoft Forms
- Conclusion

Businesses are receptive to newer advancements and technology additions that make their enterprise processes better. If we talk about large firms like Microsoft, they have been adding so much in their list of offerings to offer the best business services for other enterprises.Microsoft forms is another application by office 365 that helps businesses know customers’ view-points and opinions.
Microsoft forms can be used to create surveys, quizzes, polls and questionnaires for businesses of all sizes. With expansion in businesses undertaking Microsoft forms for their business, the idea of data collection and analysis has got simpler. More and more businesses are taking advantage of this and getting real-time updates and responses on customers queries. This makes Microsoft Forms an inseparable part of customer business. So, our SharePoint experts has decided to bring more information on Microsoft forms. In this blog, we will see how to create Microsoft forms and its integration with other Office 365 apps . So, let’s get started with what Microsoft Forms are.
What is Microsoft Forms?
The users wanted a unique application that would cater their needs of building an app for collecting survey data. Microsoft Forms is an expert in building unique surveys, quizzes, polls, and questionnaires. The web-browser on any device or computer may also send an invitation to other users to fill out the Microsoft Forms. The creator may check the outcomes in real time and analyze the data collected. Generally, In many institutions, companies and government agencies, Microsoft forms services may be utilized to satisfy their data collecting requirements and to generate an actual report.
Platforms and Versions Supported by Microsoft Forms
Microsoft is a smart player as they know their users are wide spread and develop apps that are compatible across all major platforms. So when it comes to versions and compatible operating systems, Microsoft has taken care of everything. They have covered almost all main platforms such as Windows, MacOS, Android, iOS and Web . Desktop and mobile browsers allow access to forms. This helps Microsoft Forms to make large polls and surveys among individuals outside your company easier and better. Forms surveys without installing a specific software are simply accessible.
How to Get Started with Microsoft Forms?
Not many of you might know that Microsoft forms started specifically for the education industry. But now it has spanned across many industry verticals. Microsoft Forms may be accessed using your Microsoft office 365 applications or with your Microsoft account. Here’s how you can begin:
Step1
You need to start with the basics by Logging into your Microsoft account. It can be your Microsoft 365 business or education school account, or your Microsoft Outlook account.
Step 2
Find “Forms” in the list of Microsoft office 365 applications.
Step 3
Select “Forms”. You may also go straight to the Microsoft Forms page and sign in using your Microsoft account credentials.
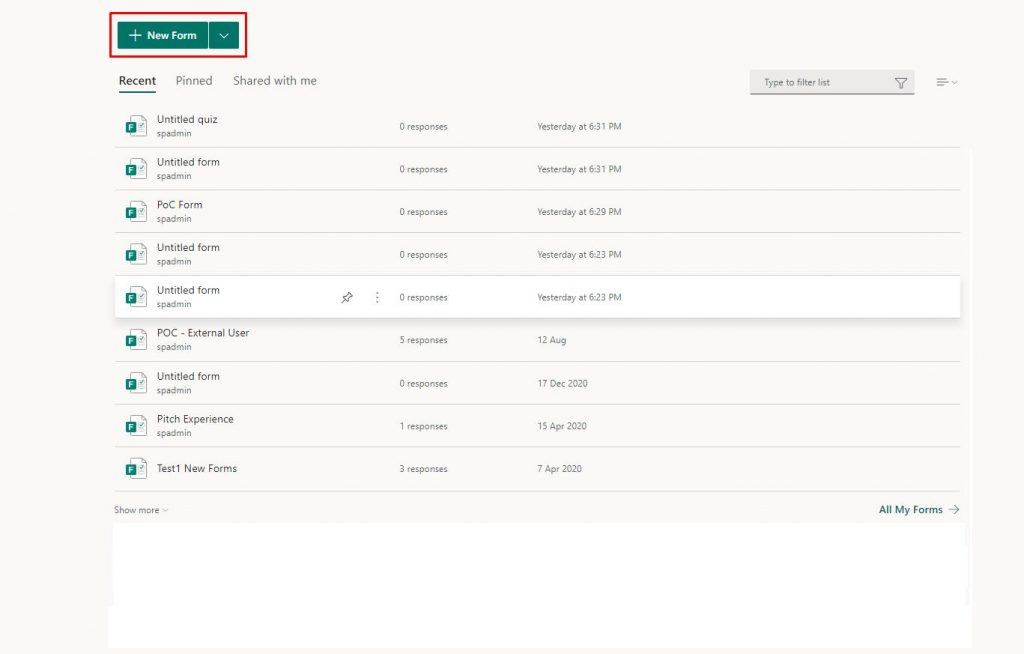
At the top of the Forms page, there is a row of templates with choices to create a new form or a new quiz. If you’ve previously generated one or more forms, they’ll appear in the “Recent” section, where you can view a list of recent forms as well as those you’ve pinned to the page for easy access. You can now click on “All My Forms” to view all of your previous forms.
Ways to Create a New Microsoft Form
1. On the Homepage tap on, click “New Form.” if you want to create a survey or a Poll. Microsoft Forms will open in a new tab of the browser.
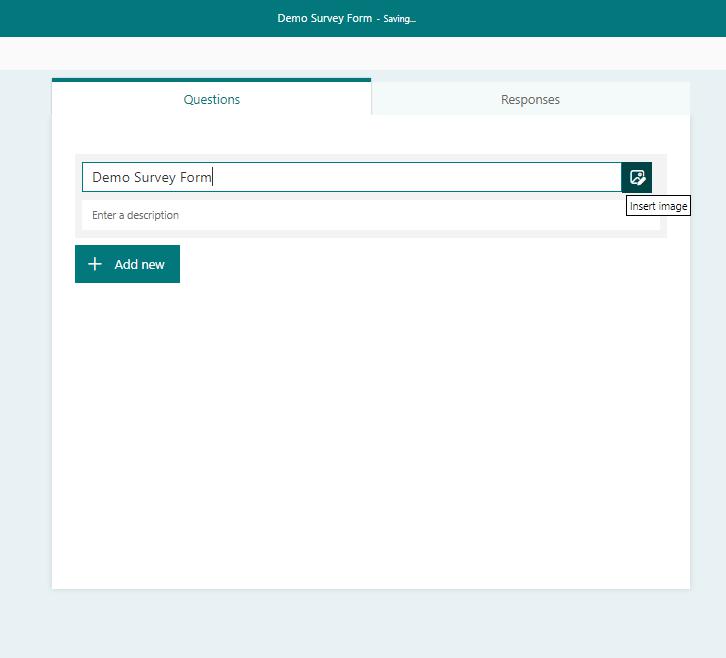
Now it’s time to give name and description to your “Untitled Form”
You can also add a picture to the form’s top by clicking the image icon on the right.
2. Select “Add new” if you want to add any question.
3. In the pop-up box, select the type of entry you wish to make from the options for your form. You have multiple choices for adding different question types or options on the survey form.
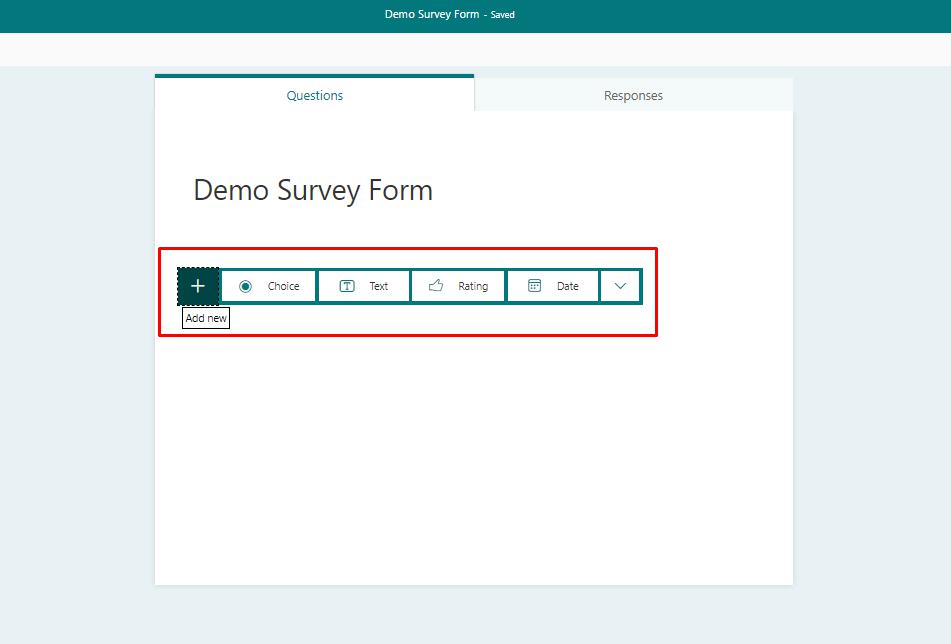
It might be a Choice button, a free-form fill-in-the-blank text entry, an entry in which the user must provide a star rating, a date input, or something else.
With the help of the “Choice” button you can add multiple-choice questions as well as many answers. You can also decide whether the person replying can give multiple-answers or not.
Using the “text” button a respondent can give an answer by typing or writing anything they want in the text box.
The form is ready with all the questions now, all you need is to check how it looks.
It’s now time to preview your form
4. To preview your form, you will see the “Preview” option on the toolbar at the top of the page on a computer or mobile device.
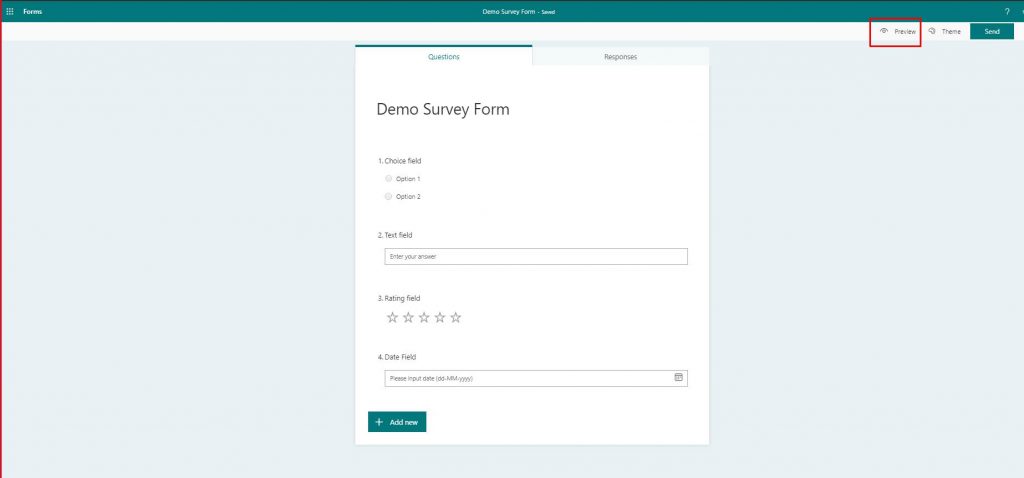
To test your form, fill out the questions in Preview mode and then click Submit.
Select Back to continue editing your form.
When and How to Use Microsoft Forms?
It is extremely simple to use Microsoft Forms: You can create forms (such as a poll or survey) or quizzes; the difference is that quizzes include right answers and can be scored. After you’ve created your form, you can share it with the appropriate audience and evaluate the real time results using Forms’ built-in analytics display.
The question of when to use Microsoft forms depends on its implications. Many organizations, corporations, and government agencies can utilize the Microsoft Forms service to gather data and communicate information with their staff and consumers. The following are some instances or options in which you might want to use the Microsoft Forms service.
- You may rapidly build a quiz and share it with anonymous people.
- Developing a small business order application
- Microsoft Forms may be used by teachers to assess their pupils on a certain topic.
- When you wish to integrate the survey, quiz, and registration forms on your website, blog, or Learning Management System.
- When you wish to personalize forms and link your forms app with other Microsoft services such as Microsoft Teams and Micros.
How to Share Microsoft Forms?
There are several alternatives for sharing your forms inside your company or with anybody outside of it. When your form is completed, you can tap on the ‘Share’ to view the link. The first method is to simply copy and paste this URL into your email. Anyone who clicks on it will be sent to a form where they may provide their response. Utilizing Microsoft Forms, the procedure of sharing your survey becomes super easy. You can choose whether the survey is exclusively accessible to your team members or to everyone who obtains the link. You may also cooperate on survey design by sharing survey templates. Due to this even they will be able to create similar forms when needed.
You can also share the form by generating a QR code – the respondent just needs to scan this QR code through mobile to use the forms. Other options for sharing are ’embed’ and ’email’. The ability to share your forms with other Microsoft products will be a favorite feature. Because it is so simple and easy to share. So it’s time to incline more towards form integrations and ways of doing it.
How to see Responses and Results?
Once the users have taken the survey, it’s now time for you to review the responses. The process of review is simpler and there is no much hassle. In your survey, there is a responses tab, click on that and it will open up to a dashboard.
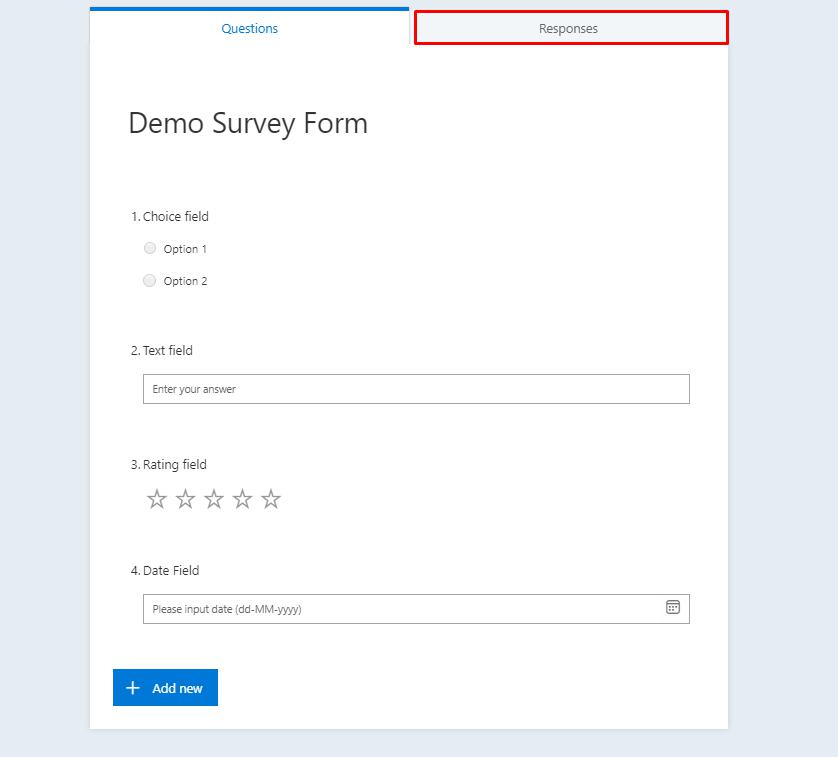
After clicking on the responses tab, you will find there analytics attached to the data which will visually tell you the response ratios. Just like the one shown in the image below. You can also export results to Excel for checking the responses.
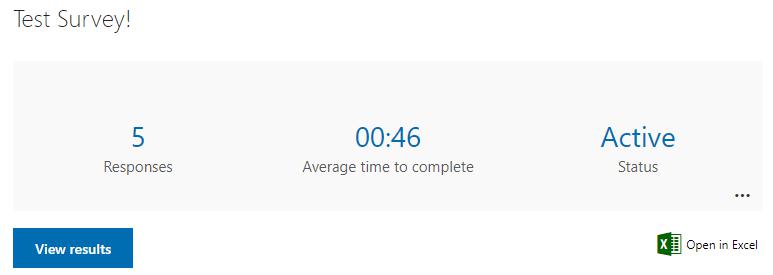
You can immediately learn a summary of all the responses like how many people have responded, the average time it takes a respondent to finish the form, and what are the maximum answers received and so on. It can be represented visually like with some charts or bar graphs. A pie chart and the amount of replies for each option are displayed for a multiple-choice question.
Integrating MS Forms with Power Automate and Power BI
MS Forms provides us with the easiest way to create a form which can be used for multiple purposes such as surveys, polls, feedback, and many more. We can also expand the functionalities of MS Forms by using it with other Office 365 apps like Power Automate, with which we can automate tedious day to day life tasks. For example, we can save the responses of MS Forms to a certain third-party database dynamically. We can also use MS Forms with Power BI to represent the responses of MS Forms in a custom visualization. You can gather survey data, and utilize Microsoft (MS) Forms, and then we use Power BI to show the findings, allowing for real-time changes as replies come in.
Objective
In this demo, we will integrate MS Forms with Power Automate and Power BI. We will be using a COVID Survey Form in this demo as displayed in the image below. For the survey, the form will be having following fields:
- Have you taken the first dose of the vaccine? (Boolean field)
- Have you taken a second dose of the vaccine? (Boolean field)
- Have you been tested for COVID-19? (Boolean field)
- If you have tested for COVID-19, have you tested positive? (Boolean field)
- When was the last time you were tested as COVID positive? (Date field)
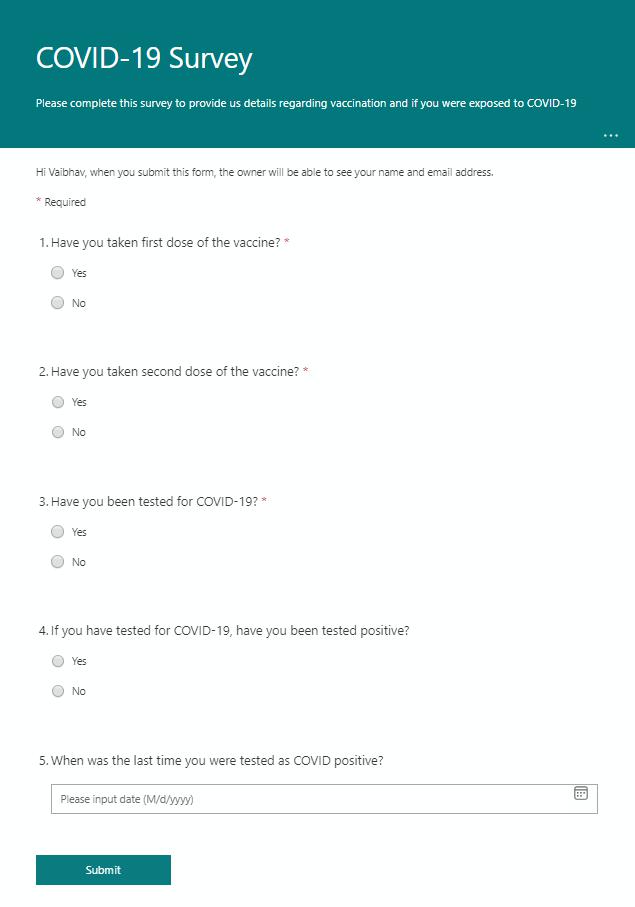
Using Power Automate, we will save the responses from this form to a SharePoint list, then we will transfer those values to a Power BI streaming dataset, using which we will generate a dynamic Power BI report
Integrating MS Forms with Power Automate
The only shortcoming of Microsoft forms is that it does not have many connectors. While Power BI has multiple other direct connectors. To overcome this issue, we can use Power Automate to automate the data import procedure into Power BI.
We’ll be demonstrating this with an example. This will help you utilize a steaming data set to import the data into Power BI. We’ll then retain a master record store of the data obtained via Forms in a SharePoint list. After that, we used Power BI Desktop to build the report by connecting to the streaming data set. Now for that, we would first need to see how to create a SharePoint list.
The first step to this is to ensure that the data collected is through Microsoft forms. Only then, we can go to the next section of aligning it with SharePoint. We will create a SharePoint list of survey data and then start with automatically streaming data. Let’s start with first creating a list on SharePoint.
- We will first create the COVID-19 Survey MS Form shown in the image above, and then get its response in a Power Automate flow.
- To store the response from MS Forms, we will use a SharePoint list. Login to your SharePoint site and then click on the gear icon on the upper right corner. Click on “Site Contents”.
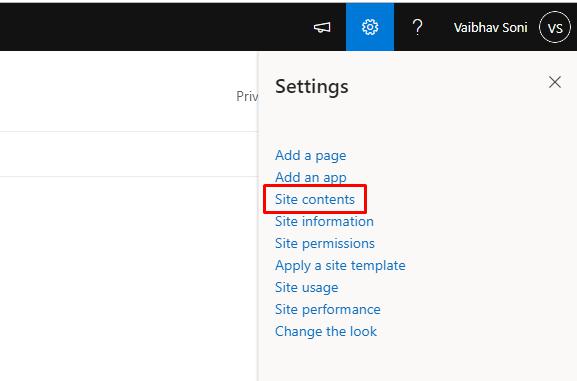
- In the Site Contents page, click on New 🡪 List.

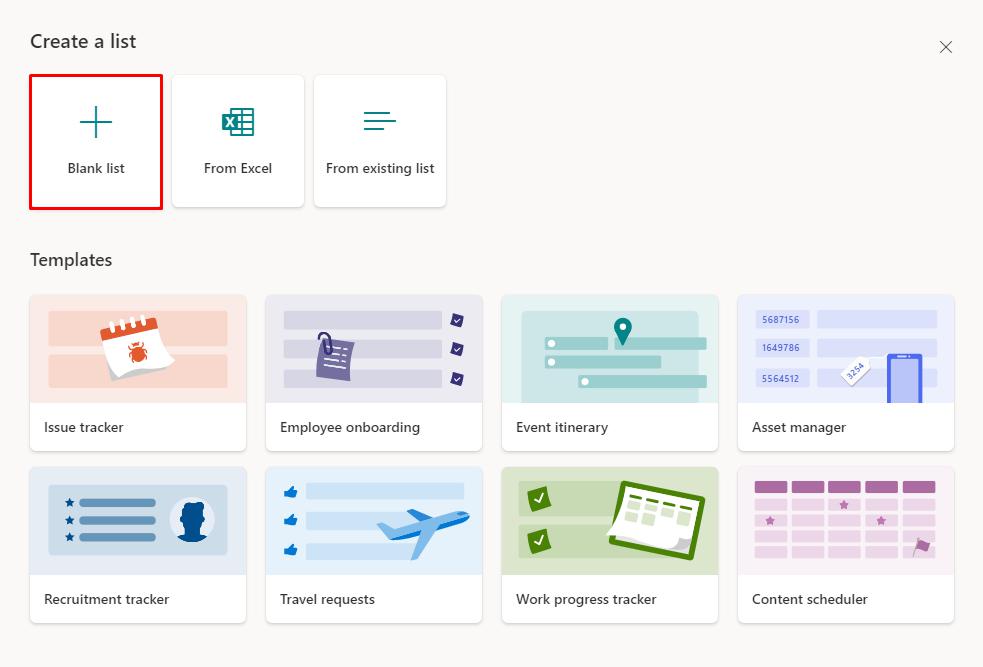
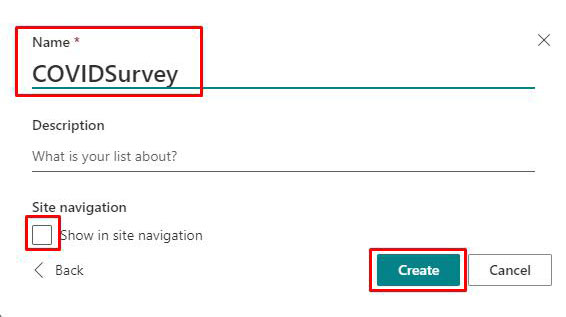
- Click on “Blank List”, and then we will give the name “COVIDSurvey” to the list. You can tick “Show in site navigation” if you want the list to be displayed on the SharePoint site navigation menu. Now, click on create and your SharePoint list is now created.
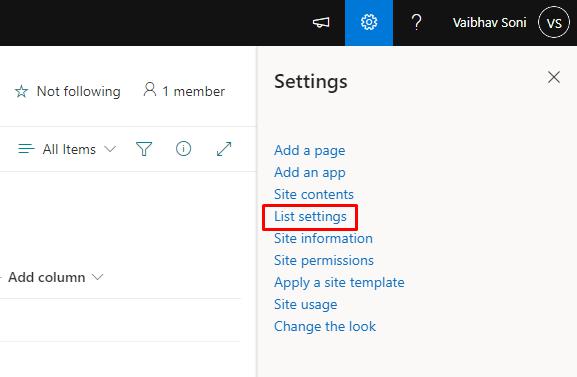
- Once you are on the list page, click on the gear icon, and then click on “List settings”.
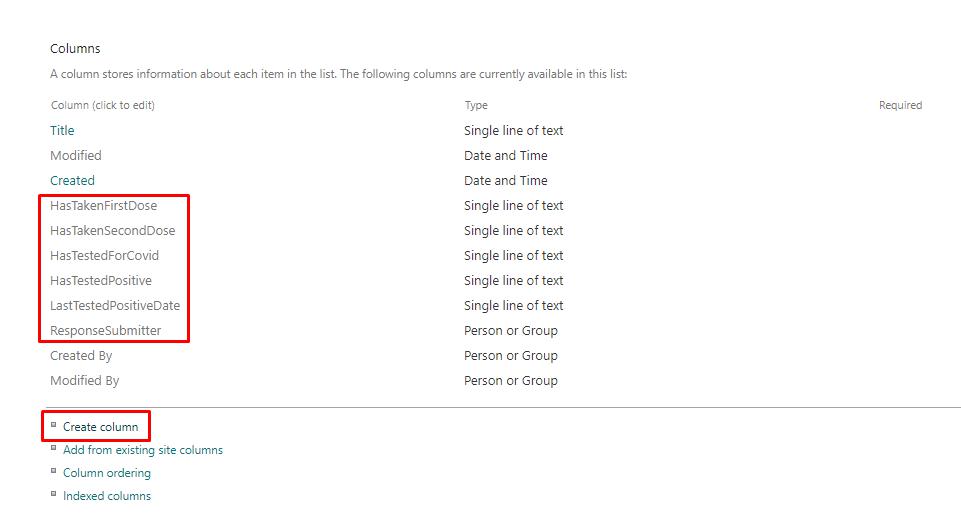
- On the list settings page, we will create columns corresponding to each field in the MS Form. Click on “Create Column” and enter the name of the column. Here we have kept the type of all columns as “single line of text” except the “ResponseSubmitter” column which is “Person or Group”.
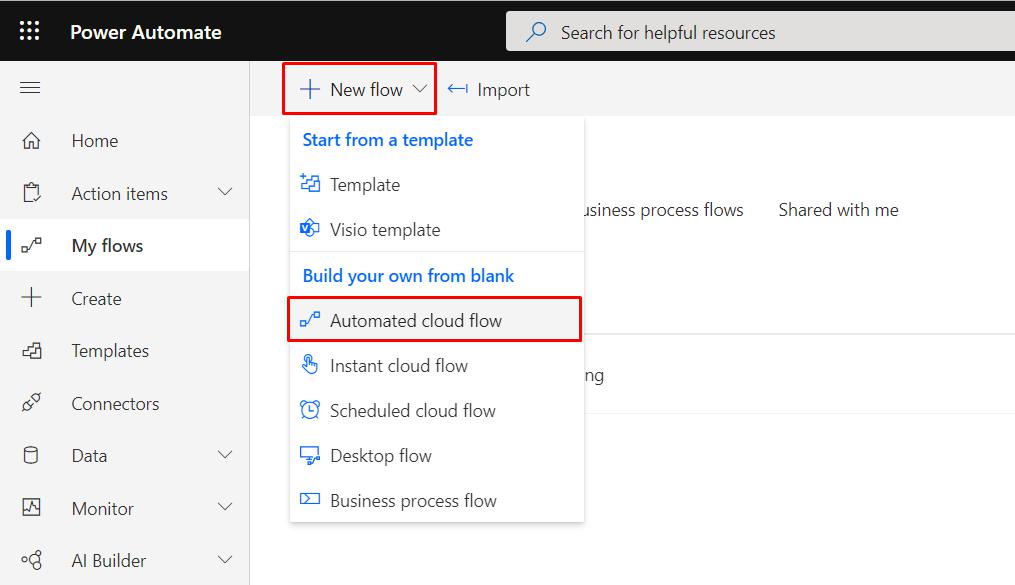
- Now that our SharePoint list has been created, we will proceed to create a Power Automate flow. Login to Microsoft Office 365 and open Power Automate. Click on “New flow” 🡪 “Automated cloud flow”.
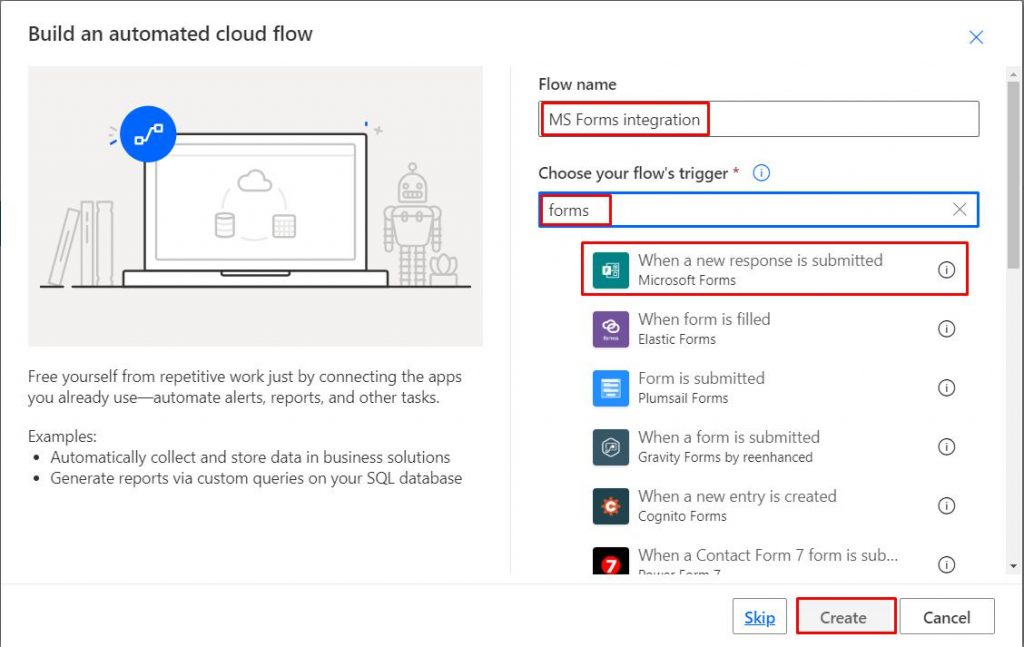
- Type the flow name, we have entered “MS Forms integration” as the flow name here. Now, in the “Choose your flow’s trigger” we will use the MS Forms trigger named “When a new response is submitted”. You can also type “forms” in the search bar and the trigger will be displayed.
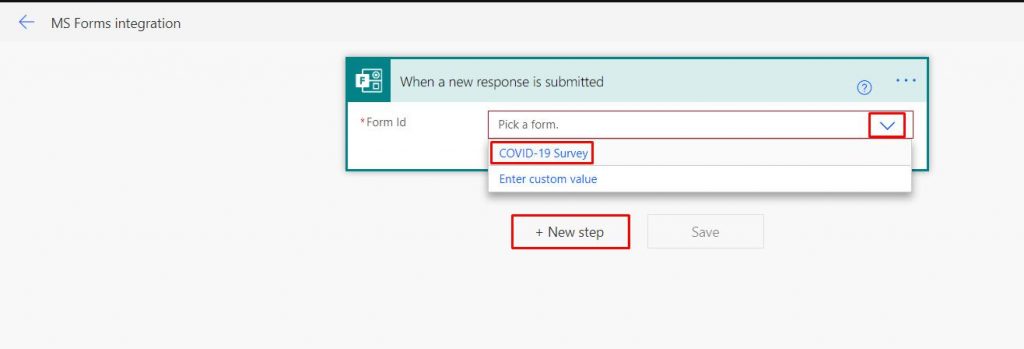
- This will create a Power Automate flow with the name “MS Forms integration” and you will be redirected to the flow screen. Select the Form Id by clicking on the dropdown arrow button, and then select the MS Form we recently created. Once you have selected the form, click on the “New step” button displayed below.
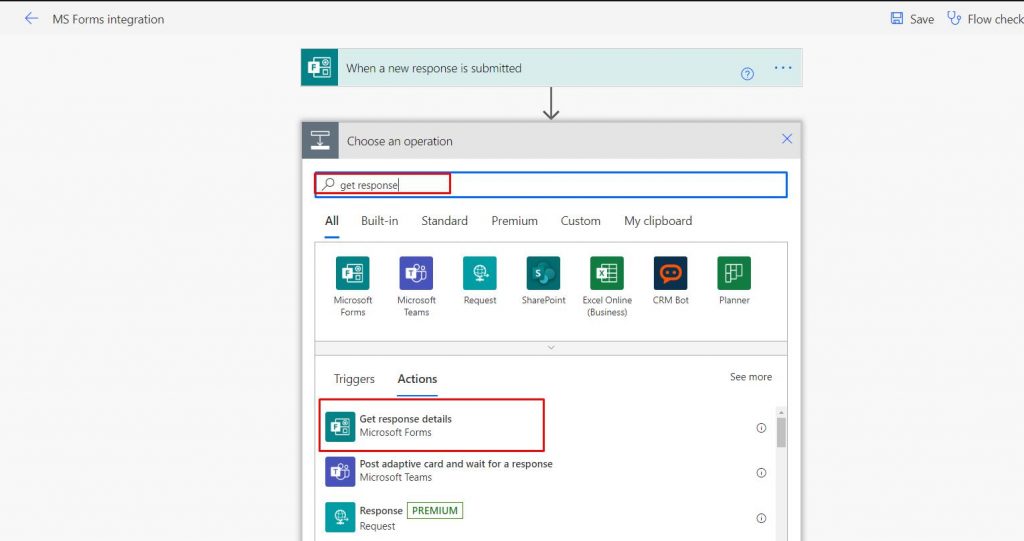
- We will now fetch the response details of the selected form, for that we will use the “Get response details” action. Type in the action name in the “Choose an operation” section and select the action.
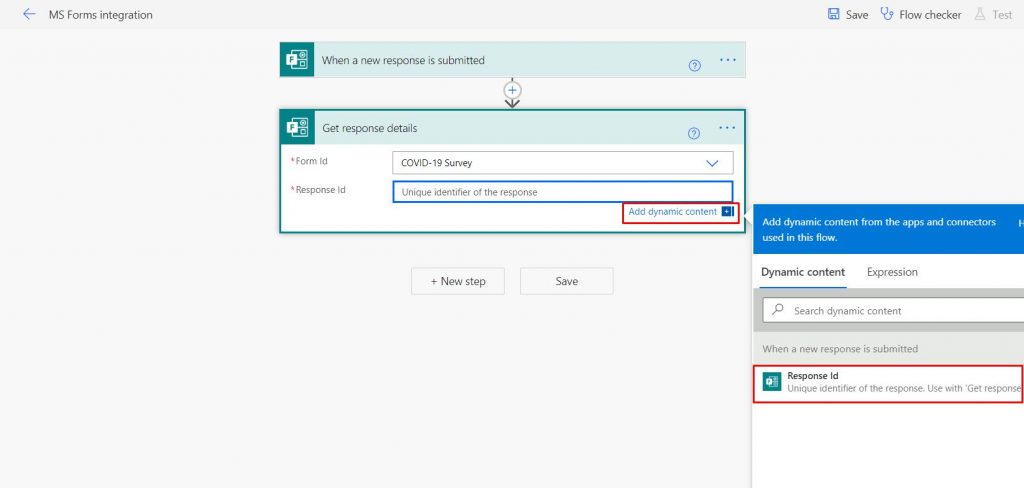
- Select “COVID-19 Survey” in the Form Id field and for entering the Response Id, click on “Add dynamic content” displayed below the field which will open the dynamic content panel, and then select the “Response Id”.
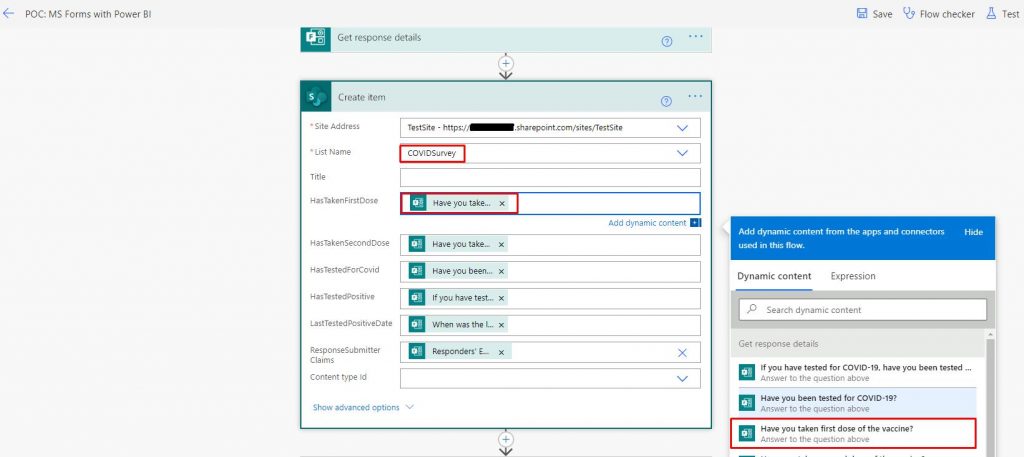
- Now, we will use the above created “COVIDSurvey” SharePoint list to store the responses via Power Automate. For that, we will use the “Create item” action which we will add following the same steps mentioned for “Get response details” action. Select the SharePoint site URL in which the SharePoint list is located and the list name.
- As soon as we select the list name, all its corresponding fields will be displayed in the action. Select the appropriate dynamic content from the “Get response details” action for each column as shown in the image below.
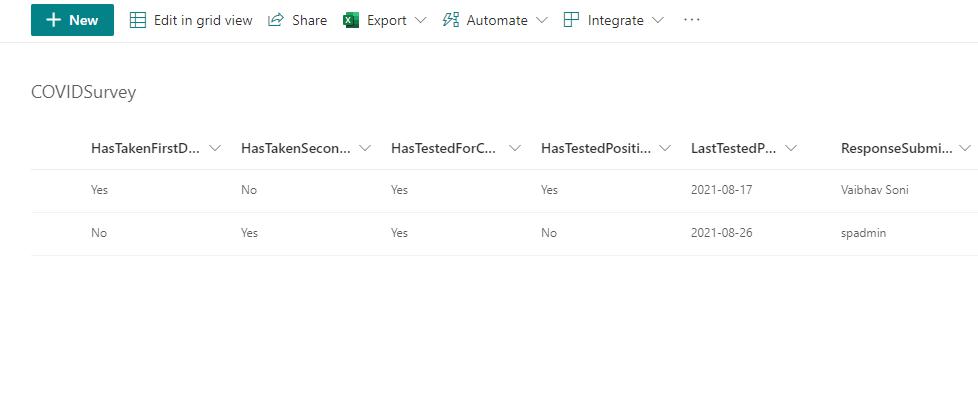
- Now save the Power Automate flow, and then you will notice an entry in the SharePoint list as soon as a new MS Form response is submitted.
Integrating MS Forms with Power BI
Other ways of doing it is through Power BI, in the next section, let us explore how we can use Microsoft forms along with Power BI. You can gather survey data, and utilize Microsoft (MS) Forms, and then we use Power BI to show the findings, allowing for real-time changes as replies come in.
Power BI has a plethora of direct connections, while MS Forms does not. So, to overcome this shortcoming, we have introduced Power BI software in the development plans.
Power BI is a powerful tool for creating visually stunning reports and visualizations from a variety of data sources. For data analysis and reporting, you may import your Microsoft Form data into Power BI. On the web and through mobile devices, you may exchange reports with power users.
- We are now going to integrate MS forms with Power BI. For this, we will be using the same “COVID-19 Survey” form that we used for integration with Power Automate.
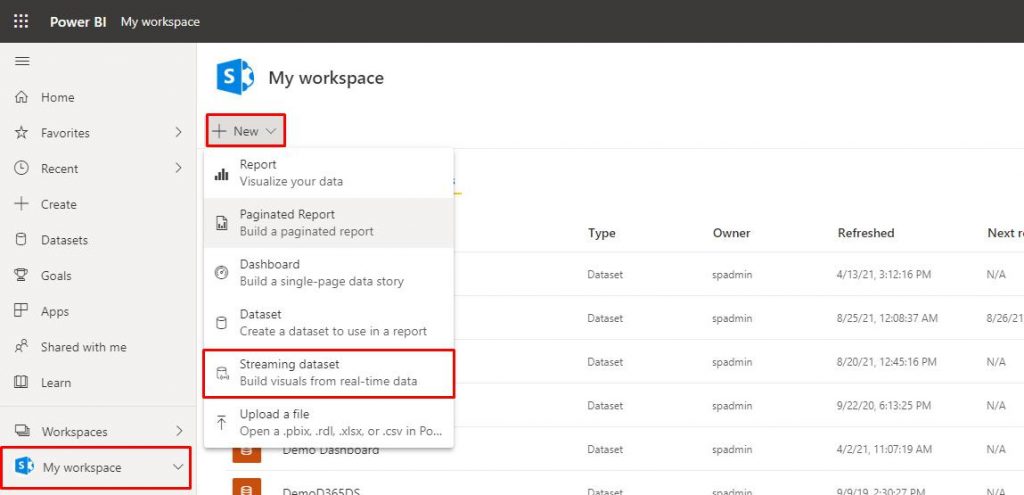
- We are first going to create a streaming dataset in Power BI. For that, head on to Power BI and select any workspace of your preference. Here, we have selected “My Workspace”.
- Click on “New” 🡪 “Streaming dataset”.
- In the left panel, select “API” and click on next.
- We will keep the name of the dataset as “COVID Survey Demo” and in the “values from stream” section, we are going to enter the fields that are to be stored from MS Forms to the dataset. Here, we have entered the 6 fields that are being used in MS Forms.
- Set “Historic data analysis” as on, and then click on the create button.
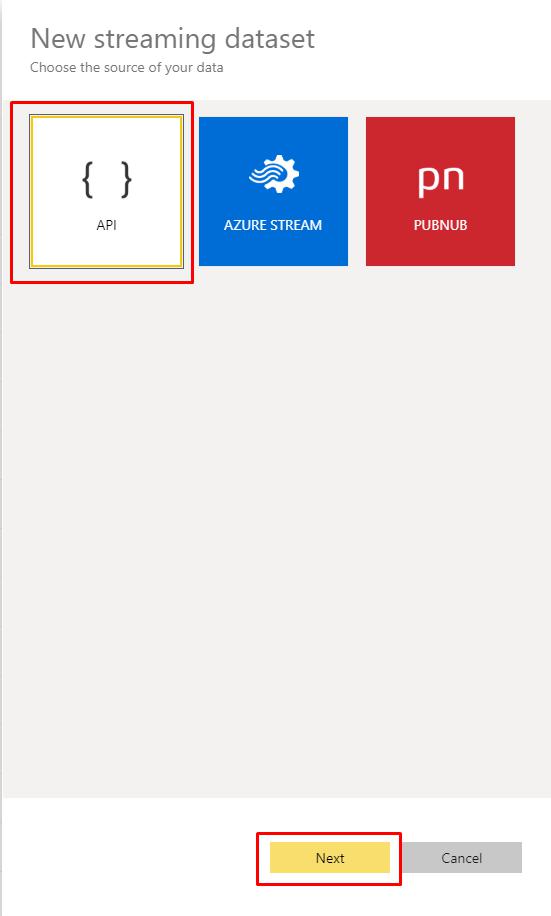
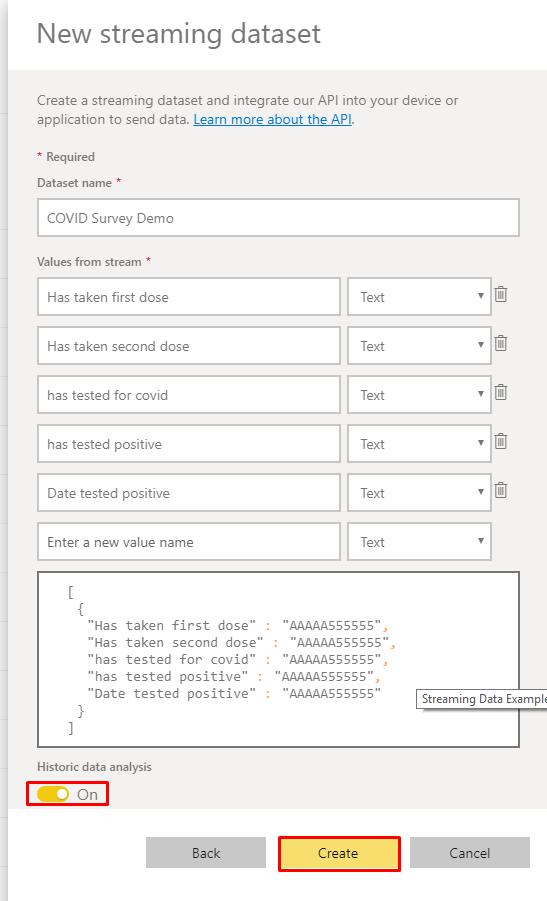
- This will create a new dataset with the name “COVID Survey Demo”.
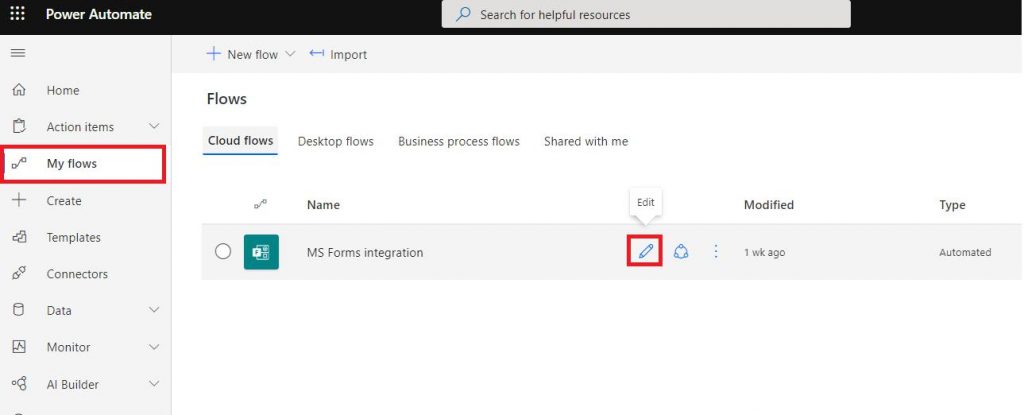
- We are now going to make changes to the existing Power Automate flow we created above. For that, head on to the Power Automate page and under “My flows”, hover on the “MS Forms integration” flow and click on the edit button.
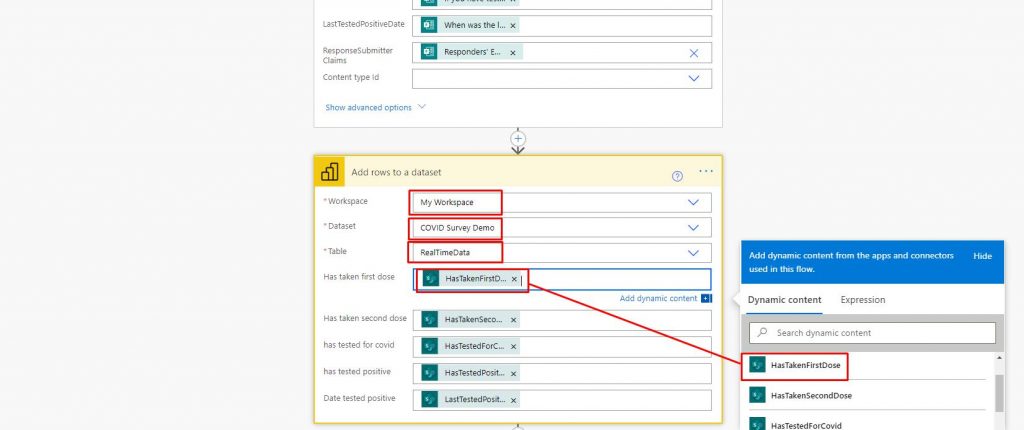
- Now add a new step to the flow and we are going to add an action named “Add rows to a dataset”. Select the Workspace in which the dataset has been created and select the dataset from the dropdown. Keep table as “RealTimeData”.
- Once we select the dataset, all it’s corresponding fields will be displayed in the action. We will select the dynamic content from the “create item” action in the flow.
- Now, whenever a new response will be submitted in MS Forms, an entry will be made in the dataset as well.
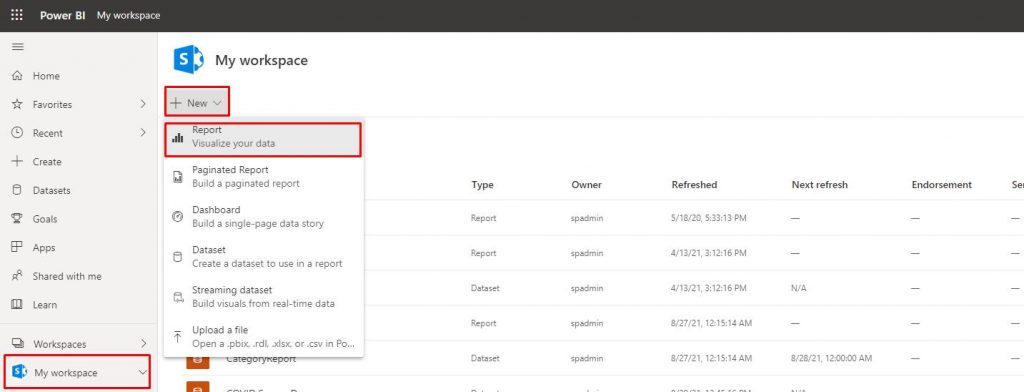
- Our Power Automate flow is completed here. Now we will proceed to create a Power BI report from the dataset. For that, navigate to Power BI and go to “My workspace”. Click on “New” 🡪 “Report”.
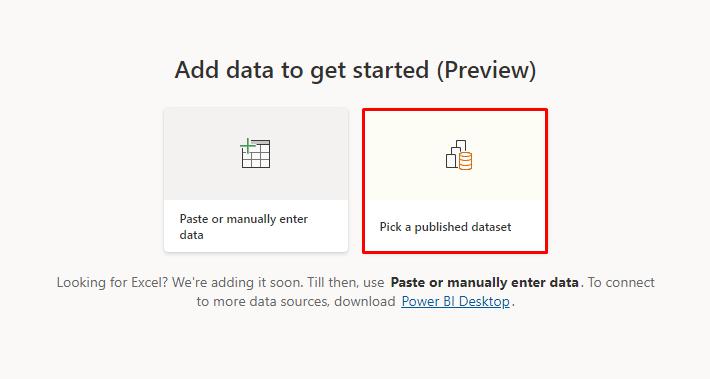
- You will be redirected to a new page. Select “Pick a published dataset” from the two options.
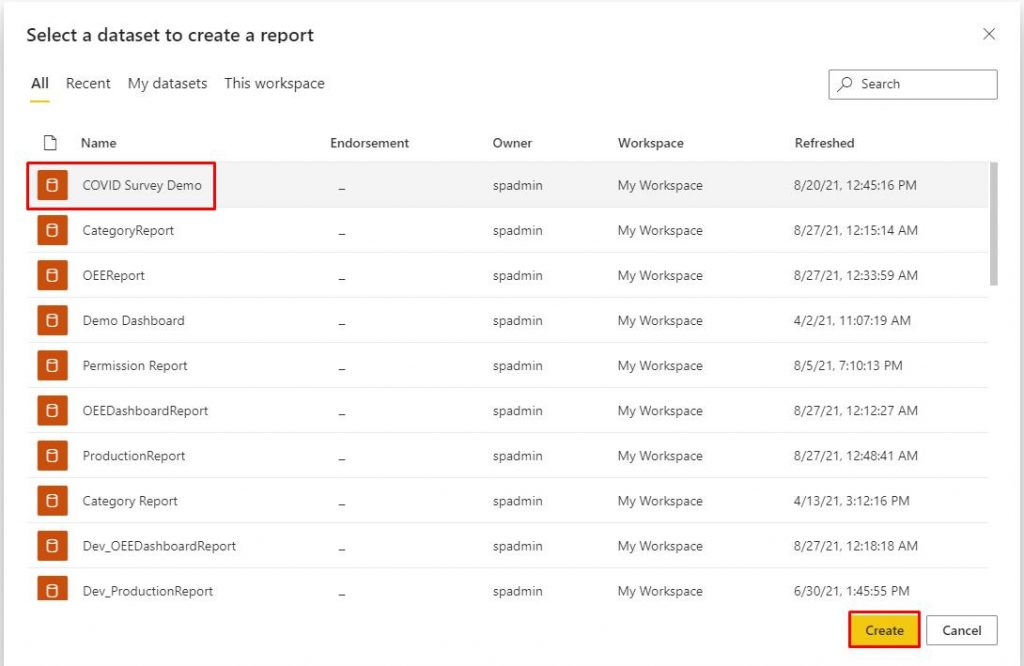
- A panel will be opened asking to select a dataset for the report. Select the “COVID Survey Demo” dataset which we created earlier and click on create button.
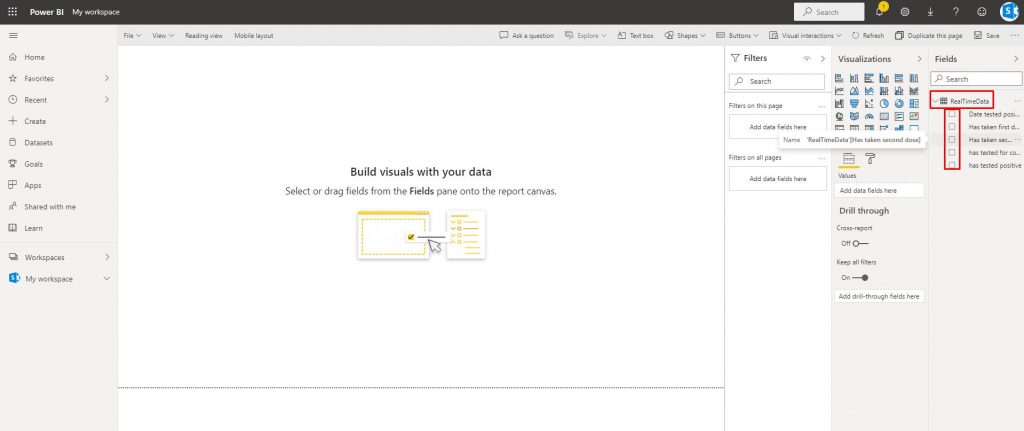
- You will now be redirected to the development area for the Power BI report. Check all the fields from the right panel as shown in the image below.
- Once all the fields are checked, you will be able to see the data in tabular format. Expand the report as shown in the image below to accommodate all the fields into the area.
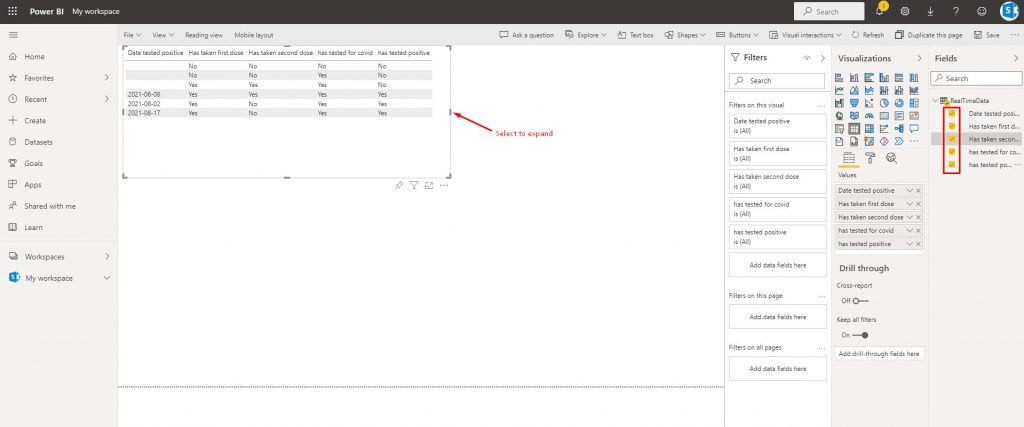
- Now use the Ctrl+S keyboard shortcut to save the Power BI report and type the name of the report as per your preference and click on save.
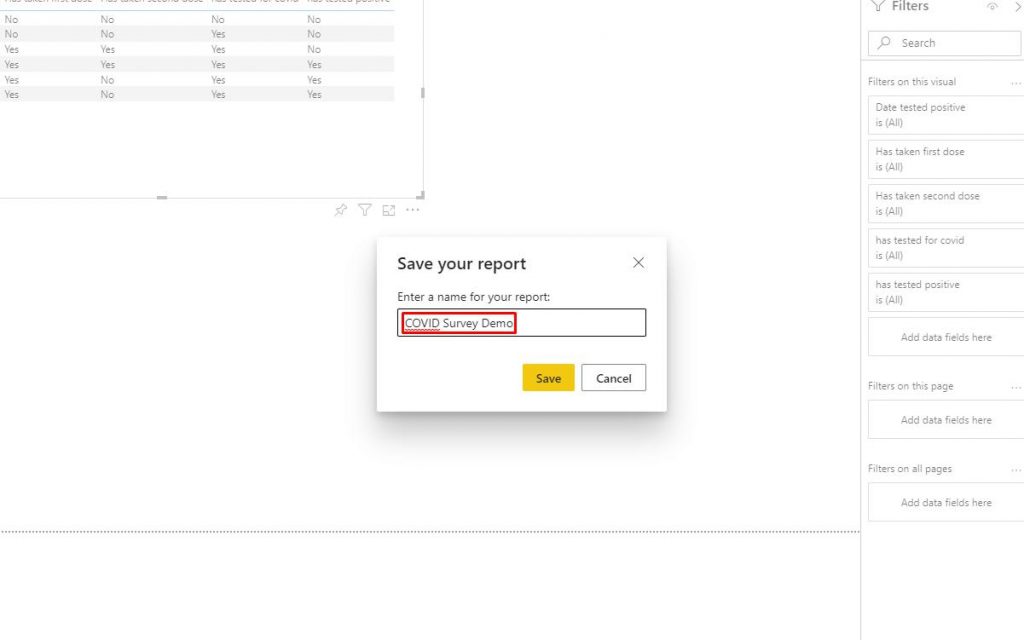
- Our Power BI report has now been saved. As soon as a new response is submitted via MS Forms, the report will automatically be updated, and the data will be reflected on the report.
Integrating MS forms with One Drive
The integration of MS forms with One drive and integration of SharePoint with MS forms is almost the same. The ideal approach includes the elimination of the requirement for humans. Thus, this means forming a trigger will automate the form generation from OneDrive instead of the home page. Let’s see how we can do this.
We will utilize OneDrive for this solution. However as mentioned within a SharePoint group the same procedures also may be implemented. For example, in Onedrive, you will first construct the form in files folder in OneDrive for a company browser account then find that account. The best approach to find OneDrive folder online and browse it to my Explorer OneDrive folder. Now click the OneDrive folder and choose the Online view. Later, the whole procedure is the same as we did in SharePoint.
Microsoft forms recently released a new version called Microsoft Forms Pro (Dynamics 365 Customer Voice) which allows us to set up workflow automation and integrate it with Dynamics 365 as well.
Advantages of Microsoft Forms
There are many benefits of Microsoft Forms that were designed with keeping the educators/trainers and students in mind. But it also has a wide range of uses for people and businesses.
- You may create a poll, quiz and survey to gauge your colleagues preferences or to collect structured input of teams on collaborative initiatives and activities.
- Use images and video in your polls and quizzes and create different questions based on the content of those visual components.
- The other segmented questions can be used to customize a form based on how a user responds to the first array of questions. Then they can modify it creatively and can be used to create their own style of story.
- Forms may be used to construct math tests with mathematical symbols.
- It’s simple to distribute polls and quizzes, and you may restrict access to people co-workers in your organization (if you work or go to school) or make it available to everyone with a link to the form.
- You may distribute polls and quizzes in whatever manner that works best for your audience, such as links in emails or through QR code that can be scanned with a mobile phone.
Conclusion
In a nutshell, this entire blog on Microsoft forms has taken us through the exact definition of Microsoft forms, ways to create Microsoft forms, how to share and integrate platforms with other users. The demand for forms is continuously increasing as it offers multiple benefits to businesses. If we go by analysis for the next few years there is no downfall and hence companies should not think twice before taking up Microsoft forms. It is a simple, easy to use and initiative application that will always be favorable in the long-run. So, take the best opportunity up and utilize it for your business.
We have also covered the features of Microsoft forms in another article here.

Shital Patel
Shital Patel is VP at TatvaSoft with a high-level of proficiency and technical precision in SharePoint Development. His experience of the last two decades has helped businesses to solve complex challenges resulting in growth and performance of Startups to Fortune 500 companies.
Subscribe to our Newsletter
Signup for our newsletter and join 2700+ global business executives and technology experts to receive handpicked industry insights and latest news
Build your Team
Want to Hire Skilled Developers?




Comments
Leave a message...