Related Blogs

In the previous blog, we have discussed how to use Nintex Workflow and how it can prove beneficial for users to automate daily tasks with ease and convenience. In this blog, we will take a deeper look at different Nintex Forms. Whenever you are designing a digital form for your business your business, you want it to be fast and easy to use and functionally rich in user interface and layout.
This becomes possible with the help of Nintex Forms. It provides a wide range of designing options, advanced functions, better data control, the ability to store signatures, geolocation and much more to come.
1. What are Nintex Forms?
Nintex provides a robust platform for building forms with a wide range of options. There is a broad array of features it offers to businesses such as:
- Barcode scanner
- Signature
- Geolocation
- Conditions
- Themes
- Responsive Design
With these features, users have a wide range of options for building their forms for Office 365. Compared to Forms provided in SharePoint Online, SharePoint Developers can make a lot of changes using Nintex forms. For e.g., Users can change the theme of the forms and also add functionalities like dropdown cascading, custom validations, regular expression validations, etc.
2. Types of Designing a Nintex Form
Currently, there are two options for designing a Nintex form:
- Responsive Designer
- Classic Designer
2.1 Responsive Designer
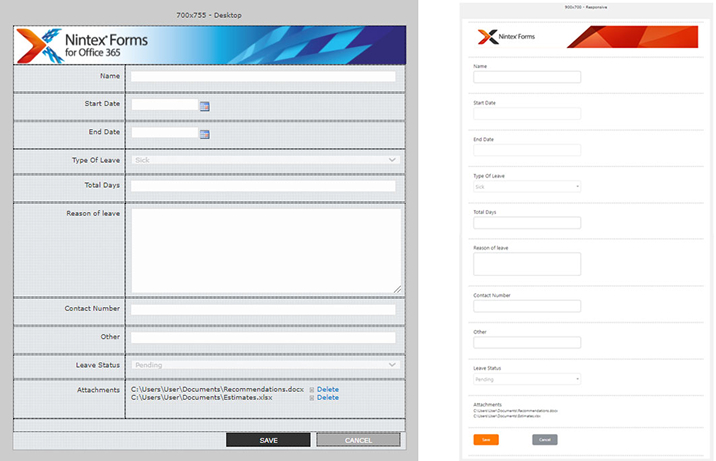
The Responsive Designer is an updated version of the classic designer which is used more widely compared to the classic designer for Nintex forms. It allows us to create responsive Nintex forms with the design experience being responsive as well. With the Responsive Designer, users can just drag-and-drop controls to change the single-column layout to a multi-column layout.
Also, New Rows are automatically created when the user adds a new control to the canvas. We can resize the control easily with the buttons to resize on each control.
The Responsive Design also provides a new theme feature where we can easily change the colors and fonts, without the need for CSS.
The Rules Pane has also changed considerably in the new Responsive Design. We will see the changes for the same in the later stages of the blog.
Although Responsive Design has some great features and advantages, there are times when we can still prefer the Classic Designer for designing Nintex forms. The Responsive Designer doesn’t support custom CSS or JavaScript. Hence we can use classic designer for custom CSS and JavaScript.
2.2 Classic Designer
The classic designer enables you to create a customized form in the environment of SharePoint technology without making much effort. The classic form designers enable the businesses to create a pixel-perfect form with the use of different layouts that controls the look of the form and sees to it how the form will appear in each form.
When it comes to configuring controls on the designer canvas, the classic designer creates the form by adding, moving, and grouping all the controls. Besides, the classic form designer comes with a simple layout that enables the user to enter the fields and save the form after attaching the required files.
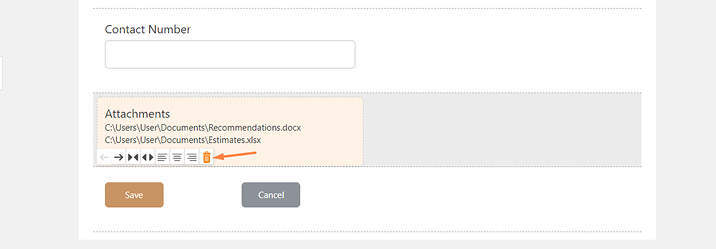
Unlike responsive designers, there is no delete button for the attachments in the classic form designer. This means that once any document is attached to the form, it cannot be deleted, all you can do is cancel the entire form and enter everything again if you have attached a wrong file.
Besides, when the user wants to work with custom CSS or JavaScript, the classic form designer is the best option as this is something that responsive designer fails at providing.
Here is how the Nintex form will look like in Classic Designer and the Responsive Designer:
3. How to Create a Leave Application Form Using Nintex Forms?
To demonstrate the Nintex Forms, we have prepared a Leave Application Form which a user can fill in an organization for leave approval. We will also prepare a single-stage approval workflow for the same using Nintex Workflow for Office 365.
This is how our Form will look like after we have prepared it using Nintex forms:

And this is how our workflow will look like:
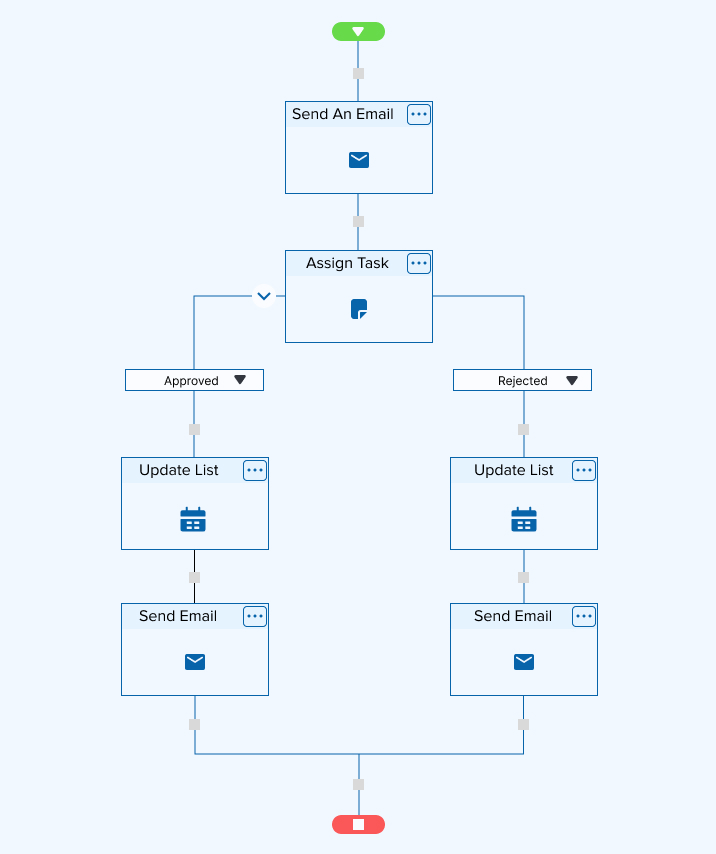
Here, we will be focusing more on creating the Nintex Forms for Office 365, you can check out the steps for creating a workflow automation software from our previous blog.
4. Steps for Creating the Nintex Forms in Office 365
- Add Nintex Office 365 to your Office 365 account. You will be able to get this application from the Microsoft Store.
- Login to the SharePoint online site and create a SharePoint list. We need to add Nintex forms to SharePoint Online sites to customize list or library. Here, We have created a Leave Application List from the SharePoint list with the following columns: Name, Start Date, End Date, Type of Leave, Other Type of Leave, Total Days, Reason of Leave, Contact Number, Leave Status.
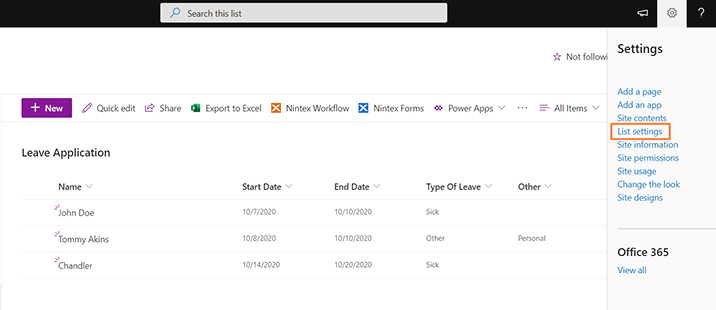
- As you can see, there is a “Nintex Forms” option in the command bar.

- We will need to hide the Leave Status column from the form. So that the users cannot change the leave status from the form. For that go to list settings from the settings option.
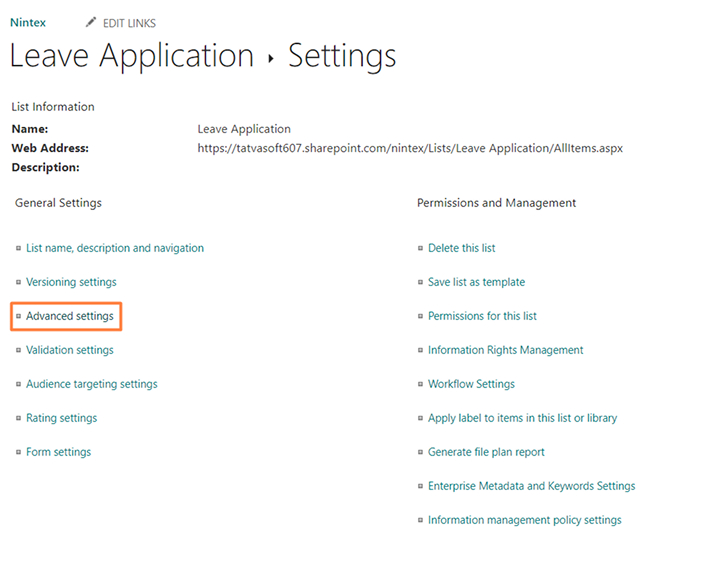
- Then, click on advanced settings. Now you will see the first setting “Allow Management of content types?”, select “Yes” for that.
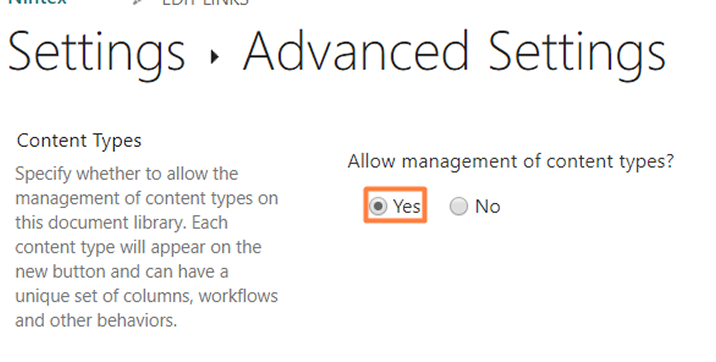
- You can now see the content type section in list settings as shown in the image below. Click on the item content type now.

- You will now be able to see all the columns. If you want to hide some columns then you can click on the hide option of the form and select the ‘hidden option’.
- Note that a new column “Leave Approval” is created when we create the Nintex Workflow, we’ll need to hide that column as well with the same steps used for hiding the “Leave Status” Column.

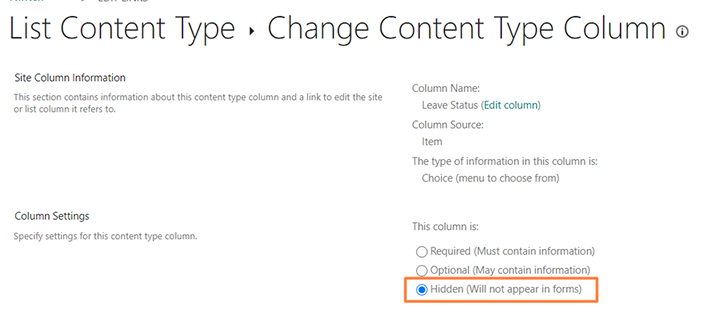
- Now that we have set up the list let’s start the designing of the Nintex Forms. Click on the “Nintex Forms” option now.

- Now, The Nintex Forms Designer will open up as shown in the image below. Click on the “Responsive Designer” option in Forms Designer.

- Clicking on the “Responsive Designer” option will open up the designer for us as shown in the image below:
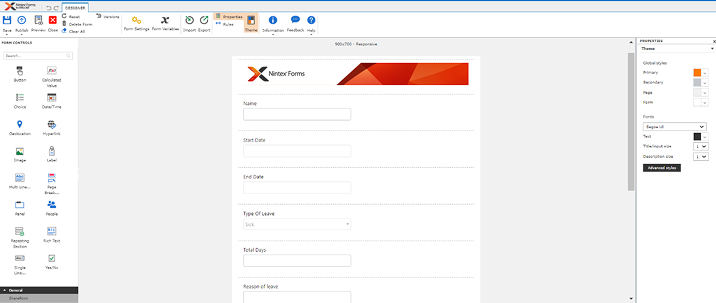
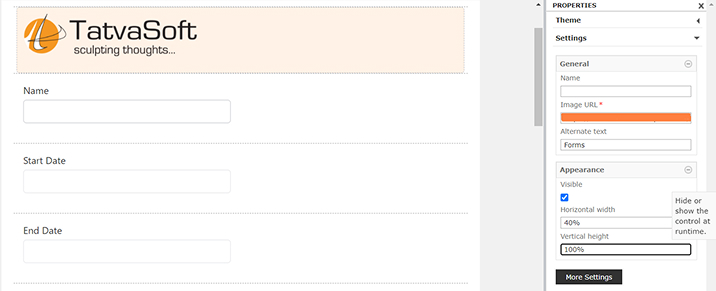
- Now, let’s start designing our form. As you can see there is a Nintex Forms image at the top of the form. We can change this image as per our preference. To do that click on the image and change the Image URL from settings, we can store the image in any part of our SharePoint Online site, here we have stored it in the “Site Assets” part of Site contents and provided the URL of the same.
- Users can change the dimensions of the image from the appearance section.

- When creating a Nintex Form, there will be an attachment field by default at the end of the form, to remove that field, hover on the field and click on the delete button of that field.
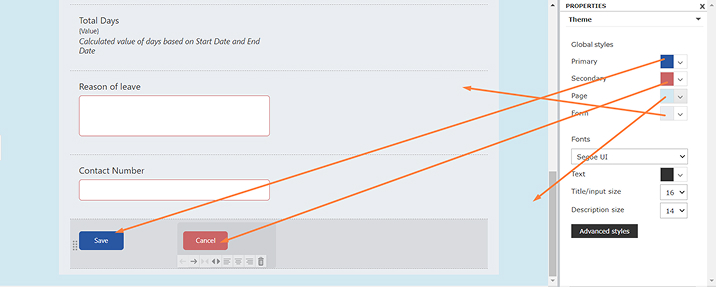
- Now let’s change the look of our Nintex form, from the designer tab in the top navigation, select the Theme option and change the color of the form, background, button, etc. Here is the image demonstrating the theme options and where they apply to.
- Now that we have made changes to the design of the Nintex form, let’s make some changes in the form’s functionality. First, we want the “Total Days” column to be a calculated value based on the “Start Date” and “End Date” provided by the user.
- To do that first, delete the Total Days field which is being displayed by default. Then add “Calculated Value” Form Control from the Form Controls Panel and go to more settings for the control.
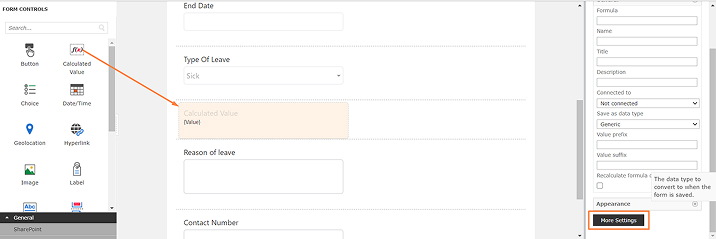
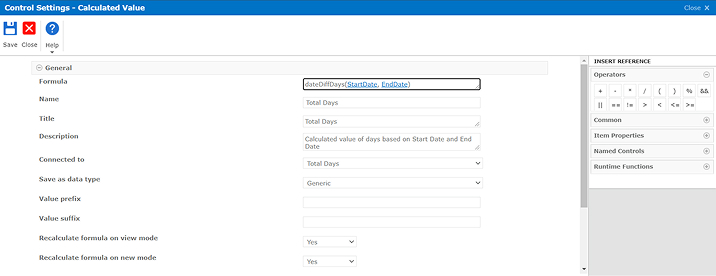
- In the Formula, you can insert references from the right panel of the window.
- Here, we have selected the “dateDiffDays()” Function from the “Runtime Functions Section”. Now, insert “StartDate” and “EndDate” from the Named Controls Section.
- The function dateDiffDays will calculate days between two provided Dates.
- Enter the Name, Title and Description of your preference. In the Connected to part, we have to select the SharePoint Column that this control would be connected to. Here we have selected Total Days for the same. Now, click on the Save button.
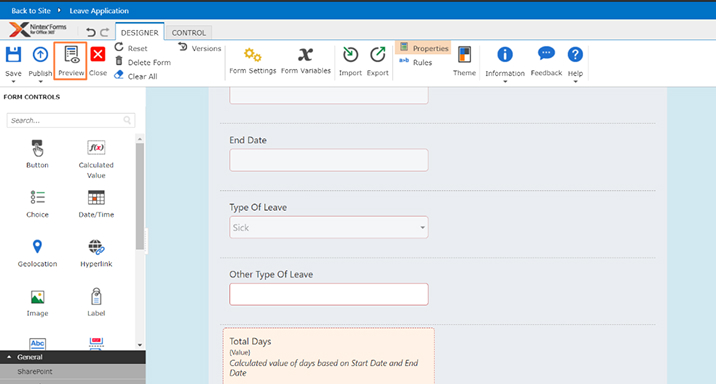
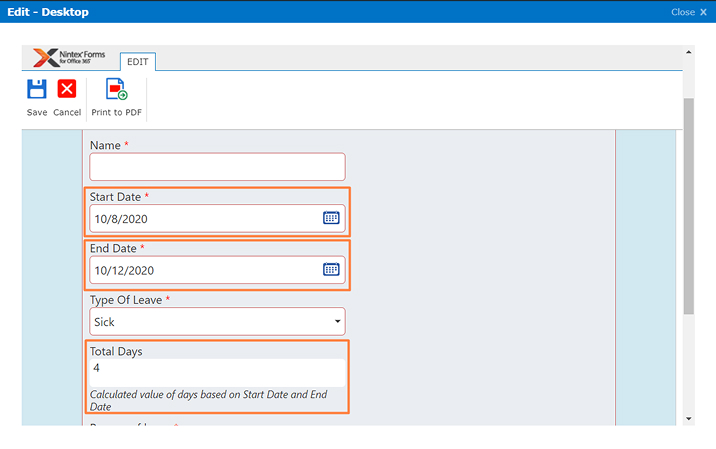
- Now, let us preview the form to check if the given functionality is working as expected or not.
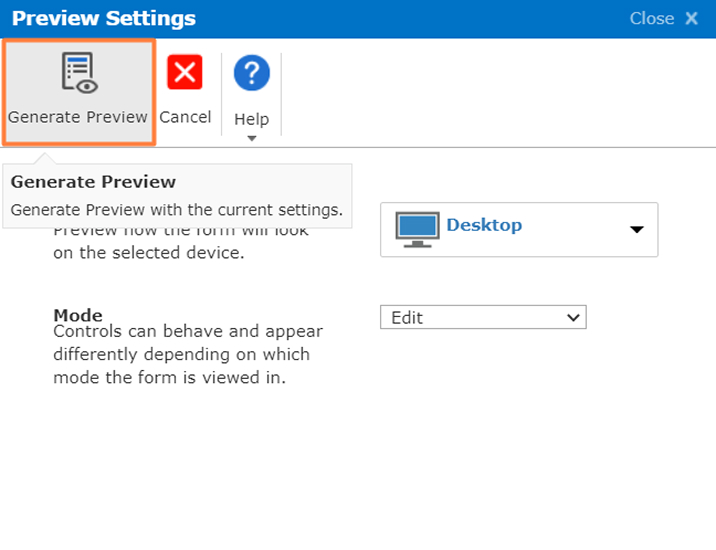
- To do that, click on “preview” from the top navigation. Here, we can select the device like Desktop, Tablet or mobile smartphone to check for responsiveness.
- Select any mode from edit, new or display.
- Then, click on Generate preview and then we can test the working of our functionalities in the preview.
- We have populated the Dropdown Type of Leave with the following values shown in the image below:

- Now, when the user selects the Other value in the dropdown, we want to display the textbox field “Other Type of Leave” to specify the Other value. This field will enable you to see the drop-down list named “Type of leave” with the value “Others”.
- To do that, we will need to add a Rule so that the control will stay hidden when the dropdown value is not equal to “Other”. For that select the control and then click on the “Add Rule” button from the top navigation. Using Rules, we can Disable, Hide or Invalidate any control.
- Now, we have added a condition that when “TypeOfLeave” is not equal to “Other”, this field will stay Hidden as shown in the image below.

- Now, let’s preview the Nintex form and check if this functionality is working as expected.


- As you can see, when “Type of Leave” has any value other than “Other”, the “Other Type of Leave” Field will stay hidden. But when “Type of Leave” has the value “Other”, the “Other Type of Leave” Field will be visible to the user.
- Here we have set the required field validation while creating the list itself from SharePoint list. We can also add required field validation through Nintex Form.
- Let’s demonstrate it by adding the required field validation in the “Contact Number” control. Add a rule to the “Contact Number” control.
- We have set the Rule name as Required Field. To check whether the field contains any value, we have used the function “isNullOrEmpty”. Thus, this is how we can add a required field validation.

- There is one more validation that is necessary: The start date should not be greater than the end date as it would make no sense in the real world.
- To add that validation, add a rule in End Date control to check whether the End Date is less than the Start Date.

- Now, let’s preview our Nintex form and check. As you can see, when a user enters End Date less than the Start Date, he/she will receive a validation error stating that “End Date must be greater than or equal to Start Date”.

- After this, Save the form and Click on Publish button from the ribbon.
5. Conclusion
With the help of this blog, we have understood how to use Nintex Forms to build any form easily. Also, we get to know how using Nintex Forms is so simplified with its rich user-friendly interface compared to the standard SharePoint Online form. Users can build many other forms for their business without any need for programming knowledge. With many other features released regularly, Nintex Forms is improvising day after day and it sure holds a bright future ahead.

Shital Patel
Shital Patel is VP at TatvaSoft with a high-level of proficiency and technical precision in SharePoint Development. His experience of the last two decades has helped businesses to solve complex challenges resulting in growth and performance of Startups to Fortune 500 companies.
Subscribe to our Newsletter
Signup for our newsletter and join 2700+ global business executives and technology experts to receive handpicked industry insights and latest news
Build your Team
Want to Hire Skilled Developers?


Comments
Leave a message...