Related Blogs
Table of Content

In today’s world, Workflow Automation has become useful to complete any range of tasks with ease and convenience. Workflows can be used to automate automate business processes that consist of Approvals, Notifications, Status Updates, etc. which are highly repetitive and manual tasks. Nintex is among many tools used to create and run workflows. But what makes Nintex special is its user-friendly interface and visualization when compared to other tools such as SharePoint Designer. It also provides many functionalities such as LDAP, web service, SQL Queries, etc. during the execution of the workflow. It provides Drag-and-Drop actions to make it easy to automate the most sophisticated processes easily.
1. What is Nintex Workflow?
Nintex is a platform that consists of tools for Process Management, Workflow Automation, Robotic Process Automation, Document Automation and eSignature. Using Nintex, we can easily manage, improvise, and automate business processes quickly in any industry. It also comes with an advanced form builder that can contain complex logic and helps in creating Nintex forms.
Nintex targets both business and professional developers. It facilitates clients to create workflows without much technical or coding proficiency.
Nintex provides 3 types of Workflow automation tools:
- Nintex Workflow Cloud
- Nintex For SharePoint
- Nintex Office 365
Here, our SharePoint Development team will be focusing more on Nintex for Office 365.
2. What is Nintex Workflow Cloud?
The simplest version of Nintex Office 365 is Nintex Workflow Cloud. Users can simply draw out their processes and drag and drop the required actions. It was released in the year 2016, so it is the latest version of Nintex Workflow. Even then, it is getting power and better every day. Also, it is very easy to use and users do not need prior system knowledge or programming skills to create a workflow. Nintex Workflow Cloud is not installed in the SharePoint environment as it is cloud-based.
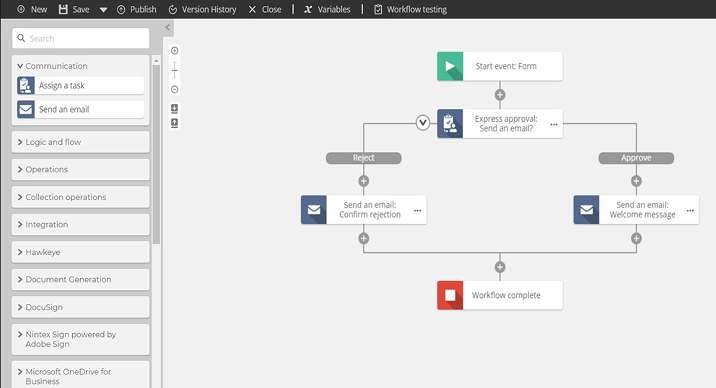
- Nintex Workflow Cloud Dashboard

- Nintex Workflow Cloud Designer
3. What is Nintex for SharePoint?
Nintex For SharePoint is made for On-premises versions of SharePoint. There is also a difference between the actions for Nintex for SharePoint On-Prem vs Office 365. Nintex workflow For SharePoint consists of the following different products:
- Nintex For SharePoint 2019
- Nintex For SharePoint 2016
- Nintex For SharePoint 2013
- Nintex Hawkeye
- Nintex App Studio
- Nintex Workflow for Project Server 2013
This version of Nintex also consists of Workflow Reporting which doesn’t exist in the office 365 version and also it is more matured compared to office 365. Although Nintex For SharePoint only works for On-Premise versions of SharePoint, you cannot deploy it in SharePoint online. New features and updates don’t occur very often on Nintex Workflow For SharePoint. So, it sometimes lacks behind office 365 for workflow performance.
4. What is Nintex for Office 365?
This version of Nintex Workflow is widely used and that is for a reason. We can create workflows for SharePoint online using Nintex for Office 365. It consists of a much more friendly and robust user interface and a Rich UI Design compared to the traditional SharePoint Designer 2013. Users can easily build workflow using out-of-the-box controls without any programming skills. Conditional steps and Branching logic are also easily supported here. Making workflow development becomes much faster and easier using Nintex Office 365. It may still lack some of the major features which can be advanced through future releases. You can get Nintex for Office 365 from the Microsoft store.
5. Create a Two-Stage Approval Workflow Using Nintex for Office 365
To demonstrate workflow using Nintex Office 365, we have prepared a two-stage approval workflow for the document approval process in a SharePoint Document Library. The author will upload the document which then will go through two groups for approval: Nintex Reviewers Group and Nintex Approvers Group.
1. Scenarios for the Two-Stage Approval Workflow:
First, the Author will upload the new document:
- Any user from the Nintex Reviewers Group will approve the document and it will be forwarded to the Nintex Approvers Group. A user from the Nintex Approvers Group will then approve/reject the document. Mails will be received accordingly to the Author and both the groups.
- Any user from the Nintex Reviewers Group will reject the document and the workflow will stop. Mails will be received accordingly to the Author and both the groups.
Permissions will be assigned in the following ways:
- Administrator users will always be allowed to contribute permission for the document library.
- The Author will be assigned ‘read-only’ permission after uploading the document as he/she shouldn’t be able to make any changes to the document during the approval process. The Nintex Reviewers Group will then be assigned contribute permission.
- After someone from the Nintex Reviewers Group will Approve/Reject the Document, both the Author and the Nintex Reviewers Group will be assigned read permissions. The Nintex Approvers Group will then be assigned contribute permission.
- After someone from the Nintex Approvers Group will Approve/Reject the Document, the Author, Nintex Reviewers Group and Nintex Approvers Group will be assigned read permissions and the workflow will be completed.
2. Steps for Creating the Flow in Nintex Office 365
- Now you can combine and add Nintex Office 365 to your account. You can get this application from the Microsoft Store.
- Login to the SharePoint site and create a SharePoint document library. Here, We have created an Invoice Document Library with the following metadata columns: Invoice Number, P.O. Number, Invoice Date, Description, Review Status, Approval Status, etc.
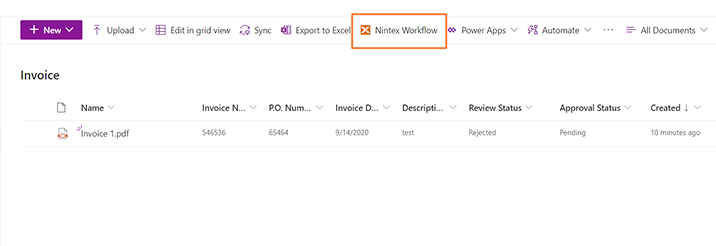
- As you can see, there is a “Nintex Workflow” option in the command bar.
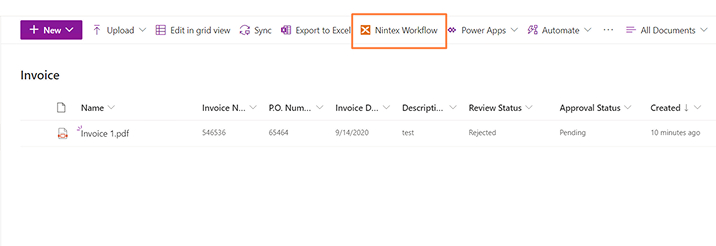
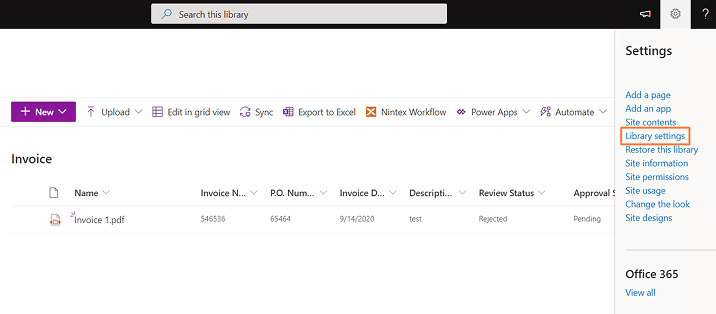
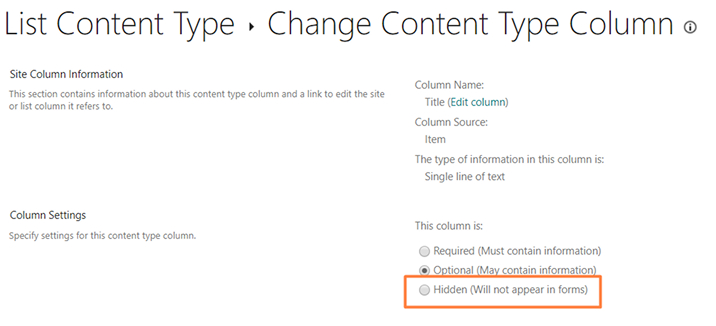
- We will need to hide the columns Title, Review Status and Approval Status so they would not be displayed in the form. For that go to library settings from the settings option.
- Then, click on advanced settings. Now you will see the first setting “Allow Management of content types?”, select “Yes” for that.
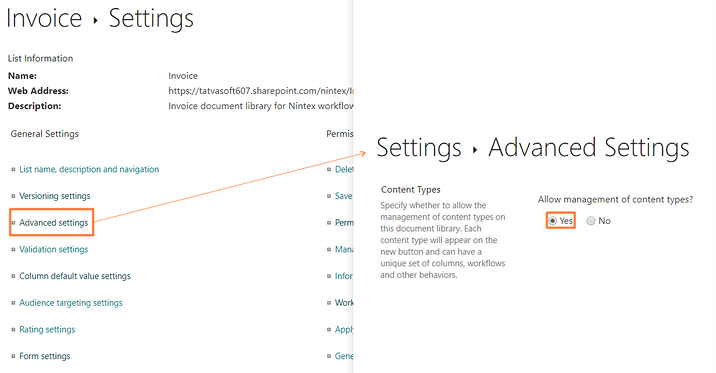
- You can now see the content type section in library settings as shown in the image below. Click on the document content type now.

- All the columns will be displayed now. You can now click on the column that you wish to keep hidden from the form. Later select the Hidden Option.

- Now that we have set up the document library, let’s start the designing of the Nintex Workflow. Now you can tap on the “Nintex Workflow” option
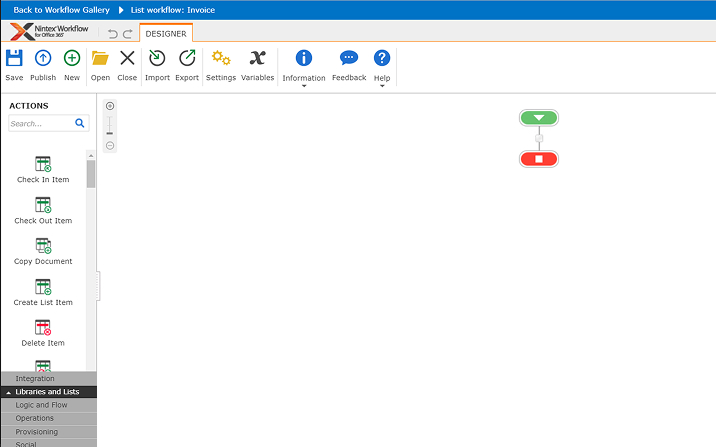
- Now, The Workflow Gallery will open up in the Nintex Workflow Platform as shown in the image below. You can tap on the “Create list workflow” button.

- This will open up the Workflow Designer for us as shown in the image below:
- This is how the two-stage approval workflow will look like:
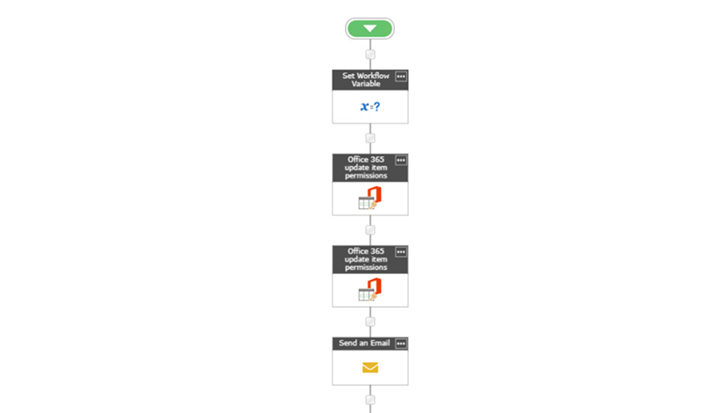
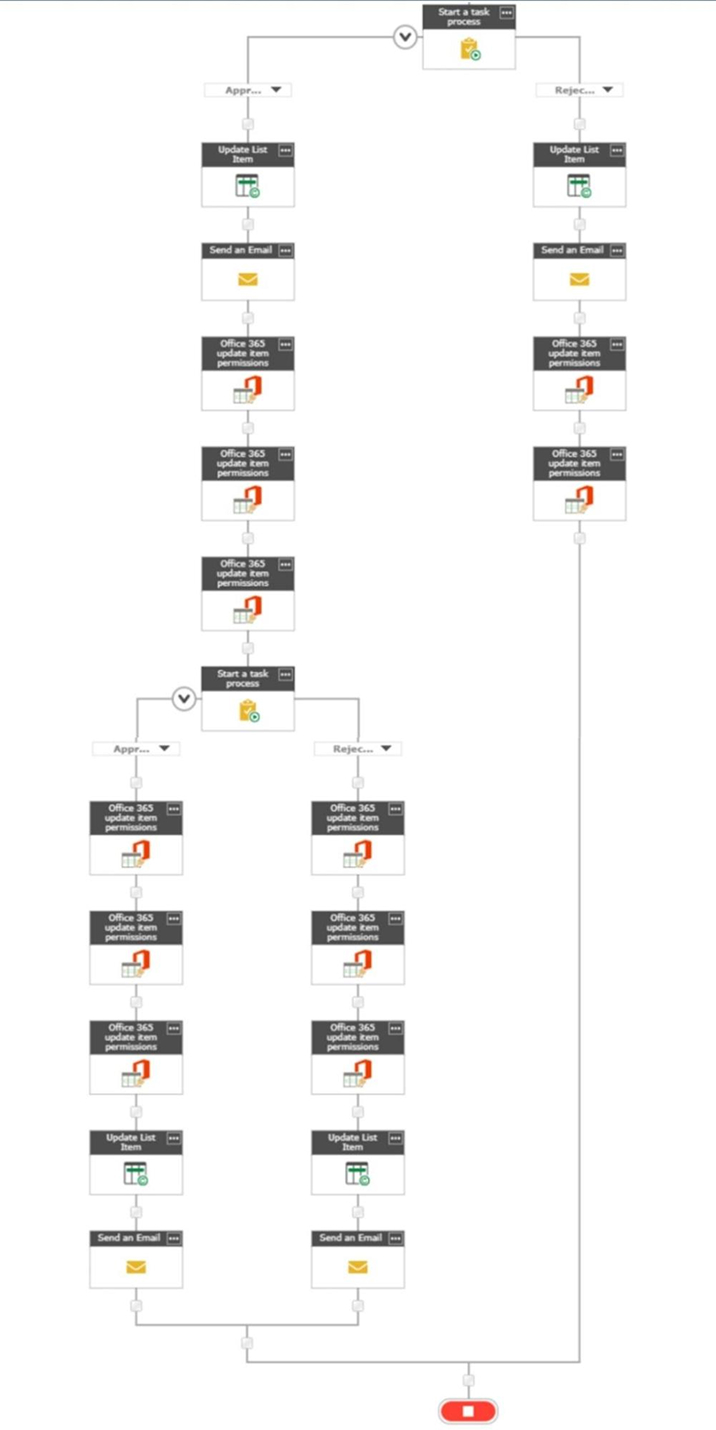
- We have created two groups using SharePoint OOTB functionalities: Nintex Reviewers and Nintex Approvers. First, we’ll initialize variables for these two groups. For that drag and drop the action “Set Workflow Variable” from the Actions Toolbox and then click on configure option.

- Now we’ll create two variables: Reviewers Group and Approvers Group. Select the “Create New Variable” option. Write the variable name with type text. Here we have kept the value of Reviewers Group as “Nintex Reviewers” (Same as the SharePoint Group Name) and the same for Approvers Group.


- Now, we will use the “Office 365 update item permissions” action from the Actions Toolbox and configure it.
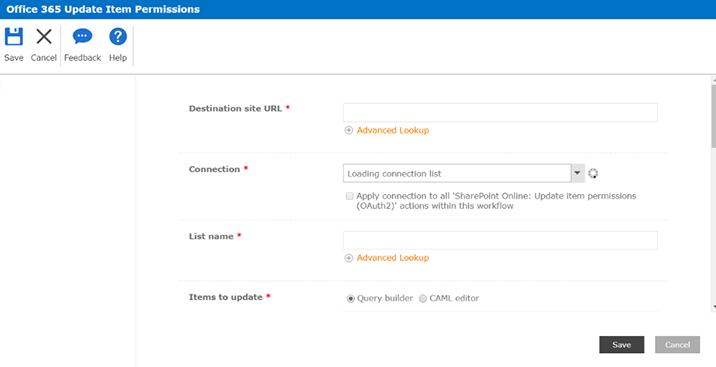
- Here, we can use the advanced lookup to get values from our workflow variables, workflow context or from our list dynamically.

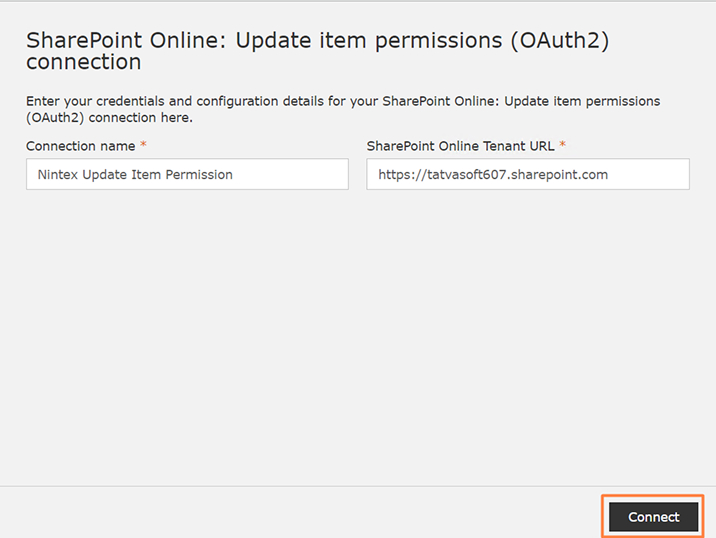
- Now, let’s create a new connection for connecting to our SharePoint Tenant Site so that we can create and assign permission for the list item. Note that only an Administrator can create connections for this. Here, we have created a connection called “Nintex Update Item Permission”.

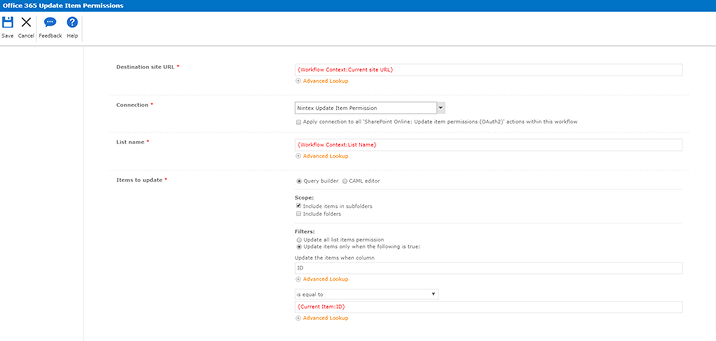
- After creating the connection, fill the fields for the action as shown below. In the field “List Name” we have passed the current list name. Also, we have set the item to update only when the ID of the Invoice Document Library is equal to the current item ID. So, the permission will be set only for that particular list item.
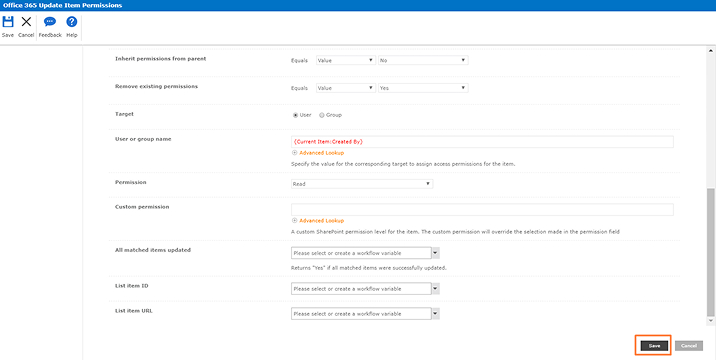
- Now, we have set the “Inherit Permissions from parent” value as null. With this, it will restrict businesses from granting permission of the items inherited from the parental sites. Also, we have kept the value of “Remove Existing Permission” to yes to remove all existing permissions.
- Now, we want to assign read-only permission to the author after He/she has uploaded the document. The “Created by” metadata column will have the same name and details of the person who has uploaded the document.
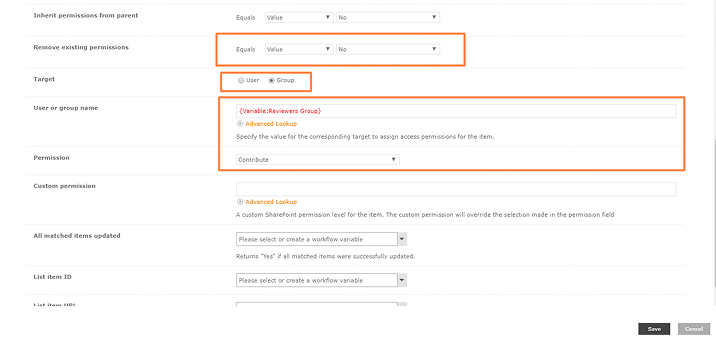
- Now, we have to assign the contribution permission to the members of the “Nintex reviewers” Group. So, we’ll add the same action again. But now, there will be a few changes. We’ll set the value of “Remove existing permissions” to no since we do not want to remove the read-only permission of the author.
- Also, we’ll change the target to a group instead of the user.
- Now, we’ll set the permission of the Reviewers Group to Contribute. Here, we have used the variable “Reviewers Group” which we initialized in the first step of the workflow.
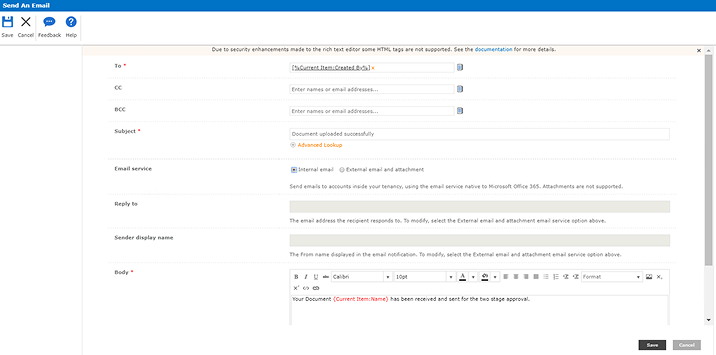
- Now, we’ll send an email to the author notifying Him/her that their item has been sent for the Two-Stage Approval process. For that, drag the “Send an Email” action and we’ll configure the action as shown in the image below:
- Now, we’ll start with the first stage of the approval process. For that, we’ll send the email to all members of the Nintex Reviewers Group. If any member of the group approves the document, the document will be sent for the second stage of approval and the “Review Status” field will be assigned Approved Value. If any member of the group rejects the document, the workflow will be stopped and the “Review Status” field will be assigned a Rejected Value.
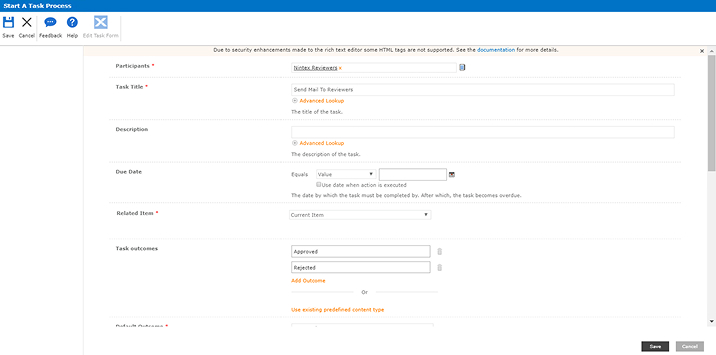
- From the Toolbox called Actions, you can drag and drop the “Start the task process” and get that into action. Enter the group name in Participants. Set task title to any value of your preference.
- Here, we have kept two task outcomes: Approved and Rejected. Users can add more outcomes if necessary.
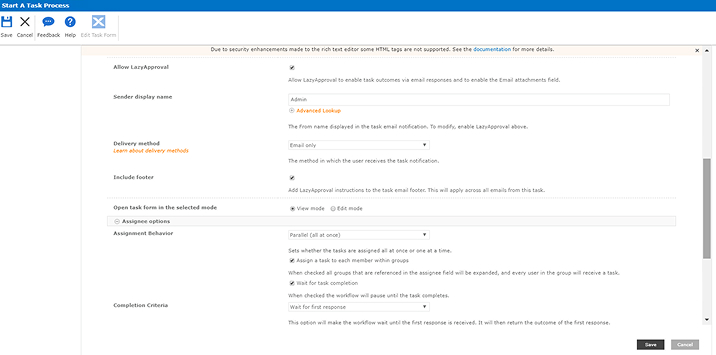
- Here, we have checked “Allow Lazy Approval”. With the help of lazy approval, the user can approve and reject tasks from the mail itself. We have kept the sender display name as “Admin” which will be reflected on the front of the email.
- Also, in the “Assignee Options” section, we have kept “Assignment Behaviour” as Parallel to send mail to all members of the group at once.
- Now you can set the completion criteria to the option “wait for first response”. This will make the workflow wait until the first response is received.
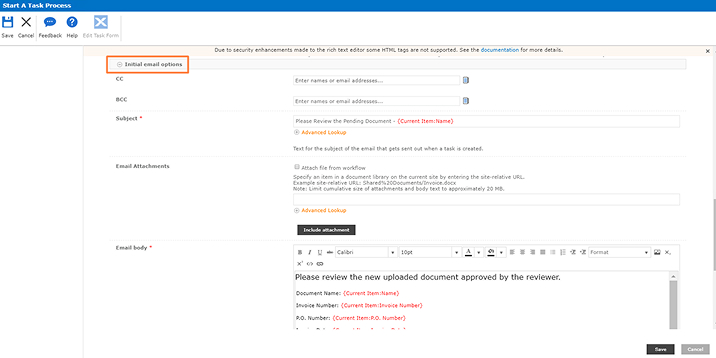
- “Enlarge” the initial email options”. Fill out the necessary properties for the same.
- In the “Email body” part we have returned the metadata column values: Document name, P.O. Number, Invoice Number, Invoice Date, Description.
- Also, we have sent the link to the document itself. We can set that with the “Encoded absolute URL” parameter in List Lookup.
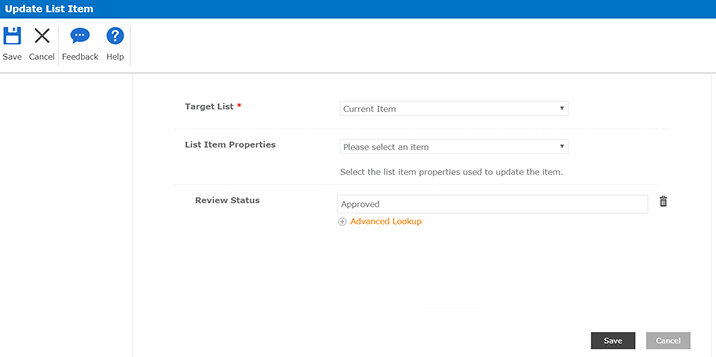
- Now, we will be updating the Review Status to Approved/Rejected based on the outcome. For that, we will use the drag and drop method to “Update List Item” action from the Actions Toolbox. Using this action, we can update multiple columns of list items. Here, we have set the Review Status as “Approved” when the task outcome is “Approved” by the Reviewers Group. It will be set to “Rejected” when the task outcome is “Rejected” by Breathe Reviewers Group.
- Now, we’ll send the email to the author notifying them that their document has been Approved/Rejected by Reviewers Group.
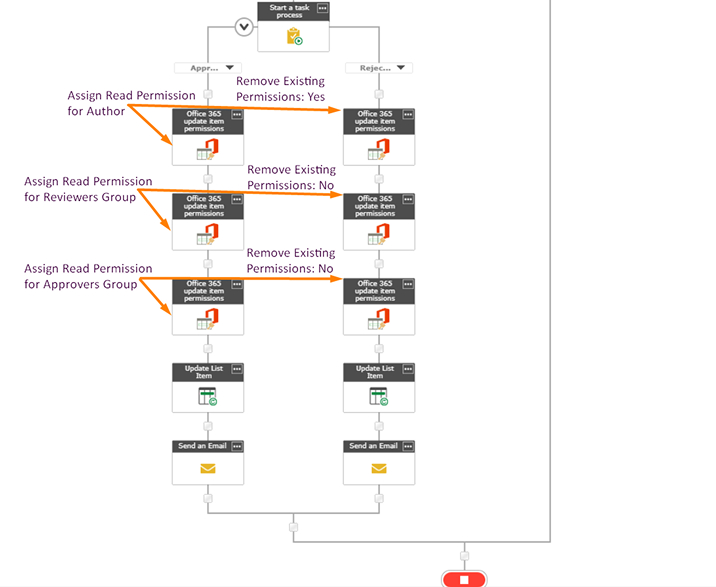
- Also, now we need to assign read permission to the Author and Reviewers Group irrespective of the outcome and Contribute permission for the Approvers Group if the item is approved.
- For that, we’ll set “Inherit permission for parent” to “no” for all permissions and “Remove existing permissions” to “yes” for remaining permissions in the first stage of approval.
- This is how our First stage of Approval will look like:
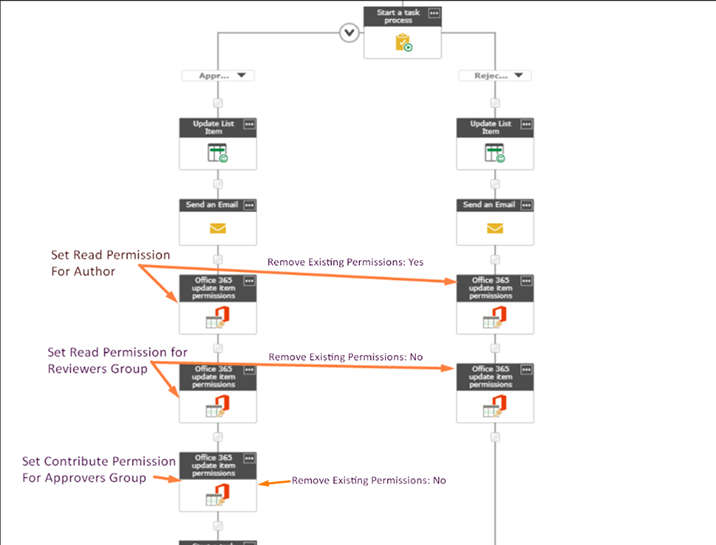
- For the second stage of approval, we will follow the same steps as we used for the first stage of approval with the following changes: This time the group name will be Nintex Approvers group and we’ll update the list item column “Approval Status” as Approved/Rejected based on the outcome.
- Then, mail will be sent to the author. If the outcome is “Approved” then the author will receive a mail notifying that his/her document has been approved by both reviewer and approver.
- If the outcome is “Rejected” the author will receive a mail notifying that his/her document has been approved by the reviewer but has been rejected by the approver.
- Permissions to the item will be assigned as shown below:
6. Conclusion
With the help of this blog, we can understand how to use Nintex Office 365 to build a two-stage approval workflow. Also, we get to know how using Nintex Workflow is so simplified with its user-friendly interface. Users can build many other Nintex workflows and Nintex forms without any need for programming knowledge. We can also build many other Nintex workflows by just using the logic required for the same. With many other features released regularly, Nintex for Office 365 is improvising day after day and it sure holds a bright future ahead.

Shital Patel
Shital Patel is VP at TatvaSoft with a high-level of proficiency and technical precision in SharePoint Development. His experience of the last two decades has helped businesses to solve complex challenges resulting in growth and performance of Startups to Fortune 500 companies.
Subscribe to our Newsletter
Signup for our newsletter and join 2700+ global business executives and technology experts to receive handpicked industry insights and latest news
Build your Team
Want to Hire Skilled Developers?




Comments
Leave a message...