Related Blogs
Microsoft has introduced workflows in SharePoint from SharePoint (MOSS) 2007, and apparently with SharePoint 2013, now SharePoint developers have 2 different templates to achieve process-based functionalities: SharePoint 2010 workflow templates and SharePoint 2013 workflow templates. These templates are very useful for SharePoint developers to develop automated processes like document approval workflows, send notification emails, etc.
Our SharePoint developers are using workflows to achieve these functionalities in On-premise as well as Online versions. But these are very much limited to SharePoint. Over the decade, Microsoft has introduced many cloud services that were previously available only in On-premise versions, i.e., Dynamic 365, MS Access, Office products, etc. With all these services, there was a requirement of one service that can interconnect all these services, communicate, and transfer data easily between these services, and Microsoft Flow (Power Automate) was introduced.
Today, in this blog, we will understand Microsoft Flow connector and how to create a custom connector using this tool.
1. What is Power Automate (Microsoft Flow)?
Microsoft Flow is a very easy to integrate, reliable, and durable tool. As the tagline suggests, “Work less, do more,” you can easily incorporate it without coding language knowledge. Microsoft has provided an easier UI to create Flows that one can learn to create very quickly. Also, documents and training modules are available here to learn it quickly. MS Flows are a better replacement of the SharePoint Designer Workflows in SharePoint Online because it’s faster, much easier to develop and maintain than Designer workflows. Hundreds of templates and many connectors are provided for users to create Microsoft Flows.
With Microsoft Power Automate (Microsoft Flow), SharePoint developers can perform recursive tasks that don’t require manual monitoring. Refer to this article to have more ideas. Microsoft has introduced AI services (called Cognitive Services) and integrated them in Microsoft Flow to make it a more powerful tool. Go through this tweet to know about MS Flow with Cognitive services.
Microsoft has introduced several pricing models for Microsoft Flow (Power Automate).
2. Connectors
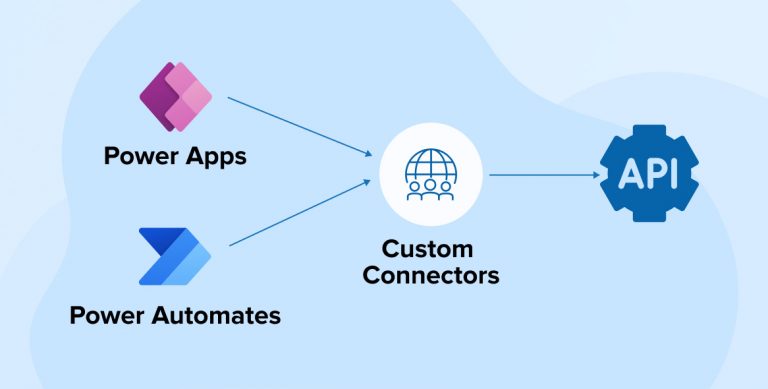
A wrapper around an API that permits the underlying service to converse with the Power Automate (Microsoft Flow), PowerApps, and Logic Apps is called a Connector. It provides a way for different applications that contain Triggers and Actions to create Flows.
Components of Connectors
Each connector provisions the set of operations, and it is in the form of Actions and Triggers.
Actions:
- This component is used to perform actions added by users in the process, i.e., Create a new item in the list, update an item in the list, send an email, get the document from a document library, etc.
- The operations are defined inside the Swagger, and all actions are mapped to these operations.
Triggers:
- This component is used to get a notification when specific events occur in the application. For instance, when an item is created or updated in the list, when the document is updated in the library when a new email is received, etc.
- With the use of Microsoft Flow app or Logic Apps, which listens to a trigger, SharePoint developers can perform an action whenever the trigger is fired.
- Two types of triggers are there to perform an action based on various scenarios:
- Polling Triggers: To check for the new data at a specified frequency, you can consume this trigger by calling your service. This trigger initiates a new run of the workflow instance with the data as input when new data is available.
- Push Triggers: These triggers listen for data on an endpoint, i.e., they wait for an event to occur. This event’s occurrence initiates a new run of your workflow instance.
Note: In power platform like PowerApps, the triggers are not supported.
However, Microsoft has a vast range of connectors which are divided into three categories for different applications:
- Standard Connectors
- Premium Connectors
- Custom Connectors
Azure Logic Apps, MS Flows, and Power Apps provide 180+ connectors in Standard and Premium Connectors categories to connect Microsoft and non-Microsoft services. The communication can be established with the services which are not available in the prebuilt connections by developing a Custom Connector. Here, we consume a custom connector from scratch so let’s dive into it.
3. Lifecycle of Custom Connectors

Build Your API
PowerApps, MS Flows, and Logic Apps can communicate with the REST API or SOAP API with the assistance of custom connectors, which is a wrapper around that REST API.
These APIs can be:
- Public (available on the public internet):
- Private (available on your private network):
For public APIs, you can use Azure functions, Azure Web Apps, and Azure API apps from Microsoft Azure, or you can use dedicated hosting to host your APIs.
Secure Your API
Below are the standard authentication methods for the APIs and connectors:
- OAuth 2.0
- API Key
- Basic Authentication
For your API in the Azure Portal, you do not require to implement the authentication externally if you set up Azure AD authentication. To have more knowledge, visit here.
Describe Your API and Define the Connector
Once SharePoint developer has your API ready with authentication, you will have to describe your API so Microsoft Flow, Logic Apps, and PowerApps can communicate with your API through various below supportable approaches:
- An OpenAPI definition (previously known as a Swagger file)
- Generate a custom connector using an OpenAPI definition
- OpenAPI documentation
- A Postman collection
- Make a Postman collection
- Develop a custom connector from a Postman collection
- Postman documentation
- Begin without any preparation by utilizing the custom connector portal (Microsoft Flow app and PowerApps only)
- Generate a custom connector without any planning
You can use OpenAPI definitions and Postman collection to create machine-readable documents that describe your API, yet both use different formats. With the use of various tools, you can generate these documents for your API, but MS Flows, Logic Apps, and PowerApps use OpenAPI to define connectors.
Use Your Connector
There is no difference in the usage of Microsoft-managed connectors and Custom Connectors. Connectors created in the MS Flows app will be available in PowerApps and vice versa but this will not be true for Logic Apps. You will have to recreate connectors using existing OpenAPI definitions or Postman collection in Logic Apps.
Go through the below links to learn more about the usage of custom connectors:
| Sr. No. | Usage Medium | Reference Link |
|---|---|---|
| 1 | Microsoft Flow | Use Custom Connector Flow |
| 2 | PowerApps | Use Custom Connector PowerApps |
| 3 | Azure Logic Apps | Use Custom Connector Azure Logic Apps |
Share Your Connector
SharePoint developers can share your custom connector with other members of your tenant in the same way you share resources in (Power Automate) Microsoft Flows, Logic Apps, and PowerApps. Sharing connectors are optional.
Certify Your Connector
You can submit your connector in Microsoft for certification if you want your connector publicly available in other tenants in the cloud. After reviewing it, Microsoft will approve it if it meets the expected criteria. Certifying connectors are optional. Else you can also share OpenAPI definitions or Postman collection files with other tenants’ members to add them to their tenants.
You will learn about more data/information from here.
Let’s create a Custom Connector with GitHub API to understand it in depth.
4. Create a Custom Connector to Access GitHub Repositories
You can access the GitHub Repositories through a custom connector. We will create two actions in our custom connector to access repositories which provide the below two details from GitHub Repositories via Rest APIs end-points:
- Get all repositories for a user
- Get issues from the selected repository
Later, this custom connector is consumed in the Power Automate (Microsoft Flow) app in which we have demonstrated one action called ‘Get issues from the selected repository.’
Getting Started
When a SharePoint developer starts building a connector, you have five options available for creating a custom connector.

Here, we will use Postman collections to develop Custom Connectors and GitHub API with Basic Authentication.
Prepare GitHub APIs in Postman
- Install Postman setup to your machine and open it.
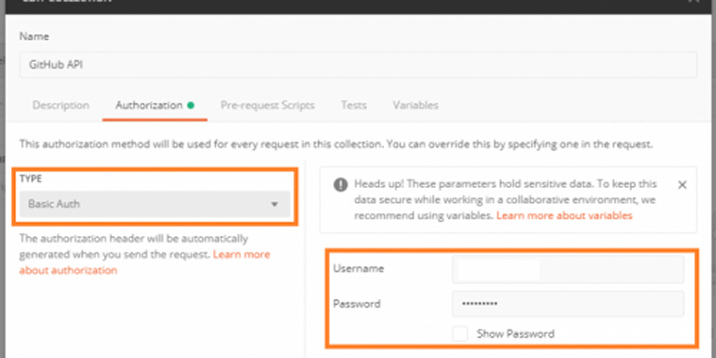
- Create a new collection on it. Here, we are creating it with the name “GitHub API.”
- Add a description for this API collection, if required.

- Click on “Authorization” to add authentication details. Select the “Basic Auth” option from the Type dropdown control and pass your GitHub user credentials.
- Click on the “Create” button to save the details.
- Here, we will create 2 REST API requests as below:
- Get all repositories for a user
- Create a new request using https://api.github.com/user/repos URL and select the GET request.
- Select the “Inherit auth from parent” option in Authorization, or you can pass GitHub user credentials as provided before.
- Click on the “Send” button to see the results.
- Get open issues from the repository
- Create a new request using https://api.github.com/repos/:owner/:repo/issues?state=open URL and select GET request along with the parameters shown in the below image:
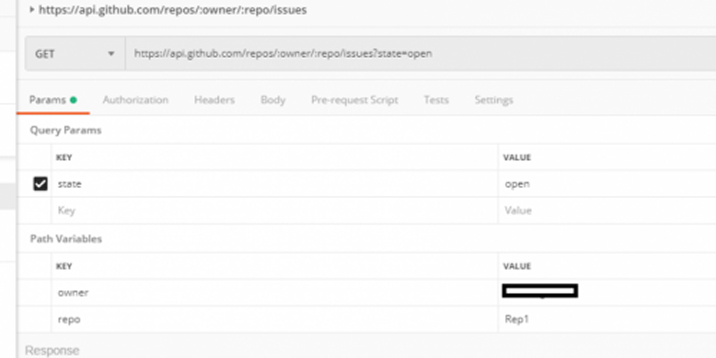
- Create a new request using https://api.github.com/repos/:owner/:repo/issues?state=open URL and select GET request along with the parameters shown in the below image:
- Get all repositories for a user
- Click on the “Send” button to see the results.
- Once both APIs are working properly, export collection from Postman.
- Click on the ellipsis in the left navigation under your collection click on the “Export” option.
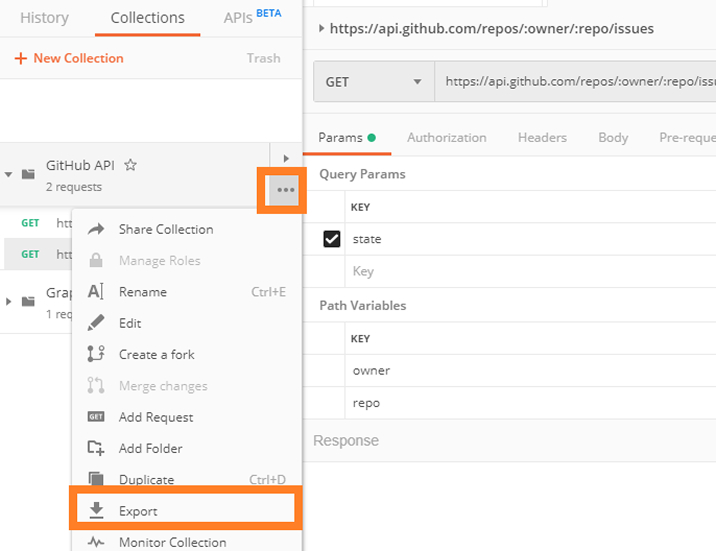
- Select the “Collection v1 (deprecated)” option to export the collection.
Note: MS Flows custom connectors creation only supports the collection v1 file.
Create a Custom Connector in MS Flows
- Open https://flow.microsoft.com with proper credentials.
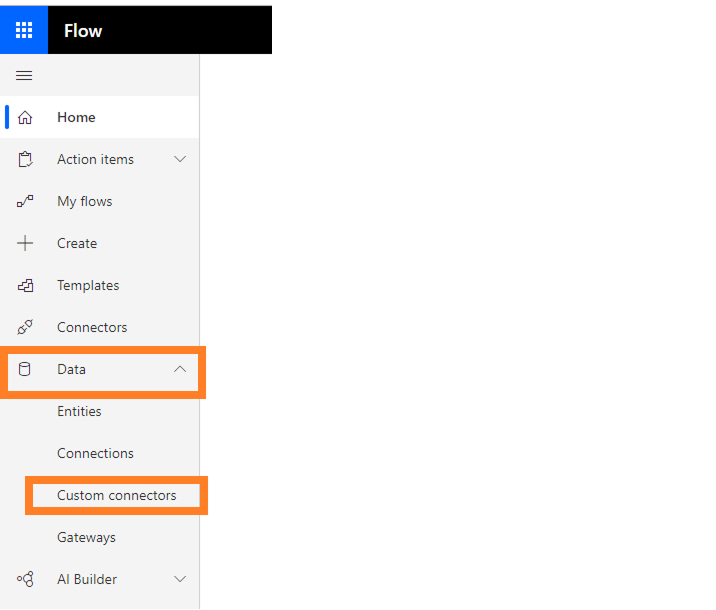
- From the left navigation menu, click on “Custom connectors” under “Data.”
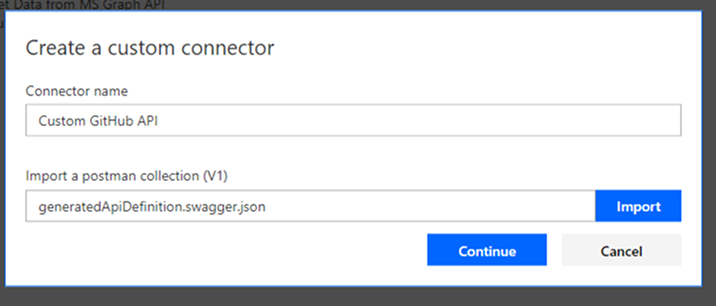
- Click on “New custom connector” and select “Import a Postman collection.”

- Pass proper connector name and V1 file (previously saved from Postman collection) click on the “Continue” button.
- Once the collection is imported, you will have four stages to create and publish the connectors.
- General
- Security
- Definition
- Test
General
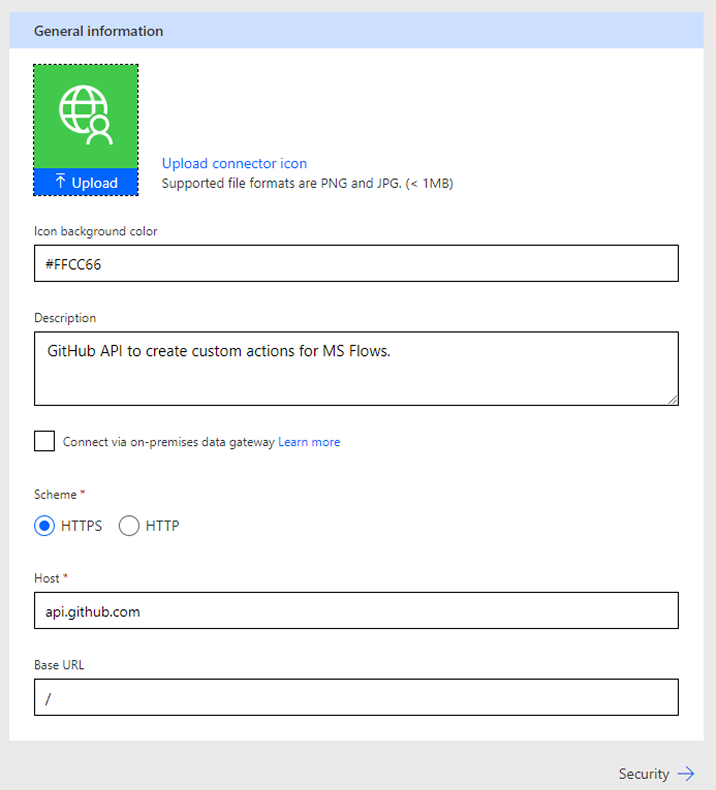
- In the General section, it will allow us to set an icon for the connector and background color in the hash value.
- Set proper Description as per the connector.
- Select “https” in Scheme pass “api.github.com” in Host pass “/” in Base URL.
- Click “Security” at the bottom to go to the next stage.
Security
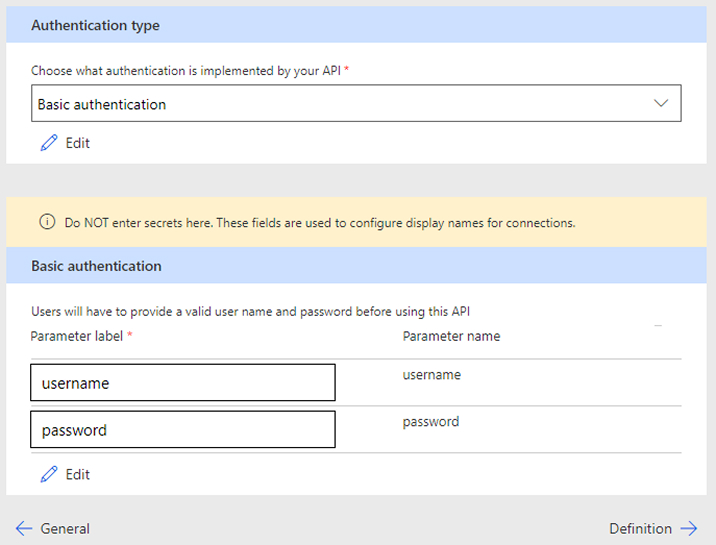
- It will directly take Basic Authentication from the Postman collection file, but you can set it from here if not taken.
- Create parameters for username and password.
- Click “Definition” at the bottom to go to the next stage.
Definition
Note: There is one interesting functionality provided by Microsoft that one can create action in custom connectors to be used for internal purposes. This action will not be available in MS Flows to add in Flows, but it can be used in another action in the same custom connector definition. Let’s see this in detail.
- In this section, you can add triggers and actions for your custom connectors. Here, two actions are added.
- Get all repositories for a user
- Get issues from the repository
- Click on “New action” to add a new action.
- In the general section, provide “Summary,” “Description,” and “Operation ID.”
- Select the “Internal” option for “Visibility” to use this action internally in other actions.

- In the Request section, click on “import from a sample,” and the pane will be opened from the left side. Select GET method and pass URL: https://api.github.com/user/repos
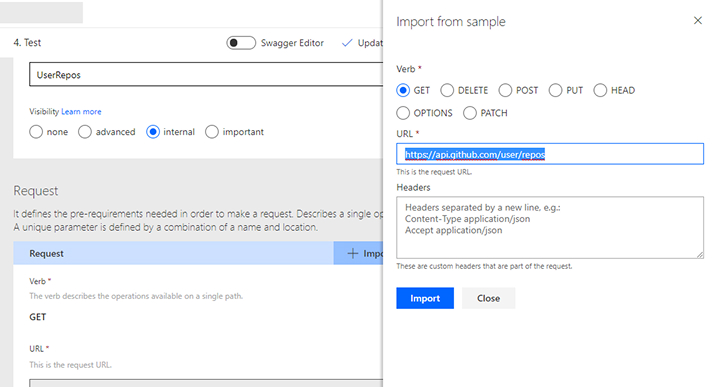
- Click on the “Import” button.
- Follow the same process for other actions. Use the below URL and choose “none” in “Visibility” control to use this action in MS Flows.
https://api.github.com/repos/{owner}/{repo}/issues
- You can see there will be a few parameters in the Request tab. You can set values for these parameters by populating dynamically and statically or taking input from the user in actions.
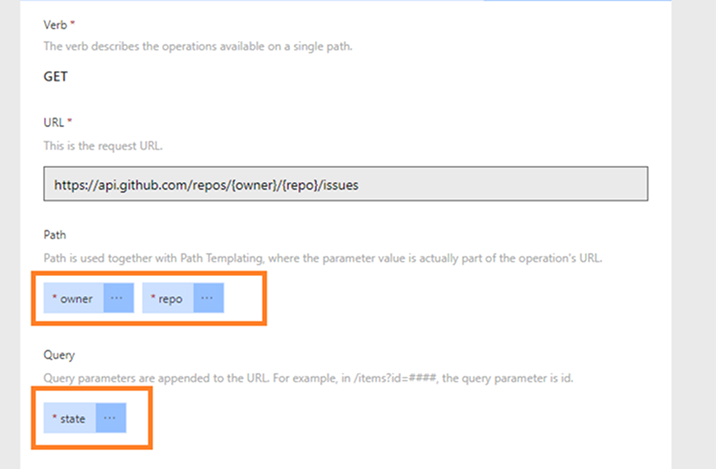
- Click on the ellipsis beside the “owner” to edit it.
- Set the default value of owner and required/non-required parameter as shown below:

- Click on “Back” to go to the earlier page.
- Click on “repo” to edit it for setting its default value as per the need.
- Repository values can be populated dynamically, so let’s populate these values dynamically here.
- Set “Type” to “String” and choose dynamic in “Dropdown type.”
- Below there will be “Operation ID” dropdown control. It will have all the actions we have created in this connector.
- Select “UserRepos” in that dropdown control.
- Select the parameter “name” in “Value” and “Value display name” dropdown controls.

- Click on “Back” to save the details.
- Click on ellipsis beside “state” to edit it for setting its default value.
- States can be “open” and “close.” Let’s set dropdown control for this with static values.
- Select “Static” in “Dropdown type” and pass values with comma separated and covered with double quotes as shown below:

- Click on “Back” to save the details.
- Click on “Test” to go to the next stage.
Test
- SharePoint developers can test your connectors before making them available for users to use in MS Flows app in your tenant.
- Click on “New connection.”

- It will redirect to a new page where you will have to pass credential details for GitHub authentication.

- Pass credentials and click on “Create connection” for testing. These connection details will be populated in the “Selected Connection” dropdown control, as shown below:

- You can select an action from the left side, pass the required parameters, and click on “Test operation” to test the actions.

- Check the output details, as shown below:

- Once you are satisfied with the output, save the connector by clicking on the “Update connector.”

Use an action in Power Automate (MS Flows)
- Login to https://flow.microsoft.com with proper credentials.
- Go to “My flows” to create a new flow with the “Instant – from blank” option.
- Here, for illustration, the “Manually trigger a flow” trigger is selected.

- Click on the “New step” button to choose an action.
- In that card, click on the “Custom” tab to view all custom connectors added to your tenant.

- Select the “Custom Github API” connector to see all actions and triggers under it.

- You will find the “Get Issues from selected repository” action inside it.

- Click on that action to add it to your flow.
- Action will be added in the flow with default values in parameters.

- You can add your GitHub authentication in this action.
- Click on the ellipsis provided on action click on “Add new connection” to add your credentials.

- Add the “Compose” action below this action to see its output.

- Save this flow and Run it to see the output.

5. Conclusion
Through this blog, you get a basic idea about the custom connectors and their consumption in MS Flows, Logic Apps, and PowerApps. Custom connectors are very powerful and helpful for SharePoint consultants who don’t like to write code. It is a simple process of building a custom connector when the correct end-points are known.
SharePoint development company can also create a reusable custom connector to carry out the development process effectively and efficiently. A custom connector can be reused by downloading it from the custom connectors listing, and the downloaded custom connector is an OpenAPI file. This JSON file can create a new connector that includes more actions but the point to remember is that you have to manually provide the Client ID and Client Secret for OAuth 2.0 authentication.
We realize that the Power Automate( MS Flow) app is fit for handling complex tasks and also allows us to create complex integrations between different platforms, i.e., either On-premise or Online. Thus, create your complex custom connector and give it a try with the MS Flow.

Shital Patel
Shital Patel is VP at TatvaSoft with a high-level of proficiency and technical precision in SharePoint Development. His experience of the last two decades has helped businesses to solve complex challenges resulting in growth and performance of Startups to Fortune 500 companies.
Subscribe to our Newsletter
Signup for our newsletter and join 2700+ global business executives and technology experts to receive handpicked industry insights and latest news
Build your Team
Want to Hire Skilled Developers?


Comments
Leave a message...