Related Blogs
1. Overview
Microsoft is the fastest growing technology company that offers almost all types of business services. From in-built applications to subscription-based applications, they offer an all-inclusive service to businesses. To name a few, Microsoft has Office 365, on-premises data sources SharePoint, Excel, Office 365, Power BI, Microsoft Dataverse, Dynamics 365, SQL Server, and so on. The list would get endless and their services won’t. One of them is Microsoft Power platform. We already know what Power platform is, we will know it in depth from our previous blogs on canvas apps and model driven apps. But, we will have a quick brief to understand what power apps are, power apps portals their advantages and features.
Lets dive quickly into the basics first for more information.
2. What are Power Apps?
The definition of PowerApps says that it is fundamentally a Platform as a Service application platform. This Microsoft Power Platform enables you to develop Mobile Apps for Android, iOS, Windows (Modern Apps), and nearly any other browser, operating system or device.It is basically available to make mobility possible in every way.
You can use PowerApps as a mobile apps.Traditionally, mobile app development has entailed building apps for each operating system on which they must operate (one for iOS, one for Android, one for Windows).Non-usage of Power apps is that it effectively triples development workload, doubles supporting expenditures, and increases the number of development resources required to build business apps in your company.
It handles the differences across operating systems and just allows you to run your programmes. Power App can be called as a container that enables easier to operate mobile apps across mobs.Now we know,what is your next question, how does power apps work? Lets see it from the scratch.
3. How Does Power Apps Work?
PowerApps was created with the intention of being used for BUSINESS Mobile Apps — that is, for internal usage/for employees.
You’re not going to make a PowerApp to share with the entire globe.
These are not intended for consumer consumption, owing to the licencing model and technological constraints with sharing with third-party users.
PowerApps is an excellent drag-and-drop user interface that allows users to build a mobile app by adding different controls i.e. text field, choice field, media pictures, video, camera controls for your phone), forms, dashboards and screens. You may also link to additional data sources or save data directly within the app.Once you’ve developed an app, all you have to do is publish it and it’ll be available for download.
4. What are PowerApps Portal and What are its Benefits ?
Power Apps Portals is a Microsoft Power Platform component that allows organisations to develop low-code, flexible, customised websites that allow internal and external users to engage with specific Dynamics 365 data and its capabilities. It allows external users secure access to Dynamics 365 data.
Multitude of benefits of Power Apps Portals that makes business bend over the usage of these technologies.
- The development lifecycle becomes faster as the power apps portals can be built within some days.
- The look and feel of the application becomes interactive,smart and engaging
- Power Apps Portals provides protection from internal and external resources for data, or commercial authentication such as linkedin Microsoft or any other enterprise providers.
- Empower your customer service for customers to either contact you via self-service portals.
- Data interactions through a power apps portal remain safe and may be managed using dependable authentication mechanisms.
- Access your power apps portals from any device — access them from smartphones, tablets, or desktop computers, allowing you to access them from anywhere.
- Simple to maintain – internal administrators may easily change information and add new resources.
5. When to Use PowerApps Portals for Your Business?
Power Apps Portals are mostly used for two purposes:
The first reason to use power apps portals is when you wish to create a public–facing website that anonymous and/or authorised individuals may visit.
The second purpose to use power apps portals is to provide an integrated experience with other Microsoft technologies, such as embedding a Power BI dashboard and/or report into your website. When a user submits a form on your website, a workflow is triggered.To track solution usage using Application Insights.
Well, this is not our first blog on Power Apps, its been a series of blogs!!! This is the last blog of this series. If you haven’t visited our previous blogs, then please go through them.
6. Power Apps Portals
Let’s create a power apps Portal in which a user can log-in using his/her LinkedIn account. But before proceeding, an environment creation is required for creating Portal
Note: SharePoint developers can also create a Power apps Portal in the current environment you have logged in if no other portal of the same type exists.
1. Create an Environment
- Log in to Admin Center of PowerApps using the URL https://admin.powerapps.com.
- Under Environments, create a new environment by clicking “+New environment” and adding the required details.
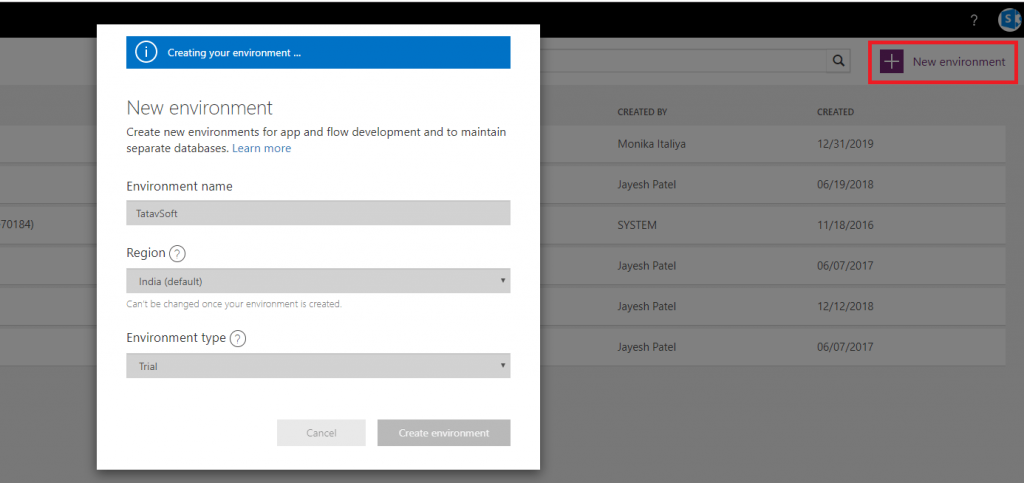
- Once the environment is created, it will ask for creating a database.
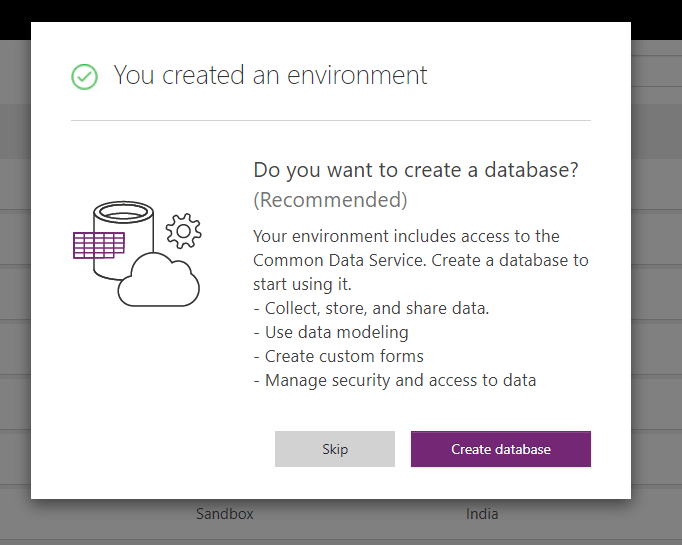
- After creating the database, switch to a new environment.
7. Create Power Apps Portals
- Navigate to the Power Apps platform using URL https://make.powerapps.com.
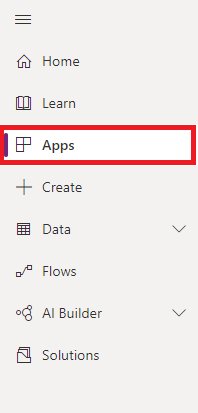
- Click on “Apps” on the left navigation menu.
- Select Portal under the “+ New app” option.
- Enter the Portal details and click on Create.
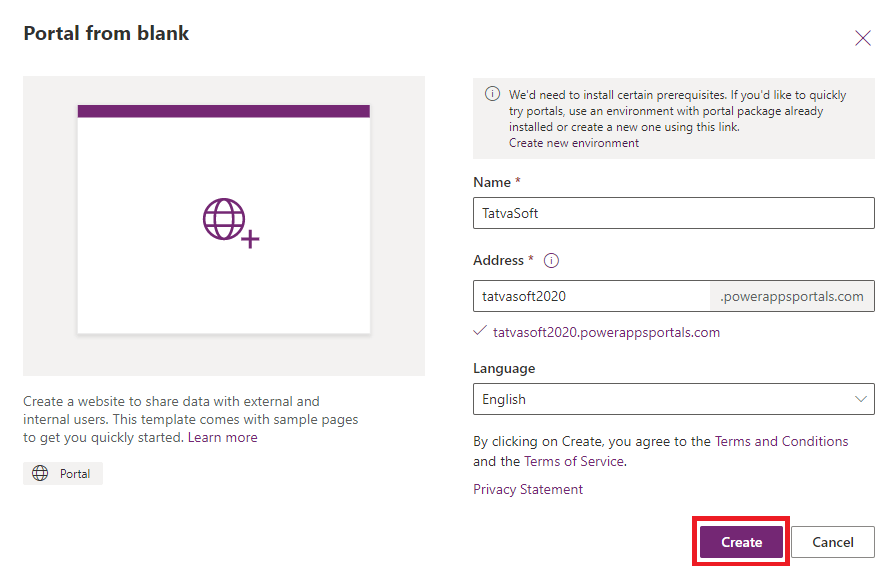
- While the app is provisioning, notifications will pop up on the right side.
- After the app is provisioned, it will appear under the Apps section.
- Edit the app as per your requirement.
Opening the Portal in Edit mode has the provision to change the default pages as per the requirement. This blog is not covering the ways you can edit the Portal.
- Clicking the Portal name will open the Portal. Below image is an example of the Portal.
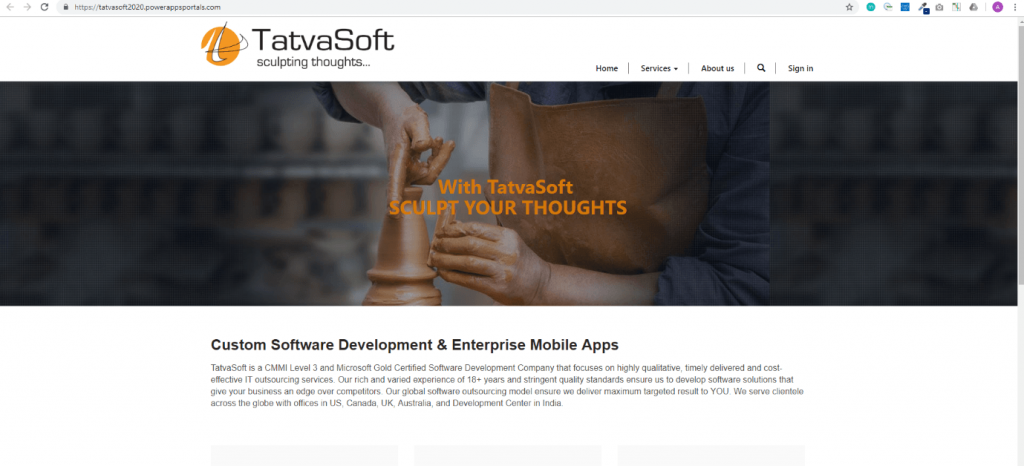
- The interesting part of Power Apps Portals is that we can allow the external users to access the app and even view or add the data to Common Data Service. CDS explained, in short, is the storage space for Power Apps.
- Here the blog will proceed on how the users can log in to Portals using their LinkedIn account.
8. Power Apps external Authentication with LinkedIn
The first step is to create the Apps inside LinkedIn, which will enable a button allowing the user to sign in using a LinkedIn account into Portals.
- Navigate to http://developers.linkedin.com.
- Click on the “Create App” button and insert the App details.
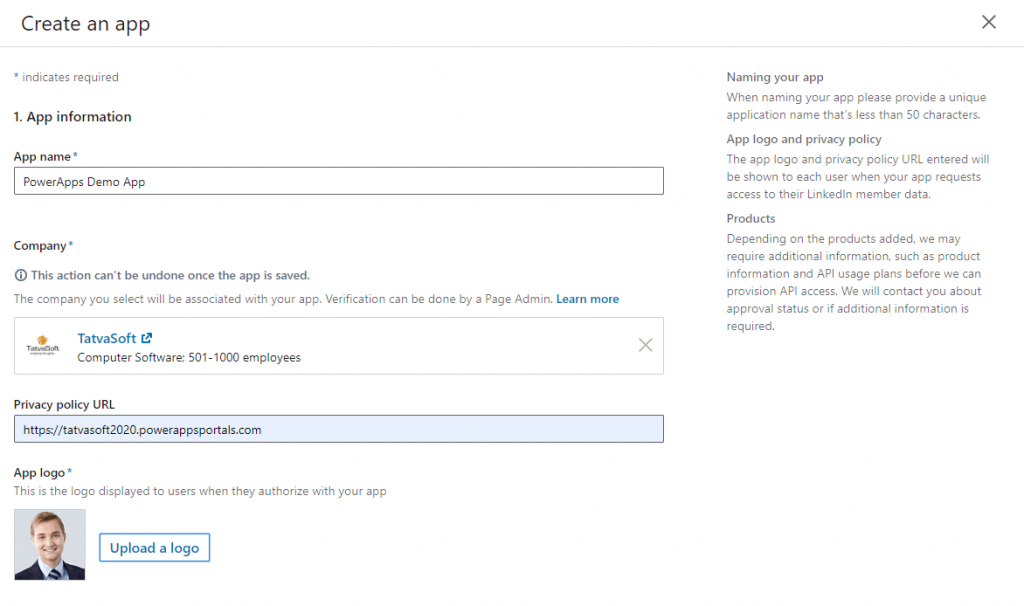
- Make sure the “Sign In with LinkedIn” option is checked.
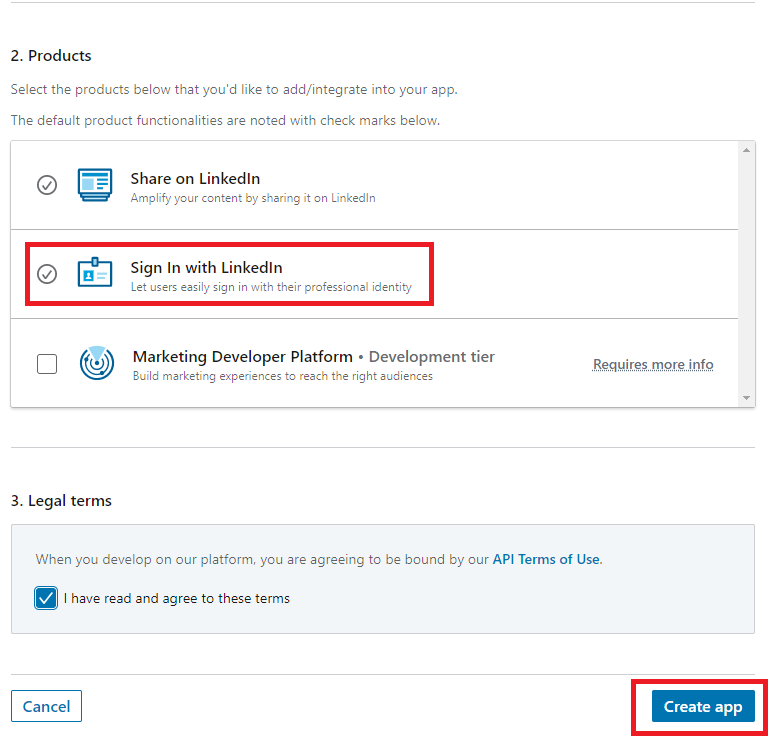
- Click on Create App, and the app will be created.
- Click on the Auth tab and change the OAuth 2.0 settings.
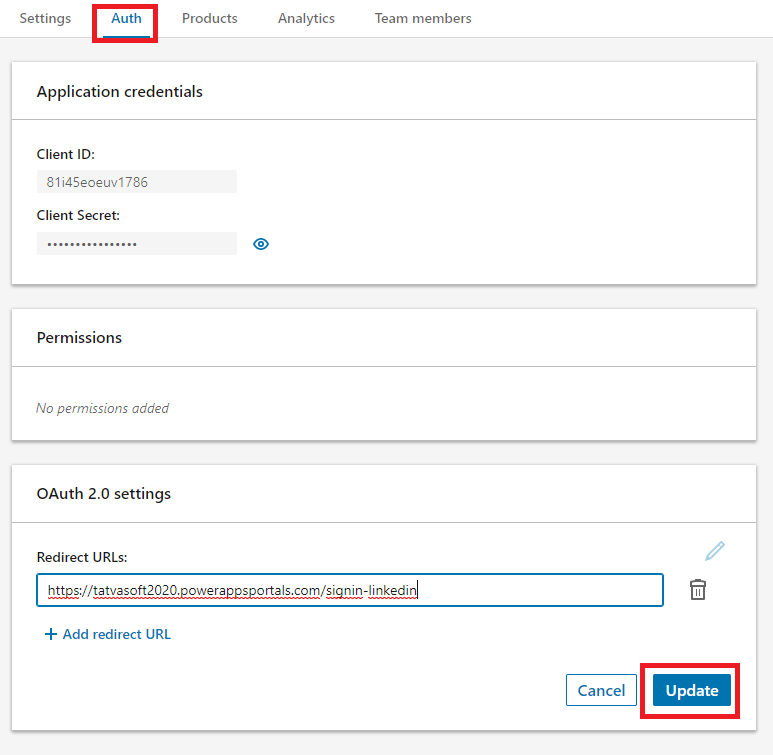
- Add the Redirect URL under OAuth 2.0 settings.
- The URL of the Portals app was created and appended /sign-in-LinkedIn after it.
- Click on Update.
Now the next step is to connect this app to Power Apps Portal. SharePoint developers can follow the below steps to connect it.
- Navigate to the Portal App created in the Power Apps platform.
- Click on the Settings option available on selecting the app.
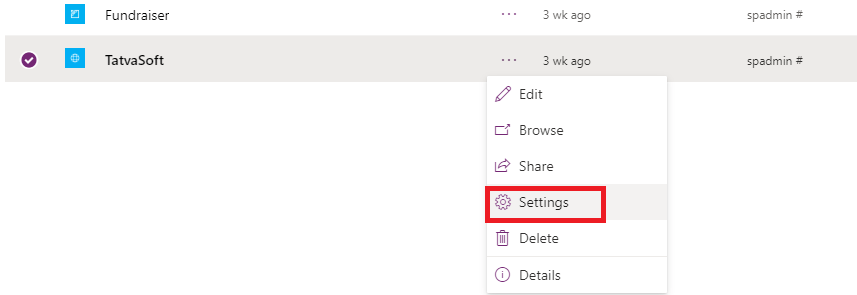
- Navigate to Site Settings.
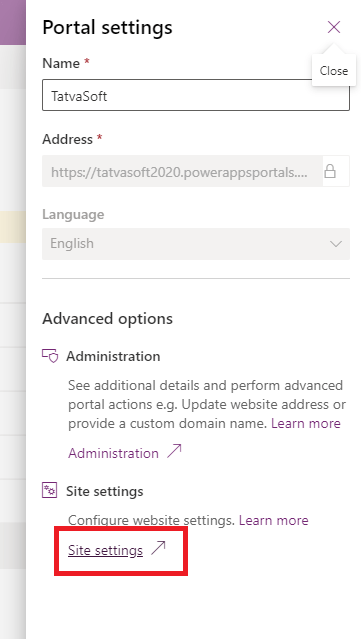
The page will open the Active Site Settings. We are required to configure the LinkedIn settings by editing its Consumer Key and Consumer Secret.

- Add the Value field of the ConsumerKey to the value of Client ID of the app created in LinkedIn.
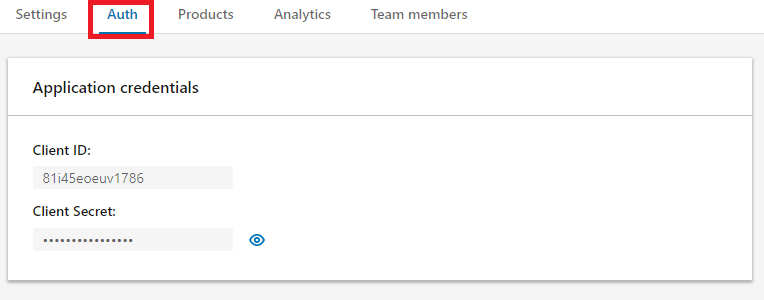
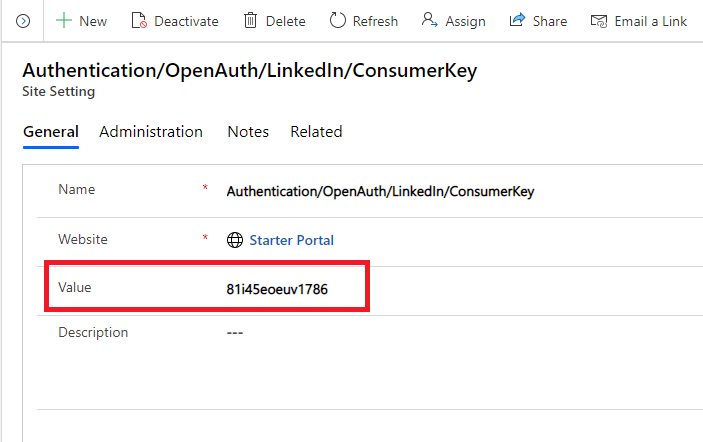
- Similarly, add the Value field in ConsumerSecret to the value of the Client Secret field of the app created in LinkedIn.
- This will add the LinkedIn button to the Sign-In page of the Portal. The Sign-In page will open by clicking the “Sign in” option available in Portal’s header.

- Clicking on the LinkedIn button will allow you to login with a LinkedIn account, and the profile will be displayed.
9. Conclusion
Through this blog, one gets an idea about creating a Power Apps Portal and how it can be used to engage with customers and partners. One can also give access to their apps through this power apps Portals. If there is a requirement to allow data access to any user in an appropriate form in the company, SharePoint developer can achieve it through our Power Apps blog series.
Here’s the Link to all the Post in this series:
Power Apps – Canvas Apps (Part 1)
Power Apps – Model Driven Apps (Part 2)

Shital Patel
Shital Patel is VP at TatvaSoft with a high-level of proficiency and technical precision in SharePoint Development. His experience of the last two decades has helped businesses to solve complex challenges resulting in growth and performance of Startups to Fortune 500 companies.
Subscribe to our Newsletter
Signup for our newsletter and join 2700+ global business executives and technology experts to receive handpicked industry insights and latest news
Build your Team
Want to Hire Skilled Developers?


Comments
Leave a message...