Microsoft provides various services using which any user can achieve the required functionality with minimal use of codes. In this blog, our SharePoint developers discuss a few of these services and frameworks. One of these is PowerApps, through which any person without having knowledge of app development and coding can create custom business applications. And another one is Bot, which provides conversational experience based on its applied knowledge. With the use of these two, one can create a smart app like PowerBot, where any user can have a conversation with the bot.
Note: The Bold & Italic set must be changed with your keys.
Steps to Create PowerBot
There are mainly two steps to create a smart app. They are listed below:
Create a Bot Service.
Users can create this QnA bot service in Azure.
Once a user creates this service, they can add/modify its knowledge base, which has questions/answers.
Create a Power App.
Create an app that has a connection to this QnA service and can take input from a user.
Create Bot Service
To create a Bot service, first, navigate to Azure and login to the account.
From the left navigation, choose All Services. Then find the keyword QnA Maker service.
New QnA Maker service is required to create. Click on the Create button and fill in all the fields’ values, as shown below.
Name: Unique name to identify this QnA Maker service
Subscription:Choose the subscription under which this service will be created.
Pricing tier:Select it as per the pricing list for service.
Resource group: This resource group will be used for the QnA Maker service. It is recommended to create a new one as QnA Maker will create several resources related to it.
Resource group location: Select it for service.
Search pricing tier: Choose an option for the Search pricing tier of the Azure Cognitive Search service. If the free tier option is greyed out or unavailable then it means that you have already deployed it through your subscription.
Search location: Select a location from this option for deploying the Azure Cognitive Search indexes.
App name: Provide the name to Azure App Service instance.
Website location: Choose a location where an App Service is required to deploy.
App insights: Enable the App insights if required. When it is enabled, the QnA Maker gathers telemetry on chat logs, traffic, and errors.
App insights location: Choose the location where App insights resources will be deployed.
Then click on Create.
Once your deployment is done, it will show success before all resources.
Now select the resource having Cognitive Services type.
It has the subscription keys that you can find from the left navigation menu, “Keys and EndPoint.”
Add Knowledge Base
Once you have successfully created the QnA Maker service, it must create a knowledge base for that service.
This knowledge base contains question-answer pairs, which will be used in Bot for conversation.
To create a Q&A knowledge base, login into QnA Maker.
Click Create a knowledge base from that QnA Maker portal to create your custom knowledge base.
On the Create page, it will ask you to Create a QnA service, which we have already done in the above steps.
In this Azure portal, to create a new Knowledge base, use those created Azure Active Directory ID, Subscription, QnA resource name which you have selected while creating the QnA service resources.
Fill in the details as per those values and requirements, as shown below images. In Step4: Add sample document URL
After filling in all the values, click Create your KB.
To extract the document and identify the questions and answers, it will take a few minutes.
Once it is created, one success screen will get open. From that screen, you can find the host URL and authorization key.
Kindly save those values, as they will be used in further steps.
Test Bot Knowledge Base
Once you successfully create a knowledge base, you can test it within the Q&AMaker portal.
Click on the My knowledge Base menu from the top navigation. It will show you the list of your knowledge base and click on the newly created KB from the listed knowledge bases.
This will redirect you to the questions and answers pair screens. From this screen, you can edit the knowledge base.
From the Right Top corner, select the option “Save and train” and then click on Test.
It will popup a screen where you can conversationally test your KB.
To clear the conversation and have it blank, you can select the option “Start over” from the Top Right corner.
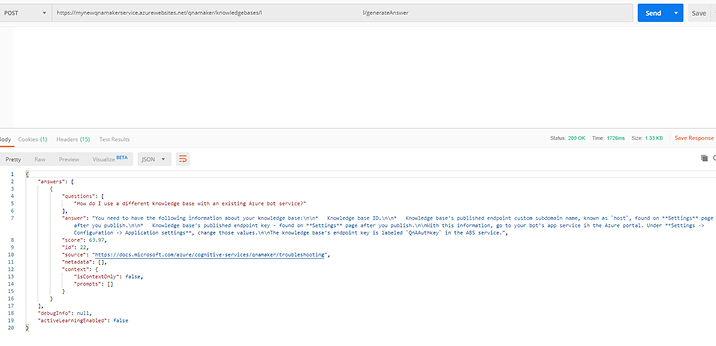
Test Bot Service with Postman
To test the QnA maker service with the postman, use the details given on Knowledge base creation.
POST /knowledgebases/<Knowledge base ID>/generateAnswer
From the screen, select the option Blank App → Phone Layout.
It will open a blank layout screen.
From the left pane, rename the screen name of “Screen1” to another. Here, it is set as “Bot.”
Once it is set then select the “Bot” and set the below code on “OnStart” of the app.
ClearCollect(chat{id:0,name:"Bot",text:"Welcome"&Left(User().FullName,<br>Find(" ",User().FullName))&"! How can I help you?.",chattime:Now()})
ClearCollect(chat{id:0,name:"Bot",text:"Welcome"&Left(User().FullName,<br>Find(" ",User().FullName))&"! How can I help you?.",chattime:Now()})
> This will create a new collection named “chat.” > That collection holds a conversation between login user and bot with their ids. > Here id = 0, represents “Bot”. This is the name that we give to our Bot chat. > Along with that, the given text will be displayed with the login user name when an app will be opened.
To add the questions answers, it is required to add DataSource of the created knowledge base.
To add that, select the View option of the top ribbon menu, and under that, select the option DataSources.
It will open the DataSource pane on the left with three different sections.
In your app: In this, all the collections and connections will be displayed, which are attached to this app.
You can see the collection “chat” on the list that we have created in the previous step.
Entities: This will display a list of entities of the current environment.
Connectors: In this, it will show a list of available connectors.
From that list, find the QnA Maker connector and click on “+Add a Connection.”
It will open the pane in the right with a textbox for API Key and Site URL.
API Key: Add EndPoint key of the Knowledge base.
Site URL: Add Host URL of the Knowledge base.
After filling in the data, click on the Connect button.
Once applying these steps, app connection and bot collection is ready. Now you are just left with the chat screen part of the App.
For that, add the below controls from the Insert menu of the ribbon.
Label: To set the top header of the app.
Gallery (Vertical): To manage the chat conversation.
Once you add that Gallery in your app, set “chat” collection as its data source.
<span style="font-weight: 400;">Click on the image icon of Gallery and set the code below for that Image.</span><br>If(id=0,SampleImage,User().Image)<br><span style="font-weight: 400;">This will set SampleImage for Bot and Login user’s image will be his/her display picture.</span>
<span style="font-weight: 400;">Click on the image icon of Gallery and set the code below for that Image.</span><br>If(id=0,SampleImage,User().Image)<br><span style="font-weight: 400;">This will set SampleImage for Bot and Login user’s image will be his/her display picture.</span>
Textbox: With this textbox, the user will ask the questions to the Bot.
Button: On the click of this button, the user’s question will be requested to the bot, and a response will be given.
Collect(chat,{id:1,name:User().FullName,text:txtQuestion.Text});<br>Collect(chat{id:0,name:"Bot",text:First(QnAMaker.GenerateAnswer("< Knowledge base id >"," < Host URL >","< <em><u>Endpoint Key</u></em> >",txtQuestion.Text).answers).answer});<br>Reset(txtQuestion)<br>Where,<br>txtQuestion: is the id of textbox control.<br>chat: is the collection that holds conversation.<br>GenerateAnswer Method: will fetch answer from knowledge base<br>Id =0: Bot<br>Id =1: Login user
Collect(chat,{id:1,name:User().FullName,text:txtQuestion.Text});<br>Collect(chat{id:0,name:"Bot",text:First(QnAMaker.GenerateAnswer("< Knowledge base id >"," < Host URL >","< <em><u>Endpoint Key</u></em> >",txtQuestion.Text).answers).answer});<br>Reset(txtQuestion)<br>Where,<br>txtQuestion: is the id of textbox control.<br>chat: is the collection that holds conversation.<br>GenerateAnswer Method: will fetch answer from knowledge base<br>Id = 0: Bot<br>Id = 1: Login user
After adding all these controls, the app screen will look like this.
To test the app, select the ▶ icon from the top right corner. It will open a new screen from where you can test the bot.
Save Power App
You can save an app on the computer and cloud.
Here, we will save the app on the cloud so that we can find our app from App Studio.
It will display two options on the left on the Save screen. From that, choose “The Cloud” and provide a name for the app.
Open Created PowerBot
After saving an app, navigate to Powerbot, and click on Apps from the left navigation.
This will open a list of apps, from that, click on the app you have saved.
Once the app is open in a new tab from where you can interact with your bot service.
Conclusion
With the use of Bot service and PowerApps,SharePoint developers can easily make their own PowerBot without writing code for it and use it in the organization. As in organization, if you have an idea that some repeated pair of questions will be asked by a group of members, then you can make a PowerBot for that, which also requires less effort in creation if you have a list of question-answer pairs. Thus, PowerBot is a powerful tool to use in the organization for having clear communication on specific topics.
Shital Patel is VP at TatvaSoft with a high-level of proficiency and technical precision in SharePoint Development. His experience of the last two decades has helped businesses to solve complex challenges resulting in growth and performance of Startups to Fortune 500 companies.


")
")
")

We absolutely love your blog and find the majority of your post's to be precisely what I'm looking for.
Good