Developing Nodejs apps is not always only about addressing the client’s requirements or Nodejs development services; sometimes, it is more than that. Because of the vastness of the systems, engineers confront a number of obstacles, such as the maintenance of codebases, the installation of new features, the correction of bugs, and the management of user roles. These concerns are particularly complex in size, and application architecture must employ a variety of techniques to prevent them.
Monolithic applications frequently encounter these challenges and distributed approaches are there to address them. The elements of distributed systems are dispersed over the network and operate autonomously. A distributed application consists of a collection of closely connected microservices that collaborate to fulfill the user’s requirements.
We shall illustrate how to begin developing Node.js microservices throughout this post.
1. What are Microservices and How Do They Work?

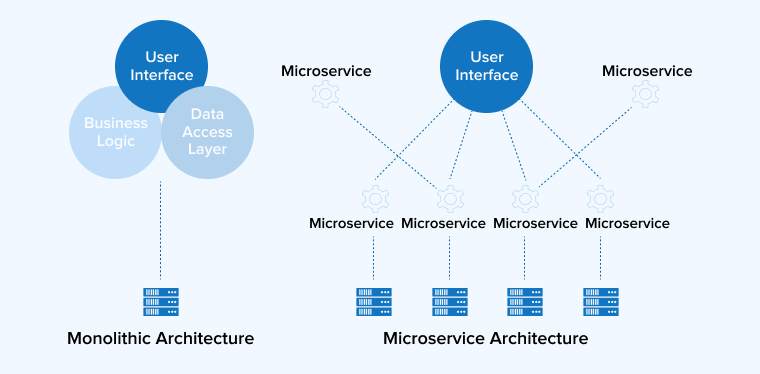
Microservices are a form of service-oriented architecture (SOA) in which the program is composed of a collection of interconnected processes during the software application development process. The system architecture is constructed with minimal protocols using microservices. The design is planted with care and services. Microservices deconstruct the application into simpler services and allow for enhanced scalability.
Microservices are significantly more advantageous than their predecessors, the monolithic architecture. You do not need to bundle all software modules and services in a single large container. With microservices, one can build an application with:
- Increased adaptability.
- Superior scalability.
- Continuous development.
- Precise data organization.
- Time efficiency.
- Dependability.
Creating JavaScript applications using microservices enables you to prioritize development of monofunctional modules with well-defined actions and interfaces. The method of developing monolithic applications grows more agile and alleviates the obstacles of continuous testing.
When you construct application using a monolithic architecture, the entire application must be delivered with each upgrade. Microservices, in contrast, are independent of the framework, approach, or programming language that utilize to develop them. The sole need for microservice architecture is the potential to provide RESTful APIs for communicating and other operations.
1.1 Benefits of Microservice Architecture
The program is simpler to maintain and comprehend since microservices have well-defined functions. Listed below are some of the most important advantages of a microservice-based architecture:
- Scalability: Scalability is simple as the entire system can be seen as a set of services, each communicating with other microservices. This enables anyone to ramp up, back, or out depending on the resources required by specific microservices as opposed to the overall operation.
- Language-independent: Microservices are not restricted to a particular computer program. Any microservice architecture can be authored in distinct programming languages that match the selected microservices communication protocol.
- Simplified experience: Optimized developer experience such that a newbie developer entering the team needs to learn only the environment variables of the system their other teammates are engaged with. This increases efficiency since they may concentrate on a single code base and its functions. As a result of platform independence and adaptability, system service programmers can select the optimal tools for the task.
- Unlimited iterations: It will be considerably simpler for developers to iterate over microservices because they are no longer constrained by other elements.
- Unit testing: Since microservices are distinct applications with an emphasis on a certain operation, it is simpler for a developer to build test scripts to check on operations.
1.2 Drawbacks of Microservice Architecture
Following are the disadvantages of microservice architecture:
- Difficult to control as a whole: Too many functioning software components can be difficult to manage simultaneously.
- Difficult to trace: If the architecture grows too complicated, the communication route among microservices is too broad, or a fault or mistake occurs, it gets challenging to walk back and locate the source of the problem.
- Requires large expertise: Delivering or building microservices calls for a high level of skills and experience in the areas of strategy and management.
- Challenging testing: It is more difficult to test microservices altogether. Convergence and end-to-end testing might be difficult as well.
- Audit logs: Audit records might be more difficult to get and examine.
2. Creating Microservices with Node.js
You’re building something meaningful—keep going, one small step today brings you closer to a resilient, well-designed microservices system.
2.1 Prerequisites and Initialization
i. Install Node.js (Setup Node.js on your machine to start. You may get the latest release of Node.js for any operating system at nodejs.org)
ii. Run the below command in the root directory.
npm init |
It will create a package.json file.
iii. Install express and request using the below command.
npm install express request --save |
Express and request are two core packages. The Express package is a Node package. It serves as a cornerstone to power the Node.js microservices architecture and the Request package facilitates connection establishment using web-based APIs.
The function npm init will produce two documents and a directory. One can save as the original file naming server.js, while API support files in the API subdirectory.
The generated folder contains package-lock.json, package.json, and node modules. Node modules store Express and Request package dependencies.
2.2 Creating Database Connection
Let’s begin with the most fundamental step in establishing a DB connection. Generate a db.js file in the db subdirectory to link the database. This is only a simple example program, but huge, complicated apps also have separate databases for each service.
// db.js const mongoose = require('mongoose'); mongoose.connect(process.env.MONGO_URI, { useNewUrlParser: true, useUnifiedTopology: true, useFindAndModify: false, useCreateIndex: true }).then(() => { console.log('Connection successful!'); }).catch((e) => { console.log('Connection failed!'); }) |
In db.js, one must include the mongoose package to access the MongoDB database.
The connect() method will accept two assertions: Uri and options.
2.3 Specifying the Routes
Establishing the routes is a crucial step in the creation of Node.js microservices. Two destinations for sending and receiving responses from the routes.
Create a server.js file in the root directory. It will be executed when the server is started. In the server.js, add the code given in the following snippet. An app object is accountable for setting or removing characteristics within the application scope in JavaScript programming. The port is now supplied, and the system attributes are defined based on the process objects. The job of the process object is to conduct the operation by completing the input, executing the given process, evaluating the process’s output state, and then terminating the process.
The standard value for the port requirement is 3000. By defining PORT as the environment variable, you may configure the port value (integer) dependent on the system the program is operating on.
In the subsequent step, a route object is sent from the routes.js document to the API subdirectory. During this process, the app object (which was previously constructed) is pushed through with the routes object. This authorizes the application to begin wiretapping the specified port. As soon as this procedure concludes, the application shows a notification on the prompt.
Each server-defined route must be allocated a controller object target. Utilize the two destinations and an endpoint that gives application data to construct the controller object. For such missions, the two factors establishing the route for distant endpoints will include the two ZIP codes. When the objective is set, the endpoint indicates the determined distance in miles between the 2 ZIP codes.
let express = require('express'); let app = express(); let port =process.env.PORT || 3000; let routes = require('./v1/routes'); routes(app); app.listen(port,function(){ console.log('Listening on port: ' + port); }); |
With the “use strict directive,” modern releases of JavaScript ensure the security of coding standards. “module.exports” is used to declare the functionalities within a component. Thus, the specified functions may be utilized by storing them in a separate file that contains the route’s component. The routes component defines the Express package’s routes and is loaded through the server.js directory.
Two routes are introduced to the microservice at this level. The GET queries on the /about endpoints are delivered using the initial route. The controller’s role is to reply to such queries. The second route handles GET requests on the /distance object or endpoint, with the controller calling the GET distance method. “zipcode1” and “zipcode2” are correspondingly supplied as arguments.
In the subsequent phase, the controller object which manages those queries is built. It is essential to remove the controller object from the functionalities of the server.js and routes.js files to ensure that every file can view it.
2.4 Building the Controller
Applying controller logic to the microservice provides it with a variety of useful capabilities. A controller object evaluates user objectives, activities and notifies process objects of any new or updated data.
For such a microservice, you’ll need to create a controller object within the controller file with two properties. The two attributes are merely routines for processing responses coming from the route’s component.
const controller = require('./controller'); module.exports = function(app) { app.route('/details').get(controller.details); app.route('/distance/:from/:to').get(controller.get_distance_between_two_zip); }; |
The properties controller object is constructed using this code. It refers to the package.json file that is prepared in the first phase of this microservice development. This object enables the process object to acquire and utilize the data of the package.json file.
In addition, the code consists of two independent sections: the about function and the get_distance one. The first feature takes query and response objects. As the response object for performing the about method, a fresh object from the package.json file is given.
The get distance method synchronizes the distance component with the find method (callback function). It supports both distance objects and error objects. If the search fails, the response object is returned.
2.5 Making the External Call
Following the steps for creation of controller logics, the next step is to construct an outside API key to handle requests to a third-party API.
The distance API in order to utilize it is freely accessible at zipcodebase.com.
Below used is the expired test key as the standard key for external api calls in the app. See the following code:
'use strict'; var props = required('../package.json'); var distanceService = require('../service/distanceService'); var controllers = { details: function(req,res){ var details = { name:props.name, version: props.version, description: props.description } res.json(details); }, get_distance_between_two_zip: function(req, res){ distanceService.find(req, res, function(err,distance){ if(err) res.send(err); res.json(distance); }); }, }; module.exports = controllers; |
The preceding code will execute the Request package for the HTTP response. This code provides request, response, and next objects as arguments to the search feature.
With these three, only the request object supports the site’s URL. The action is then processed by the callback function.
In the event of failures, the status of the requests will be HTTP Status code 200. The response body then splits into components and returns, which boosts the response handling’s performance.
2.6 Execution
Your program is now ready to execute, assuming there are no mistakes. There is a transfer of remote things. The controller can encapsulate functions and real examples of external API calls as required.
var request = require('request'); const apiKey = process.env.ZIPCODE_API_KEY || "az748nM1748rppqawvvf4Q1G4ta7qasFSu8l1daqpl8574q8ZAQaqWMWssbEsdwQ"; const zipCodeURL = 'https://zipcodebase.com/'; var distanceService = { find: function(req, res, next) { request(`${zipCodeURL}/${apiKey}`/distance.json/${req.params.from}/${req.params.to}/mile', function (error, response, body) { if (!error && response.statusCode == 200) { response = JSON.parse(body); res.send(response); } else { console.log(response.statusCode + response.body); res.send({distance: -1}); } }); } }; module.exports = distance; |
3. Conclusion
Each function in Node.js microservices is platform independent, accessible, and upgradeable, which considers microservices a desirable technique to design in the business.
Microservices are easily integrated, and also with similar Node.js microservices of well-defined platforms utilizing protocols like HTTP, they stay steady and accessible in the case of a failure, meaning that even if the computer hosting the microservice fails, the program must continue to deliver its objective.
I believe the objective of your reading this article is accomplished. Are you seeking assistance with your NodeJS project? Do you require professional and devoted engineers with knowledge of NodeJS? Then approach us immediately in order to engage with our best NodeJS professionals.


Comments
Leave a message...