
Angular is known as one of the most popular front-end JavaScript frameworks created by Google to help developers build scalable enterprise-grade web applications. Sometimes these application sizes could go large because of requirements and this also affects applications’ performance/ load time.
In order to reduce the load time and enhance the overall experience for users, Angular development services providers use a technique which is known as lazy loading. This native Angular feature is very useful in terms of performance as it allows users to load only the required bits of web application based on priority and then it loads other modules as and when needed.
Here in this article, we will learn about the lazy loading feature module in Angular, what is NgModules and how to import NgModule from Angular, how lazy loading works, how the lazy load feature module is used in a new Angular project, and how it is beneficial to speed up a web application.
1. What is Lazy Loading in Angular?
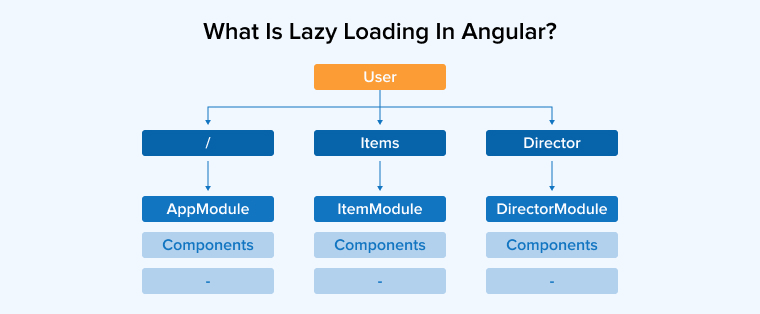
Lazy loading features of Angular refer to the technique of loading all file-loaded webpage elements only when they are required. Fetching all images, videos, CSS, and JavaScript code eagerly might mean long load times — bad news for users.
Lazy loading is often used in the web app when there are many images and videos/media on the network tab of a website. The lazy loading feature loads the elements in the site based on their location on the page as and when the user scrolls into the view. This feature helps to avoid using a lot of bandwidth and bogging down page views on the network tab.
Angular is a Single Page Application (SPA) framework that completely relies on JavaScript for most of its functionalities. As the application grows the app’s collection of JavaScript can easily become large. Eventually, it corresponds to increasing the data usage and its load time. In order to speed up things, you can use lazy loading which is required to fetch the modules which are on top of priority and defer the loading of other modules unless and until they are required.
2. What are NgModules?
There are some Angular libraries such as RouterModule, BrowserModule, and FormsModule are NgModules. Angular Material, which is a third-party tool, is also a type of NgModule from the Angular core. NgModule from Angular core consists of files and code related to a specific domain or that have a similar set of functionalities.
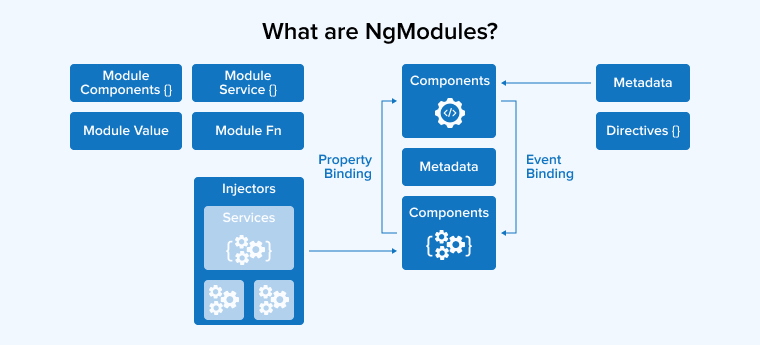
A typical NgModule file declares components, directives, pipes, and services. It can also import other modules that are needed in the current module. One of the important advantages of NgModules is that they can be used for lazy loading modules. Let’s have a look at how we can configure lazy loading.
3. Why Do We Need Lazy Loading in Angular?
Lazy loading is used by Angular developers as sometimes they need to load the routes whose UI is being displayed and not any other. This means that if the user is on the website’s homepage, any other site page shouldn’t be loaded. This concept might not make sense when a website has few pages. However, using this approach can be very beneficial for all business sizes.
3.1 Benefits of Lazy Loading in Angular
Here are some of the major advantages of lazy loading in Angular –
- Less Data Usage: Lazy loading can be used to split the application data into smaller chunks that can be loaded when required.
- Faster load time: JavaScript comes with various instructions enabling developers to display the webpage and load its data accordingly. And with Angular, there is a render-blocking resource which means that the browser will not load the JavaScript all at once but will render the page. By using lazy loading, JavaScript can be split into chunks and loaded separately.
- Conserved Browser Resources: As the web browser loads only required chunks, there will be no wastage of CPU and memory to render and interpret the code.
4. Steps to Implement Lazy Loading in Agular
Let’s understand how to implement Lazy loading in Angular applications-
Step 1: Create a New Project
Create a new Angular project with the name lazy-loading-example by using the below command:
ng new lazy-loading-example –routing |
Go to the new project directory by using the below command:
cd lazy-loading-example |
Step 2: Create a Module and a Separate Routing File
The very first thing to do is create the angular module and separate routing file as in general, the independent routing can handle the components of the lazy loading modules present in Angular 11. For creating the module and routing file, the developer needs to use the following command.
ng generate module products --routing OR ng g m products --routing |
In this command, the routing file name is products.
The one question that beginners ask is why to start creating with a module. The answer to this question is the structure of Angular technology. With it, lazy loading a single component isn’t possible. This means that a module in Angular is a collection of components and a single module declares a set of dependencies. All these dependencies form a chunk which is a transpiled JavaScript code. Here, the main chunk has modules that are imported directly which are generally lazily loaded from separated chunks.
Step 3: Create a Component
The next step is to create a component inside the products module.
For this, we will go through an example. Imagine there is a billing portal and a route ‘/admin-dashboard’ which enables displaying the admin dashboard UI of the portal. It comes with an option that asks you to create a new invoice and also displays the old invoices of various admins. Here is the command that can help you create a component named admin dashboard. The command is –
ng generate component products OR ng g c products |
Step 4: Add the Link to the Header
Now, the developer must add a link to the header for which lazy loading must be implemented. In this case, only the ‘products’ component is loaded when the interrelated route is active by following the link present in the header of the ‘/products’ route.
For this, the following code can be written in the app.component.html –
//Example of Lazy Loading products page <button type="button" routerLink="/home" [routerLinkActive]="['active']"> Home </button> <button type="button" routerLink="/categories" [routerLinkActive]="['active']"> Categories </button> <button type="button" routerLink="/products" [routerLinkActive]="['active']"> Products </button> <router-outlet></router-outlet> |
Step 5: Implement Lazy Loading with loadChildren()
Now, it’s time to implement lazy loading using the loadChildren(). The component that is displayed on the ‘/products’ route will be lazily loaded using two different implementation approaches namely – Promise and Async.
Using Promise
First, the implementation will be carried out by using promise. Here, lazy loading is implemented with loadChildren by writing a code that uses a promise-based syntax. To achieve this, as seen in the below code, the Angular developers need to changes in app-routing.module.ts –
const routes: Routes = [ { path: '', redirectTo: 'products', pathMatch: 'full' }, { path: 'products', loadChildren: () => import('./products/products.module').then(m => m.ProductsModule) } ]; |
Here, the path property value is set as the ‘/products’ route. Besides this, as the above code uses a promise-based syntax to specify which system routes should be lazily loaded, these routes must be added to the loadChildren property.
Using async
For implementing lazy loading, async can also be used instead of promises. It helps the developers in making the code simpler, presentable, and readable. To write a code using async, the following example can be taken into consideration –
const routes: Routes = [ { path: '', redirectTo: 'home', pathMatch: 'full' }, { path: 'home', loadChildren: () => import('./home/home.module').then(m => m.HomeModule) }, { path: 'categories', loadChildren: () => import('./categories/categories.module').then(m => m.CategoriesModule) }, { path: 'products', loadChildren: () => import('./products/products.module').then(m => m.ProductsModule) } ]; |
Step 6: Setting Up the Route
The next and final step of the lazy loading implementation process is to set up the route. And for this, the following code can be used in the products-routing.module.ts file.
import { NgModule } from '@angular/core'; import { Routes, RouterModule } from '@angular/router'; import { ProductsComponent } from './products.component'; const routes: Routes = [ { path: '', component: ProductsComponent } ]; @NgModule({ imports: [RouterModule.forChild(routes)], exports: [RouterModule] }) export class ProductsRoutingModule { } |
Final Step: Demonstration of Angular Lazy Loading
After going through and following the lazy loading implementation steps in Angular, you will see the output as shown below except for the CSS.
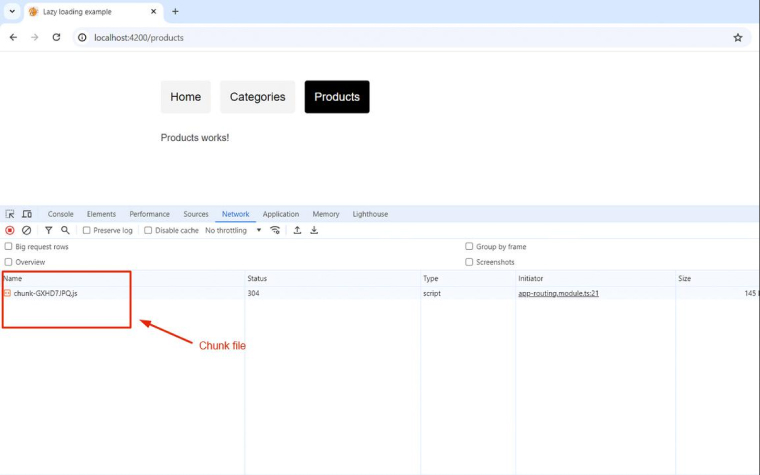
In the output, you can see that once we click on the Product tab, the Lazy loading chunk file is loaded.
5. Lazy Loading vs Eager Loading
Here we will compare lazy and eager loading. To compare them and get a proper understanding, first, the developer will have to create an app module that is eagerly loaded and see its impact on the file’s load time and file size. For this, we need to declare all the components in app.module.ts, as shown in the below code:
@NgModule({ declarations: [ AppComponent, CategoriesComponent, HomeComponent, ProductsComponent ], imports: [ BrowserModule, FormsModule, HttpClientModule, AppRoutingModule ], providers: [], bootstrap: [AppComponent] }) |
To use the Eager Loading strategy, we start by listing all the components we want to load eagerly in the app-routing.module.ts file using the forRoot strategy.
const routes: Routes = [ { path: '', redirectTo: 'home', pathMatch: 'full' }, { path: 'home', component: HomeComponent }, { path: 'categories', component: CategoriesComponent }, { path: 'products', component: ProductsComponent } ]; |
5. Summary
As seen in this blog, when it comes to smaller web applications, it might not matter much if all the modules of the application are loaded at once or not. But when the applications are huge and are carrying out major business transactions, it is really helpful to have separate modules which can be loaded as and when required. And for this, the lazy loading method is used as it can help to reduce the load time of the websites which can be helpful to get the client’s business site rank higher in SEO.





Comments
Leave a message...