Frontend is no longer monolithic, it too (just like backend) has gone micro. Developing and scaling the front end of a large, complex app for instance Angular front-end application was difficult at once. But with the advent of Angular Micro-frontend, it has now become easy.
You can easily hire a trusted Angular development company to develop and deliver a highly responsive enterprise-grade application that can be scaled effortlessly as per your varying business requirements.
This article discusses the concept of micro frontend and its benefits. Then, it guides you through the process of adopting and implementing the micro frontend architecture for your Angular application.
1. What is a Micro Frontend?

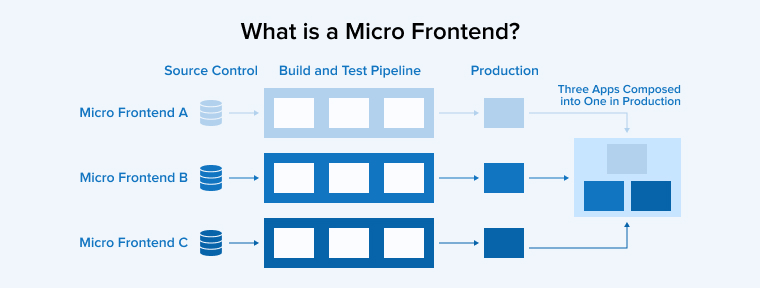
Micro frontend is a concept that facilitates the separation and implementation of the domain as it presents the subdomain of a business. Based on project requirements, the implementor can adopt different frameworks & technologies such as Angular, React, Vue, etc. for the application as not every area of the application works independently.
In addition, the angular team could voluntarily participate in the development process so that responsibilities are bifurcated and tasks remain familiar to the independent team. This is because the main objective is to minimize the code which is shared with other subdomains but it’s important to have a single micro frontend owned and responsible for one team.
Further Reading on: React Micro-frontend
2. Benefits of Angular Micro Frontend Architecture
Here are some of the major benefits of Angular micro frontend architecture –
2.1 Automation of CI/CD Pipeline
One of the major benefits of micro frontend architecture is that when web applications integrate and deploy independently, automation of the CI/CD pipeline is used to simplify the development process. The main reason behind it is that all the functionalities are separate and the developer doesn’t have to worry about the entire application program while bringing in some new features. And if in this process, there is a little error in the code, the CI/CD pipeline will break the process.
2.2 Team Flexibility
There will be multiple teams that will be working on the Angular application and all of them can add value to multiple systems despite working separately. This type of flexibility is possible with Angular micro frontend architecture.
2.3 Single Responsibility
In the Angular micro frontend approach, every team that is responsible for creating angular elements & components for the application with a single fault must focus 100% on the micro frontend’s functionality.
2.4 Reusability
The code created using the micro frontend concept can be used in multiple places. This means that once the source code is created and delivered for a module it can be reused by different teams to create new components and deployed independently.
2.5 Technology Agnosticism
Micro Frontend architecture is known for its independence of technology which means that it enables the developers to use available different technologies from Angular, Vue, React, and more.
2.6 Simple Learning
In this approach, it is easy for any developer to learn and understand the smaller modules.
3. How to Adopt a Micro Frontend?
Here are some of the ways that show you how to adopt a micro frontend architecture for your Angular app development project –
3.1 Server-Side Template Composition
The server-side composition is maintained among the browser and application server as it plays a vital role in the composition of the page which is fully assembled before it reaches the customer’s browser. To simplify the procedure, the micro-front ends are cached at the Content Delivery Network (CDN) which is then cascaded to the client runtime. The server composes the view during built time when it retrieves, organizes, and assembles the final output. The process makes the application robust as the load speed of the page increases as compared to pure client-side integration techniques.

3.2 Build-Time Integration
Build-time integration can be performed using the web or any component-driven framework to have effective collaboration and reutilize the existing code. The main goal of this approach is to publish it as a package. And later the Angular developers can use container applications to involve them as library-dependent. This way the integrated components remain a fully decoupled build pipeline for each frontend. For instance, from the container application, package.json uses the micro frontends as a package.
3.3 Run-Time Integration via Iframes
Using iframes for runtime integration is one of the best ways for any Angular developer to compose applications in the browser and create web pages from autonomous sub-pages. This can be possible because of iframes as they are just simple HTML documents that could embed inside another HTML document. This is helpful for developers to have better isolation of global variables and styles in iframes. For instance, applications like Spotify use iframes to fasten various sections of the view.
3.4 Run-Time Integration via JavaScript
JavaScript is one of the ways to implement runtime integration as it uses an approach to bundle and configure the frontend’s micro frontend. But considering this case, the package .json file is not used to bundle the individual files. This is why when JavaScript is used for runtime integration it can easily be used by associated teams for micro-frontend implementation with this each micro-frontend is incorporated into the page using <script> tag. Here, the script tag attaches global functions as the beginning of everything as it will not start the rendering process immediately. As a result, the container application determines what should be mounted and directs relevant functions to render itself at which position.
3.5 Run-Time Integration via Web Components
Runtime integration through Web Component is also an alternative approach. In this concept, each component defines an HTML element and this is for the container of the application to represent an instance besides defining a global function called by the container. The web components are known as the isolated components that developers can reuse in the web applications and their HTML pages and these are known as custom elements.
Install Dependencies
Install the required dependencies, including @angular-architects/module-federation
ng add @angular-architects/module-federation |
1. The very first step is to create multiple Angular applications that can be later used in the project as micro frontends. Below is the way it can be done –
// Create Remote Application 1 ng new remoteApp1 // Create Remote Application 2 ng new remoteApp2 // Create Remote Application 3 ng new remoteApp3 |
2. After that, the developer needs to enable Angular architects module federation for each application in the webpack configuration. Here is the code snippet for the same concept –
// remoteApp1 webpack config module.exports = { ... plugins: [ new ModuleFederationPlugin({ name: 'remoteApp1', library: { type: 'var', name: 'remoteApp1' }, filename: 'remoteEntry.js', exposes: { './RemoteApp1Module': './src/app/app.module.ts' } }) ] } // remoteApp2 webpack config module.exports = { ... plugins: [ new ModuleFederationPlugin({ name: 'remoteApp2', library: { type: 'var', name: 'remoteApp2' }, filename: 'remoteEntry.js', exposes: { './RemoteApp2Module': './src/app/app.module.ts' } }) ] } // remoteApp3 webpack config module.exports = { ... plugins: [ new ModuleFederationPlugin({ name: 'remoteApp3', library: { type: 'var', name: 'remoteApp3' }, filename: 'remoteEntry.js', exposes: { './RemoteApp3Module': './src/app/app.module.ts' } }) ] } |
The above code shows that the developers need to configure the Angular webpack module federation plugin for remoteApp1, remoteApp2, and remoteApp3. In this case, the property of the name specifies unique names for each micro frontend as they can be later used to identify the micro frontends in the main Angular application. In this case, the names are remoteApp1, remoteApp2, and remoteApp3.
Besides this, there is also a library property that specifies how the Angular micro frontend should expose all the modules present in it. For instance, in the above code, the type is set as ‘var’, which means that each module will be a global variable with the names remoteApp1, remoteApp2, and remoteApp3. In addition to this, there is also an exposes property that defines which modules will be used to expose the Angular micro frontends.
3. After the architect module federation is enabled, the next step is to configure the Angular applications so that they can easily get exposed to certain modules that might be used by other applications. To do so, the development teams can use the following command –
// remoteApp1 exposes AppComponent to be used by other applications @NgModule({ declarations: [AppComponent], exports: [AppComponent] }) export class RemoteApp1Module { } // remoteApp2 exposes AppComponent to be used by other applications @NgModule({ declarations: [AppComponent], exports: [AppComponent] }) export class RemoteApp2Module { } // remoteApp3 exposes AppComponent to be used by other applications @NgModule({ declarations: [AppComponent], exports: [AppComponent] }) export class RemoteApp3Module { } |
4. After that, module federation is configured in the main application to consume the created modules that are exposed by the micro frontends. For this the code is as below –
// main app webpack config module.exports = { ... plugins: [ new ModuleFederationPlugin({ remotes: { remoteApp1: 'remoteApp1', remoteApp2: 'remoteApp2', remoteApp3: 'remoteApp3' } }) ] } |
In the above code, we are configuring the webpack module federation plugin for the main application. The remote property is used to specify which micro frontends we want to consume. In this case, we are consuming the micro frontends named remoteApp1, remoteApp2, and remoteApp3. The value for each remote specifies where the micro front end can be found. In this example, we assume that each micro frontend is available at its domain or subdomain.
// Use the shared modules in the main application to create a seamless user experience import { AppComponent } from 'remoteApp1/RemoteApp1Module'; import { HeaderComponent } from 'remoteApp2/RemoteApp2Module'; import { FooterComponent } from 'remoteApp3/RemoteApp3Module'; @NgModule({ declarations: [AppComponent, HeaderComponent, FooterComponent], imports: [...], bootstrap: [AppComponent] }) export class AppModule { } |
In the above code, we are importing the shared modules that were exposed by the micro frontends. Each import statement specifies which module to import and from which micro frontend. We assume that each shared module is exported from the RemoteApp1Module, RemoteApp2Module, and RemoteApp3Module respectively.
The imported modules are then declared in the declarations array of the main application’s module so that they can be used in the main application’s components. Finally, the bootstrap property specifies the component that should be used as the root component of the application. In this case, we are using the AppComponent from RemoteApp1Module as the root Component.
5. Now that the main application has consumed the modules, the developers can make use of the shared modules in the main application to develop a seamless user experience for getting more audience to the business application. And for that, the following code can be used –
// Use the shared modules in the main application to create a seamless user experience import { AppComponent } from 'remoteApp1/RemoteApp1Module'; import { HeaderComponent } from 'remoteApp2/RemoteApp2Module'; import { FooterComponent } from 'remoteApp3/RemoteApp3Module'; @NgModule({ declarations: [AppComponent, HeaderComponent, FooterComponent], imports: [...], bootstrap: [AppComponent] }) export class AppModule { } |
As seen in the above code, the developers have defined the routes of the main application that will match the micro frontends. In this case, for each micro frontend, the developer has to define a route that specifies the lazy-loaded module and the path to load it. Besides this, the Angular developers can also use the loadChildren function in the existing application in order to specify the module that has to load when the route is activated. In addition to this, as shown above, the developers will also have to import the RouterModule and configure it in the micro frontend project with the defined routes.
4. Conclusion
As seen in this blog, in today’s modern technology age where business wants to have a unique mobile application with the latest features and faster response time, there is a rising demand for the usage of micro frontend architectures to make the frontend codebase sophisticated. For this, every Angular app development company needs to create boundaries that can help them create the right levels of coupling between the domain and technical entities. Therefore, a proper understanding of this approach is essential to deliver a highly-scaled application.
FAQ
What are Angular micro frontends?
Angular micro frontend is an architectural pattern that comes with Angular developers breaking down web applications into smaller deployable micro-applications. Each of these micro-applications comes with its own set of features.
What is an example of a Microfrontend?
When it comes to micro frontend, no single team has ownership of the application UI, each team will have a piece of it. For instance, one team will be managing the search box of the application, while others might be working on the code.
What is module federation Angular?
In the Angular app development ecosystem, module federation is a powerful feature. It enables the developer to use a Webpack that offers features to implement Micro Frontends in Angular.


Comments
Leave a message...