
In modern web development, delivering fast, responsive, and SEO-friendly applications has become a necessity. Angular, one of the most robust front-end frameworks, continues to adapt by introducing powerful features to meet these demands. One such feature is Angular Hydration, which bridges the gap between server-side rendering (SSR) and client-side interactivity, ensuring faster initial load times while maintaining dynamic behavior. By leveraging Angular Hydration, developers can significantly enhance web application performance, optimizing both speed and responsiveness.
In this blog, we’ll explore the core concept of Angular Hydration, understand why it significantly improves performance and user experience, and examine the different types of hydration it supports. We’ll also walk through how it functions internally and provide a practical, step-by-step guide to enabling hydration in your Angular applications using SSR. Whether it’s about optimizing an existing project or starting a new one, mastering hydration will help developers from Angular development companies build more efficient and scalable web apps. Let’s dive into Angular Hydration and unlock the full potential of SSR.
1. What is Angular Hydration?
Angular Hydration, introduced in Angular v16 as a developer preview and became stable in Angular v17. It has now become a default feature in Angular, so developers no longer need special configurations to enable it. Hydration is the process that allows an Angular application to become fully interactive after being server-side rendered. It offers a seamless blend of server and client-side rendering.
When a user first visits an Angular Universal application, the server generates the HTML content and sends it to the browser. This content appears immediately, improving load time and SEO. However, the page is static and not interactive yet. Hydration is the process that makes this static HTML dynamic by allowing Angular to take control of the DOM, initialize components, set up event listeners, and enable change detection.
With hydration, Angular essentially reuses the server-rendered HTML and attaches the application logic to it without rebuilding the entire DOM. This results in better performance, smoother transitions, and faster interaction readiness for users.
2. Why Hydration Matters in Angular?
- Increased Page Loading Time: Angular hydration boosts page loading speed by using the already-rendered HTML sent from the server. Instead of rebuilding the entire DOM on the client-side, Angular simply connects its component logic and event listeners to the existing HTML structure, saving both time and processing power. Hydration improves performance by reducing the need for client-side re-rendering.
- Improves Core Web Vitals: Angular Hydration directly contributes to better performance metrics that impact user experience and search engine rankings:
- First Input Delay (FID): By reducing the JavaScript that needs to be loaded and initialized on the client, hydration allows users to interact with the page almost instantly.
- Largest Contentful Paint (LCP): Since the largest visual elements (such as hero images or large headings) are already present in the server-rendered HTML, they appear more quickly on the screen.
- Cumulative Layout Shift (CLS): Hydration stabilizes page layout by avoiding unnecessary re-rendering, which means elements stay in place and don’t shift around while the page loads.
- Better SEO: Search engines can fully index the server-rendered HTML before hydration starts. This allows dynamic features to be added afterward without disrupting the page’s crawlability and SEO performance.
- Decreases Client-side Load: Since the HTML is pre-rendered on the server, the browser performs less work initially. This reduces the need for heavy JavaScript execution during page load, easing the client’s processing burden.
- No Flicker: Angular hydration eliminates page flickers or flashes of unstyled content by seamlessly continuing from the server-rendered HTML without a complete re-render, resulting in a smoother and more stable visual experience.
3. What are the Types of Angular Hydration?
Let’s discuss the various Angular hydration techniques to convert the server-rendered HTML into client-side JavaScript using JavaScript bundles.
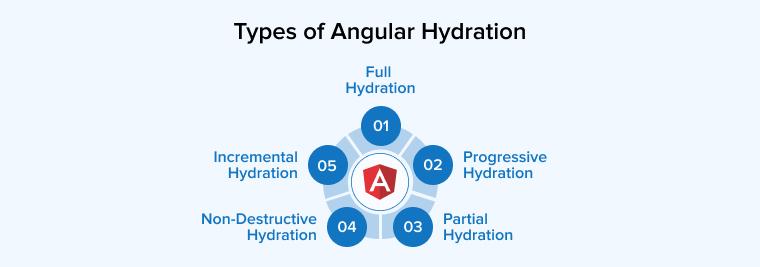
3.1 Full Hydration
Full Hydration in Angular refers to the process where the entire application becomes fully interactive right after the server-rendered HTML is delivered to the client. Angular loads all required JavaScript bundles and reinstates the complete application state in one go. While this ensures the full UI is ready for user interaction immediately, it may impact performance on large apps due to a larger JavaScript payload upfront and longer initial load times. Therefore, full hydration works best for apps needing complete interactivity as soon as the page loads, but may not be ideal for performance-sensitive scenarios.
3.2 Progressive Hydration
As the word “progressive” indicates, the hydration occurs in a progressive manner. The hydration process here is based on the sections users interact with, or which are visible on their screen. Therefore, the critical sections, or we can say sections on top of the page, are considered first for Angular hydration. The remaining content, i.e., off-screen sections, remains static and gets hydrated as users scroll the page further and interact with it. This results in optimizing page loading time and leading to a smooth user experience.
3.3 Partial Hydration
Partial hydration can also be termed as a selective hydration technique. Here, instead of hydrating the entire content, only specific sections of a page are considered for hydration. Unlike progressive hydration, which depends on user interaction or visibility, partial hydration focuses on the functionality or importance of any specific section. Therefore, JavaScript execution gets restricted to critical sections of the page, allowing effective utilization of CPU or memory resources. This approach mainly helps Angular applications loaded with a mix of static and dynamic content, suffering from performance issues.
3.4 Non-Destructive Hydration
Non-destructive hydration technique introduced in Angular 16 overcomes the challenges of destructive hydration prevalent in previous Angular versions. Here, the DOM destruction does not take place when the client application loads and bootstraps. It does not rerender the initial server-rendered view. Instead, it attaches client-side features to the previously rendered HTML element, thus preserving the unnecessary changes in the DOM structure. Thus, non-destructive hydration increases the client-side interactivity of the application by facilitating a smooth transition from server-side rendering.
3.5 Incremental Hydration
Incremental hydration in Angular is a cutting-edge feature introduced as a developer preview in Angular 19, designed to optimize server-side rendering (SSR). It allows developers to selectively hydrate components based on specific triggers, such as user interaction, viewport visibility, or idle time. By controlling when parts of an application become interactive, incremental hydration significantly improves performance metrics like First Input Delay (FID) and Cumulative Layout Shift (CLS). Using @defer blocks, developers can defer the hydration process of certain components, reducing the initial load and enhancing user experience through more efficient resource usage and faster interactivity.
4. How Angular Hydration Works?
Let’s understand the step-by-step process of Angular hydration working:
- Server-Side Rendering (SSR)
- The client’s browser sends a request to the server.
- The server receives the client’s request for the page.
- Using Angular Universal, Angular renders the requested page on the server and generates static HTML.
- This static HTML is sent back to the client’s browser.
- Initial HTML LOAD
- The browser receives the HTML and displays the content immediately.
- The user sees a fully rendered page without waiting for client-side JavaScript to load and execute.
- Client-Side Hydration
Angular begins the bootstrapping process on the client side by running the associated JavaScript. As hydration takes place, Angular evaluates the existing server-rendered HTML against the current client-side application state. It then proceeds in the following manner:- Analyzes the pre-rendered HTML to identify and connect it with the correct Angular components and directives.
- Links the initial application state and sets up event listeners to enable user interaction.
- Processes and updates dynamic elements, such as content retrieved from APIs or triggered by user interactions.
5. Step-by-Step Guide to Enable Angular Hydration Using SSR
Let’s explore how to activate Angular hydration in versions 16 and 17 using server-side rendering (SSR). The following are the steps to enable hydration within your Angular setup through SSR.
Step 1: Enable Server-side Rendering
This command generates and modifies the application code to activate server-side rendering (SSR) and incorporates additional files into the project’s directory structure.
For Angular v16:
ng add @nguniversal/express-engine |
hydration-example |-- src |-- app | |-- app.server.module.ts # server application |-- main.server.ts # main server application |-- server.ts # application server |-- tsconfig.server.json |
For Angular v17:
ng add @angular/ssr |
hydration-example |-- src |-- app | |-- app.config.server.ts # server application |-- main.server.ts # main server application |-- server.ts # application server |
Angular CLI generates a default project layout that eases the setup needed for hydration and server-side rendering. This generated project structure allows easy inclusion of hydration providers such as provideClientHydration() within the main application module or configuration. This simplicity is especially useful when setting up the bootstrapping process for applications intended to run on the server.
Step 2: Enable Client Hydration
For Angular v16
To enable hydration, modify the app.module.ts file by importing the provideClientHydration function from @angular/platform-browser. Then, include this function within the providers array of the AppModule, as demonstrated below.
import { NgModule } from '@angular/core'; import { BrowserModule, provideClientHydration } from '@angular/platform-browser'; import { AppRoutingModule } from './app-routing.module'; import { AppComponent } from './app.component'; @NgModule({ declarations: [ AppComponent ], imports: [ BrowserModule, AppRoutingModule ], providers: [provideClientHydration()], bootstrap: [AppComponent] }) export class AppModule { } |
For Angular v17
To enable hydration, go to your main app.config.ts file and import provideClientHydration from @angular/platform-browser. Then, include it in the list of providers used during the application’s bootstrap process.
In our setup, the appConfig variable is defined in a separate file and exported to main.ts, allowing all configurations to be centrally managed and used during the Angular application’s bootstrap process.
app.config.ts
import { ApplicationConfig } from '@angular/core'; import { provideRouter } from '@angular/router'; import { routes } from './app.routes'; import { provideClientHydration } from '@angular/platform-browser'; export const appConfig: ApplicationConfig = { providers: [provideRouter(routes), provideClientHydration()] }; |
main.ts
import { bootstrapApplication } from '@angular/platform-browser'; import { appConfig } from './app/app.config'; import { AppComponent } from './app/app.component'; bootstrapApplication(AppComponent, appConfig) .catch((err) => console.error(err)); |
Do not forget to include provideClientHydration in your server bootstrap configuration to enable hydration on the client side while using a custom or manual setup.
Step 3: Start the Server
For the verification of SSR and hydration, run the application locally using the command below:
For Angular v16:
npm run dev:ssr |
For Angular v17:
ng serve |
6. Skipping Hydration for Specific Components
Angular provides the option to skip hydration for particular components if you face issues like errors due to direct DOM manipulation or invalid HTML structure with hydration-enabled components. To disable the hydration, you just need to add the ngSkipHydration attribute to the component’s host tag within your template. This ensures that Angular bypasses the hydration process for that particular component and its children.
Adding the ngSkipHydration attribute to a component’s host element prevents Angular from hydrating that specific component. Applying it to the root application component will skip hydration for your entire application. This technique should be used only when necessary to work around unavoidable issues or break specific problematic components that otherwise fail to hydrate correctly.
7. Final Thoughts
Angular Hydration bridges server-side rendering with client-side interactivity, improving performance, SEO, and user experience. By reusing server-rendered HTML and restoring app logic efficiently, it ensures faster load times and smoother interactions. With the latest updates, Angular hydration is now easier to implement and essential for building high-performance web applications.


Comments
Leave a message...