

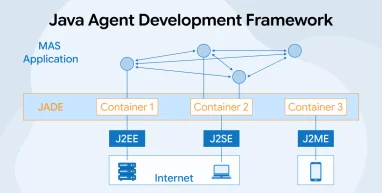
Modern software applications are becoming more advanced, with a growing need to handle tasks, share information, and make decisions without constant human involvement. Managing these operations through a single program can become complicated, especially when an application needs to handle multiple tasks at the same time. This is where the Java Agent Development Framework (JADE) becomes useful.
JADE is an open-source framework that helps Java development companies build applications using multiple intelligent software agents. Each agent can be designed to perform a particular task, communicate with other agents, and work independently toward a common goal. Built using Java, it provides the tools needed to create agents, manage their activities, and support communication between them.
In this guide, we’ll explore what JADE is, its key features, architecture, how to set it up, pros, cons, best practices, and a practical example.
What is the Java Agent Development Framework (JADE)?
JADE, or Java Agent Development Framework, is a Java-based platform for developing applications where multiple independent agents work together. It provides tools and APIs that help you create agents, manage their activities, and support communication between them. Each agent can perform its own tasks and cooperate with other agents to achieve a common goal.
JADE also supports agent life-cycle management, coordination, and movement between systems. Its built-in libraries and monitoring tools make multi-agent development easier. Its open-source feature helps develop different types of agent-based applications where cooperation between several specialized components is required.
Key Features of JADE
JADE is witnessing increasing usage owing to the following characteristics:
- FIPA Compliance: JADE follows FIPA standards, allowing its agents to communicate and work with agents built on other compatible platforms. This improves interoperability and makes integration between different agent systems easier.
- Distributed Agent Platform: JADE can operate across different computers and operating systems. Its agents can also move between containers while the system is running, helping them adapt to changing requirements and environments.
- Communication Protocols: JADE enables agents to exchange information smoothly by supporting established communication standards such as FIPA-ACL to ensure clear and reliable interactions.
JADE Architecture
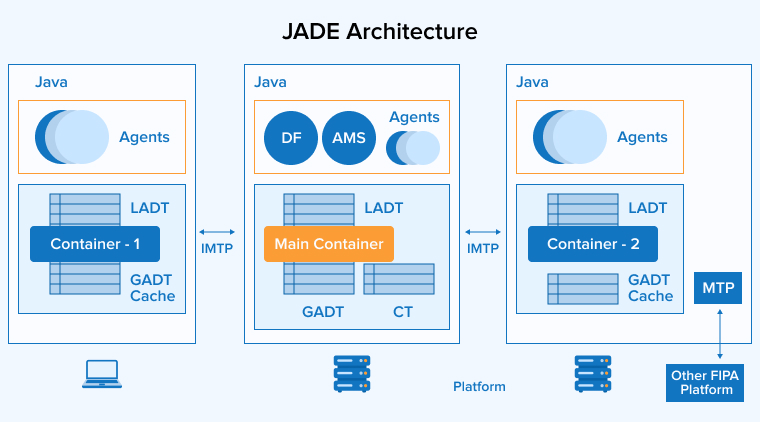
JADE offers a structured environment for building and running intelligent agents. Its components handle tasks such as agent management, communication, service discovery, and coordination. This structure allows agents to communicate, discover available services, and operate across multiple containers.
JADE Platform
JADE provides the infrastructure needed to run and manage multi-agent applications efficiently. It handles essential tasks such as creating agents, managing containers, supporting communication, and coordinating platform services. Agents can operate on one computer or communicate across several networked systems, which makes the platform suitable for distributed applications.
JADE also includes built-in services for registering and locating agents, exchanging messages, and controlling agent activities. Its runtime environment provides you with the tools and services required to execute, coordinate, and manage agents effectively.
Main Container
The Main Container is the central component of a JADE platform and is created when the platform starts. It provides the basic infrastructure needed to manage the agent environment and connected containers. It keeps track of active containers and gives access to important services, including the Agent Management System (AMS) and Directory Facilitator (DF).
By connecting these services and containers, the Main Container supports communication and coordination across the platform. It therefore serves as the foundation for managing agents and maintaining the overall JADE environment.
Peripheral Containers
Peripheral Containers extend the JADE platform by providing additional spaces where agents can run and operate. They connect to the Main Container for agents in different containers to remain part of the same platform. This arrangement makes it possible to distribute agents across multiple computers while maintaining communication between them.
You can add more containers as your application grows, which gives your system greater flexibility and helps it support larger multi-agent environments without changing its basic structure.
Agent Management System (AMS)
The Agent Management System (AMS) controls the identity and lifecycle of agents within a JADE platform. When an agent joins the platform, the AMS registers it and assigns a unique Agent Identifier (AID) for the agent to easily recognize itself. It maintains information about active agents and supports key lifecycle operations, including creating, suspending, moving, and terminating agents.
The AMS, through its central management, helps maintain an organized agent environment and ensures that each agent remains properly identified throughout its operation.
Directory Facilitator (DF)
The Directory Facilitator (DF) helps agents find services within a JADE platform. Agents can publish the services they offer, which allows other agents to search for suitable providers when needed. For example, an agent requiring translation can query the DF and identify agents that provide that service without knowing their names or locations beforehand. This approach keeps communication flexible and reduces direct dependencies between agents.
Agent Communication Channel
The Agent Communication Channel (ACC) serves as the communication backbone of a JADE platform. It enables agents to exchange messages through Agent Communication Language (ACL), which gives each message a structured format. Agents can use this channel to send requests, provide information, return responses, or issue instructions.
The ACC also connects agents operating in different containers, including those hosted on separate machines. It enables agents to exchange information, organize their tasks, and work together smoothly across a distributed multi-agent system.
Setting Up the JADE Framework
Setting up the Java Agent Development Framework (JADE) starts with preparing a Java project, adding the JADE library, creating an agent, and launching the JADE runtime. Once the basic setup works, you can extend the application with agent behaviors, message communication, service discovery, and multiple containers.
1. Prerequisites for JADE
Before setting up JADE, install the following:
- Java Development Kit (JDK) to compile and run the application.
- Java IDE, such as IntelliJ IDEA, Eclipse, or Visual Studio Code.
- JADE library (jade.jar) to access JADE classes and APIs.
- Basic knowledge of Java classes, inheritance, and object-oriented programming.
You also need to configure the Java environment correctly. Verify the installation by running:
java -version |
This command displays the installed Java version. You can also check the Java compiler with:
javac -version |
If both commands return a version number, your Java environment is ready.
2. Add the JADE Library
After installing Java, download the JADE distribution and add the required JADE JAR file to your project.
If you use an IDE, add jade.jar to the project’s dependencies or classpath. The JADE library provides important classes such as Agent, Behaviour, and other classes required to create and manage agents.
After adding the library, you can import JADE classes into your Java application:
import jade.core.Agent; |
The import statement makes the Agent class available to your Java code. The Agent class provides the basic functionality required to create a JADE software agent.
3. Create Your First JADE Agent
Create a Java class and extend the JADE Agent class:
import jade.core.Agent; public class MyAgent extends Agent { protected void setup() { System.out.println("MyAgent is ready."); } } |
This example contains a few important parts.
import jade.core.Agent; imports the JADE Agent class. You need this class because every JADE agent normally extends Agent.
public class MyAgent extends Agent creates a new agent named MyAgent. The extends keyword establishes inheritance from JADE’s Agent class, giving MyAgent access to the functionality provided by the framework.
protected void setup() defines the initialization method for the agent. JADE automatically calls setup() when it starts the agent. You can use this method to initialize data, register services, or add behaviors.
System.out.println(“MyAgent is ready.”); prints a message to the console when the agent starts. This provides a simple way to verify that the agent has successfully launched.
4. Add a Behavior to the Agent
An agent becomes more useful when you assign tasks through behaviors. JADE provides different behavior classes for handling tasks that execute once, repeatedly, or according to specific conditions.
For example:
import jade.core.Agent; import jade.core.behaviours.OneShotBehaviour; public class MyAgent extends Agent { protected void setup() { addBehaviour(new OneShotBehaviour() { public void action() { System.out.println("Agent is performing a task."); } }); } } |
Here, OneShotBehaviour defines a task that runs once. The action() method contains the actual task logic.
The addBehaviour() method attaches the behavior to the agent. When JADE schedules the behavior, it executes the code inside action().
This approach separates the agent’s identity and lifecycle from its individual tasks, making it easier to add multiple activities to the same agent.
5. Start the JADE Platform
After creating the agent, start the JADE runtime from the command line:
java -cp jade.jar jade.Boot -gui |
The -cp option specifies the Java classpath. Here, jade.jar tells Java where to find the JADE framework classes.
The jade.Boot class starts the JADE runtime environment, while the -gui option starts the JADE graphical interface.
The GUI allows you to monitor the running platform, containers, and agents. It provides a convenient way to check whether your agents have started successfully.
6. Start an Agent from the Command Line
You can start your custom agent by passing its name and class to JADE:
java -cp jade.jar;. jade.Boot -gui myAgent:MyAgent |
For Linux or macOS, use : instead of ; in the classpath:
java -cp jade.jar:. jade.Boot -gui myAgent:MyAgent |
In this command:
- jade.Boot starts the JADE platform.
- -gui enables the graphical interface.
- myAgent specifies the agent’s name.
- MyAgent specifies the Java class that implements the agent.
When JADE starts the application, it creates an agent with the name myAgent based on the MyAgent class.
7. Verify the Agent
After starting JADE, check the JADE GUI to verify that your agent appears in the platform.
You should see the Main Container and the running agent. If you use the following code:
System.out.println("Agent name: " + getLocalName()); |
JADE displays the agent’s local name in the console.
The getLocalName() method retrieves the name assigned to the current agent. This method can help you identify an agent when multiple agents run on the same platform.
8. Create Multiple Agents
JADE becomes more powerful when you run multiple agents that perform different tasks. For example, you can create two agents:
public class SenderAgent extends Agent { protected void setup() { System.out.println("Sender Agent started."); } } public class ReceiverAgent extends Agent { protected void setup() { System.out.println("Receiver Agent started."); } } |
The first agent can handle sending tasks, while the second agent can handle receiving and processing information. You can later connect these agents using JADE’s ACL messaging system.
This structure allows you to divide a complex application into smaller, independent components. Each agent can focus on a specific responsibility while JADE manages the underlying agent environment.
9. Basic JADE Setup Flow
The complete setup process follows this sequence:
Install JDK → Add jade.jar → Create an Agent class → Override setup() → Add behaviors → Start jade.Boot → Launch agents → Test communication
Once this basic environment works, you can build more advanced JADE applications using the Agent Management System (AMS), Directory Facilitator (DF), ACL messages, behaviors, and distributed containers.
Creating Our First JADE Agent
Let’s start with the basic building block of a JADE application — an Agent.
1. Import the JAR File or Dependency of JADE
First, we can either add the Maven dependency or include the JADE JAR file from the Maven repository.
<dependency> <groupId> com.tilab.jade </groupId> <artifactId>jade</artifactId> <version>4.6.0</version> </dependency> |
2. Creating Your First JADE Agent
Import the JADE Agent class and create a Java class that extends Agent.
The setup() method is used because it acts as the constructor and initialization phase for a JADE agent. Here, we retrieve the arguments using the built-in getArguments() method. We use the first argument as the interval for the TickerBehaviour and the second argument as the maximum number of ticks. Once the tick count reaches maxTicks the stop() method stops the TickerBehaviour. The takeDown() method is called when the agent itself is terminated.
package com.project.jade; import jade.core.Agent; import jade.core.behaviours.TickerBehaviour; public class MyAgent extends Agent { @Override protected void setup() { Object[] args = getArguments(); if(args != null && args.length > 0){ System.out.println("1st Argument from MyAgent for the interval: " + args[0]); } int interval = Integer.parseInt((String) args[0]); int maxTicks = Integer.parseInt((String) args[1]); addBehaviour(new TickerBehaviour(this,interval) { @Override public void onTick() { System.out.println("TickerBehaviour is running till interval time and the tick count is " + getTickCount()); if(getTickCount() >= maxTicks){ System.out.println("Maximum number of ticks is " + maxTicks); stop(); } } }); } @Override protected void takeDown() { System.out.println("MyAgent is going to shutdown"); } } |
3. Creating a Waiting Agent
After creating the first agent and understanding how the TickerBehaviour works, Let’s see how an agent can wait for a specific amount of time and then terminate itself.
For this purpose, we’ve created a separate waiting agent. The isAlive() method is used to check whether the agent is currently active. The doWait() method makes the agent wait for a specific amount of time; after the waiting period, doDelete() terminates the agent. When the agent terminates, the takeDown() method is called to perform shutdown-related operations.
package com.project.jade; import jade.core.Agent; public class WaitingAgent extends Agent { @Override protected void setup() { statusCheck(); System.out.println("WaitingAgent wait till the MyAgent task will finish"); doWait(3000); doDelete(); } private void statusCheck(){ System.out.println("WaitingAgent is performing status check..."); if(isAlive()){ System.out.println("WaitingAgent is alive and working"); } } @Override protected void takeDown(){ System.out.println("WaitingAgent process completes and going to shut down"); } } |
4. Creating Container Agent
After understanding the basic agent lifecycle, it’s time to understand where JADE agents actually run. We know that JADE agents execute inside a container. Therefore, here we’re creating a ContainerAgent that retrieves the ContainerController using the built-in getContainerController() method and then gets the name of the container in which the agent is running.
package com.project.jade; import jade.core.Agent; import jade.wrapper.ContainerController; public class ContainerAgent extends Agent { @Override protected void setup() { ContainerController container = getContainerController(); try { String containerName = container.getContainerName(); if(!containerName.isEmpty()){ System.out.println("ContainerAgent is working correctly and container name is "+containerName); } }catch (Exception e){ System.out.println("Unable to read container information"); } } @Override protected void takeDown() { System.out.println("ContainerAgent is going to shutdown"); } } |
5. Execute Program
I started running the agents with the following arguments:
-gui containerAgent:com.project.jade.ContainerAgent; myAgent:com.project.jade.MyAgent(1,5); waitingAgent:com.project.jade.WaitingAgent; |
Here, 1 represents the interval in milliseconds, and 5 represents the maximum number of ticks.
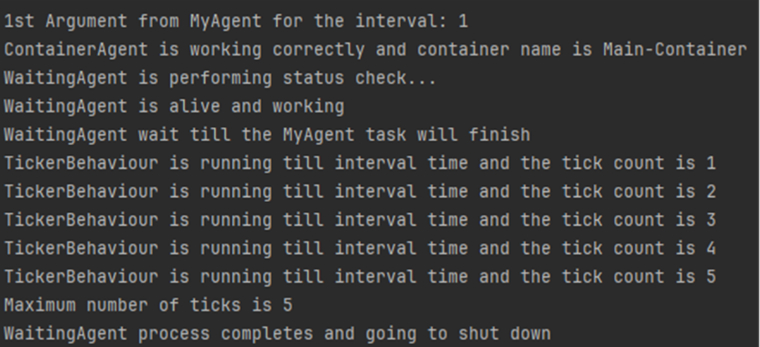
OUTPUT:
Explanation:
- WaitingAgent starts, checks that it is alive, waits for 3 seconds and then shuts down.
- ContainerAgent confirms that it is running inside Main-Container.
- MyAgent receives the interval 1 and executes its TickerBehaviour until the tick count reaches 5.
- When the count reaches 5, stop() stops the TickerBehaviour.
- Finally, WaitingAgent finishes its waiting period and shuts down using doDelete().
What Are the Advantages of Using JADE?
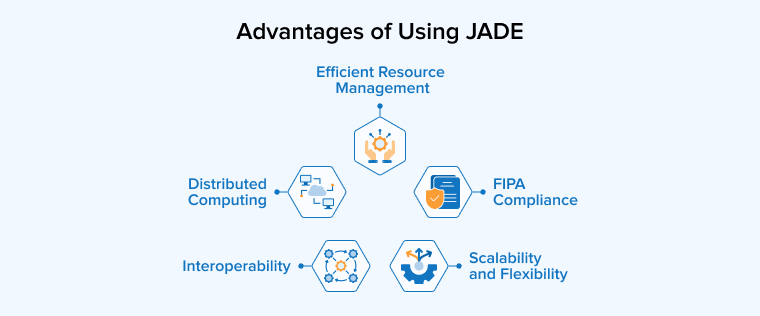
Java Agent Development Framework provides multiple advantages in developing applications involving multiple agents, such as:
FIPA Compliance
JADE follows FIPA standards for developing intelligent agents and supporting communication between them. This standard-based approach helps JADE agents work with other compatible platforms. Thus, it is easier to build distributed applications where different agent systems can exchange information and cooperate effectively.
Distributed Computing
JADE supports applications that run across multiple computers or cloud-based environments. Its communication and management features help coordinate distributed tasks between different components. This setup allows applications to handle workloads efficiently while maintaining reliable communication and smoother overall performance.
Scalability and Flexibility
JADE supports scalable applications by allowing agents to run across multiple machines and containers. Developers can add agents as application requirements grow without redesigning the entire system. Its modular structure also makes it easier to introduce new features, adjust existing functions, and respond to changing user or business needs.
Interoperability
JADE supports communication standards that help different components and services work together smoothly. This makes it easier to connect applications with external platforms and third-party services. Such flexibility also helps meet different integration needs without creating separate communication methods for every system.
Efficient Resource Management
JADE allows agents to handle tasks and resources independently. This can help applications use computing resources more efficiently, especially when workloads are demanding. Better resource management can reduce unnecessary usage, control operating costs, and support consistent application performance.
What Are the Limitations of JADE?
You must consider some of the significant challenges of using JADE that you may come across during and after development.
Performance Overhead
JADE can add some processing overhead because of its built-in services and communication layers. Connecting it with existing systems may also create compatibility and integration difficulties. You can reduce these issues through proper planning, gradual implementation, testing, and sufficient time for learning and experimentation.
Integration Difficulties
Adding JADE to an existing system may result in compatibility concerns, complex architectures, and unfamiliar concepts. Teams can make the transition easier by introducing JADE gradually, testing each stage, and providing enough time for training. Careful preparation and hands-on experimentation can also help identify and resolve integration issues early.
Debugging and Monitoring
Finding problems in JADE applications can be difficult because multiple agents may perform tasks and communicate at the same time. You must often trace interactions across different components to locate errors. Although JADE includes useful monitoring and debugging tools, teams require practical experience with the framework to use them effectively in complex applications.
What Are the JADE Best Practices?
A set of standard best practices, if followed, can help prevent development challenges midway through your project. These are as follows:
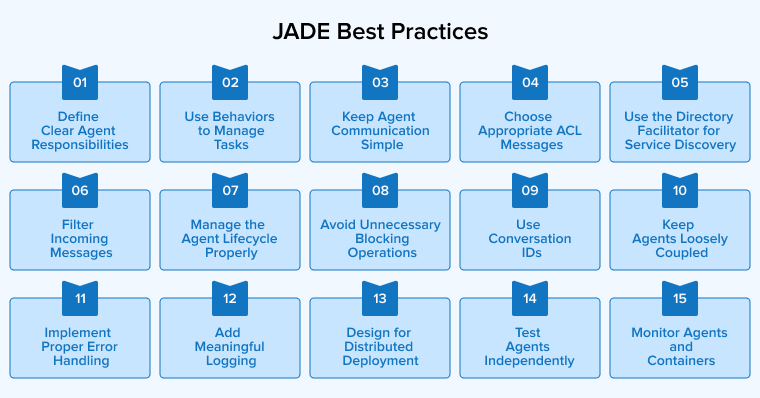
1. Define Clear Agent Responsibilities
Assign each agent a focused purpose and keep its duties closely related. Avoid making one agent responsible for several unrelated functions. A clear division of work makes the system easier to understand, maintain, test, and update. It also helps you identify problems and modify individual agents without affecting the entire application.
2. Use Behaviors to Manage Tasks
Use JADE behaviors to organize the tasks performed by each agent. Choose a behavior according to how often an activity should run, whether once, repeatedly, or at set intervals. Separating tasks this way keeps the agent code cleaner and makes its activities easier to manage, understand, and maintain without overloading the setup() method.
3. Keep Agent Communication Simple
Design agent communication around the information each task actually needs. Send relevant data in a clear and concise manner instead of generating unnecessary messages. Keep communication focused to reduce processing demands and make interactions easier to follow. It also helps you trace conversations, identify errors, and maintain the system more effectively.
4. Choose Appropriate ACL Messages
Choose an ACL performative that matches the purpose of each agent interaction. Use suitable message types for requesting actions, sharing information, or handling proposals and negotiations. Applying these choices consistently gives messages a clear purpose and makes communication easier to understand, manage, and troubleshoot across the multi-agent system.
5. Use the Directory Facilitator for Service Discovery
Use the Directory Facilitator (DF) to publish and find services offered by agents. This removes the need to depend on specific agent names when establishing communication. Agents can search for the service they require and connect with a suitable provider at runtime. This flexible approach reduces dependencies and simplifies system changes.
6. Filter Incoming Messages
Filter incoming messages so each agent handles only the information related to its assigned tasks. You can use details such as the sender, message type, or conversation context to identify relevant messages. This reduces unnecessary processing and helps agents respond more efficiently with consistent system performance.
7. Manage the Agent Lifecycle Properly
Manage each agent’s startup and shutdown processes carefully. Set up the resources an agent needs when it starts, and clean them up before it stops. Proper lifecycle handling prevents unused connections and registered services from remaining active, helping maintain a cleaner and more reliable JADE application.
8. Avoid Unnecessary Blocking Operations
Keep lengthy operations separate from an agent’s normal message handling. Use appropriate JADE behaviors for tasks that take time, repeat regularly, or need delays. This prevents one activity from blocking other agent functions and helps maintain smooth overall performance.
9. Use Conversation IDs
Use conversation identifiers to keep related messages connected during communication among agents. These identifiers help agents match incoming responses with the correct requests, especially when several interactions happen at the same time. They also make complex workflows easier to follow, manage, and troubleshoot.
10. Keep Agents Loosely Coupled
Design agents so they can work independently without depending heavily on specific implementations. Use standard messages and registered services to support communication between them. This approach reduces dependencies and makes the application easier to update, expand, and maintain as requirements change over time.
11. Implement Proper Error Handling
Design agents to respond safely when communication fails, services become unavailable, or messages contain errors. Handle unexpected conditions without stopping unrelated activities. Good error handling keeps individual failures isolated, improves system reliability, and allows other agents to continue working normally.
12. Add Meaningful Logging
Record key agent activities, including startup, shutdown, communication, service registration, and errors. Clear and useful logs help you understand what happens within the JADE platform. They also make it easier to monitor system behavior, investigate issues, and identify problems during both testing and production.
13. Design for Distributed Deployment
Design the application with distributed operation in mind from the beginning. JADE can place agents in different containers and on separate machines, so avoid designs that depend on agents sharing the same system. This approach makes the application more flexible and suitable for distributed environments.
14. Test Agents Independently
Test agents individually to verify their behaviors, communication, service registration, and error handling. Once each agent works correctly, test them together to check how they communicate and coordinate. This step helps uncover issues that may appear only during agent interactions.
15. Monitor Agents and Containers
Keep an eye on active agents and containers to spot communication failures, inactive processes, unusual behavior, or resource issues. Perform regular monitoring to detect problems early and maintain stable, reliable performance as the multi-agent application grows more complex.
Final Thoughts
JADE provides a practical way to build and manage multi-agent applications where independent agents need to communicate and work together. By understanding both its capabilities and limitations, developers can use JADE more effectively and create multi-agent solutions that are organized, scalable, and suitable for different real-world applications.
FAQs
FIPA compliance means JADE follows standards created by the Foundation for Intelligent Physical Agents for agent communication and interaction. These standards give agents a common way to exchange messages and use services. For JADE, this improves interoperability, which allows agents to communicate with other compatible systems more easily.
The AMS(Agent Management System) manages agent identities and their lifecycle within the JADE platform, including registration and termination. The DF(Directory Facilitator), in contrast, helps agents find available services by maintaining service information.
Java Agent Development Framework (JADE), your environment must have at least Java 5 or higher. However, the most recent stable releases function smoothly on Java 8. The framework is fully compatible with modern Long-Term Support updates, including Java 11, 17, and 21.

Rakshit Toke is a Java technology innovator and has been managing various Java teams for several years to deliver high-quality software products at TatvaSoft. His profound intelligence and comprehensive technological expertise empower the company to provide innovative solutions and stand out in the marketplace.


Comments
Leave a message...