


Software development is not only about creating features but also about ensuring that those features work correctly under different conditions. Here comes the important role of unit testing. It is a type of software testing that helps developers verify the expected behavior of individual code pieces before they become part of a larger application.
With the increasing size and complexity of .NET applications, it has become quite challenging for developers and QAs to maintain code quality. Unit testing in C# helps developers to write cleaner, more organized, and easier-to-maintain code. The C# ecosystem offers several popular testing frameworks, such as NUnit, XUnit, and MSTest, so that .NET development companies can choose the framework that best fits their project requirements, team preferences, testing needs, and tooling support.
This blog provides detailed theoretical and practical knowledge on unit testing in C#, its importance, associated best practices, popular frameworks, and how to set up a proper unit testing environment and write a unit test case in C#.
What is Unit Testing in C#?
Unit testing in C# is the practice of independently testing the smallest units of code, such as a particular method or class of an application. It verifies whether such units run as expected or not in isolation by executing them with known inputs and matching the output with expected results. In C# code, these tests are placed in a separate test project that references your production code.
In a typical C# project, you place these tests in a separate test project that references your production code. Each test targets one behavior, such as whether a discount calculation returns the right total or a method throws the correct error for invalid input. The tests provide fast and reliable feedback every time you change something, as it runs in seconds and depends only on the code under testing, which keeps small mistakes from reaching production.
Why is Unit Testing Important for C#?
Unit testing offers multiple key benefits in the C# software development process, such as:
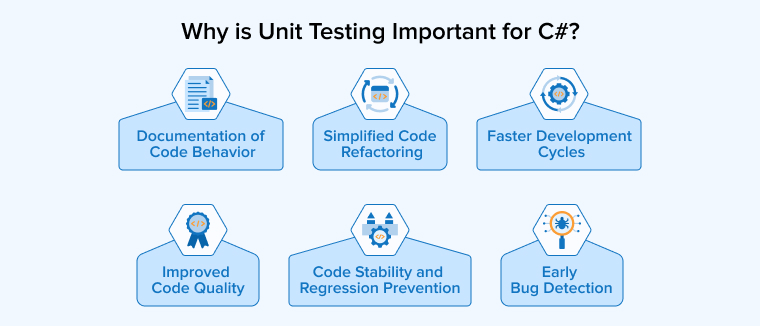
1. Early Bug Detection
Unit tests catch defects early, while a developer is still working on that piece of code. Resolving an issue at this stage is far quicker and less expensive than addressing it after the software is in production and users are affected. This prevents minor errors from escalating into serious problems later in the development cycle.
2. Code Stability and Regression Prevention
As the codebase grows, a change in one area can unintentionally break functionality elsewhere. A suite of unit tests detects these regressions immediately and points the team to the exact cause before release. The result is software that stays dependable even as new features and contributors are added.
3. Improved Code Quality
Writing unit tests encourages cleaner and more modular code with clear separation of concerns. Code structured in this way is easier to test, read, understand, and maintain. Over a period of time, this discipline produces a codebase that the whole team can work with confidently.
4. Simplified Code Refactoring
Improving existing code is essential, but it also carries risk when you are unsure what a change might affect. Unit tests reduce this risk by confirming the code still behaves as expected after each adjustment. This gives developers the confidence to refactor and optimize rather than leaving weak areas untouched.
5. Faster Development Cycles
Writing tests takes some effort in the beginning, but it saves a lot of time during testing and debugging. Instead of verifying every change manually, the team runs the suite and receives reliable feedback within seconds. This steady feedback loop leads to faster and more predictable delivery across the project.
6. Documentation of Code Behavior
Each unit test serves as a precise, working example of how a method should behave for a given input. Together, these tests document expected outputs and edge cases without a separate file that must be manually updated whenever the code changes, which can easily become obsolete from the actual code over time. Both new and existing developers rely on them to understand how the code is meant to be used.
Best Practices for Unit Testing in C#
We shall now discuss the 10 highly adopted unit testing best practices in C#:
1. Use the Arrange-Act-Assert Pattern
Structure every test in three clear stages.
- Arrange the objects and data you need.
- Act by calling the method under test.
- Assert that the outcome matches what you expected.
This layout keeps the test readable and separates setup from the actual check.
Original:
C#
[Fact] public void ApplyTax_ZeroAmount_ReturnsZero() { // Arrange var invoice = new Invoice(); // Assert Assert.Equal(0m, invoice.ApplyTax(0m)); } |
Apply Best Practice:
C#
[Fact] public void ApplyTax_ZeroAmount_ReturnsZero() { // Arrange var invoice = new Invoice(); // Act var result = invoice.ApplyTax(0m); // Assert Assert.Equal(0m, result); } |
2. Follow a Clear Test Naming Convention
Name each test with the following three parts:
- The method under test
- The scenario
- The expected behavior
A name like Add_SingleNumber_ReturnsSameNumber tells you which behavior or feature is not working correctly without opening the code. Clear names turn your test suite into reliable documentation.
Original:
C#
[Fact] public void TestDiscount() { var pricing = new PricingService(); var result = pricing.GetDiscount(100m); Assert.Equal(0m, result); } |
Apply best practice:
C#
[Fact] public void GetDiscount_AmountBelowThreshold_ReturnsZeroDiscount() { var pricing = new PricingService(); var result = pricing.GetDiscount(100m); Assert.Equal(0m, result); } |
3. Keep Tests Isolated From Infrastructure
A unit test should never depend on a database, file system, or network call. Those dependencies make tests slow and unreliable, and belong to the category of integration tests instead. Keep your unit tests in a separate project and use dependency injection so the unit test project never references infrastructure packages.
4. Write Minimally Passing Tests
Give each test only the input it needs to verify the behavior under examination. Extra setup, nonzero values, or unrelated properties make the test harder to read and easier to break. The simpler the input, the clearer the intent and the more resilient the test stays over time.
Original:
c#
[Fact] public void IsEligible_ValidCustomer_ReturnsTrue() { var customer = new Customer { Id = 4521, Name = "Acme Corp", Country = "IN", CreditScore = 720 }; var result = new LoanService().IsEligible(customer); Assert.True(result); } |
Apply best practice:
c#
[Fact] public void IsEligible_CreditScoreAboveMinimum_ReturnsTrue() { var customer = new Customer { CreditScore = 720 }; var result = new LoanService().IsEligible(customer); Assert.True(result); } |
5. Avoid Magic Strings
Replace hard-coded values that carry hidden meaning with named constants. A bare string like “1001” forces the reader to guess what that value represents, while a constant explains it simply.
Original:
c#
[Fact] public void Parse_TooManyItems_ThrowsException() { var parser = new CartParser(); Action action = () => parser.Parse("501"); Assert.Throws<CartLimitException>(action); } |
Apply best practice:
c#
[Fact] public void Parse_AboveItemLimit_ThrowsCartLimitException() { var parser = new CartParser(); const string ABOVE_ITEM_LIMIT = "501"; Action action = () => parser.Parse(ABOVE_ITEM_LIMIT); Assert.Throws<CartLimitException>(action); } |
6. Avoid Logic in Your Tests
Keep loops, conditionals, and string concatenation out of your tests. The test case built to catch bugs itself becomes a source of bugs if it contains such programming constructs. When you need to cover several inputs, use parameterized tests instead of a loop.
Original:
c#
[Fact] public void Add_MultiplePairs_ReturnsSum() { var calculator = new Calculator(); var cases = new[] { (1, 1, 2), (2, 3, 5), (10, 5, 15) }; foreach (var (a, b, expected) in cases) { Assert.Equal(expected, calculator.Add(a, b)); } } |
Apply best practice:
c#
[Theory] [InlineData(1, 1, 2)] [InlineData(2, 3, 5)] [InlineData(10, 5, 15)] public void Add_TwoNumbers_ReturnsSum(int a, int b, int expected) { var calculator = new Calculator(); var result = calculator.Add(a, b); Assert.Equal(expected, result); } |
7. Prefer Helper Methods Over Setup and Teardown
Use a small helper method to create shared test objects instead of depending on Setup and Teardown attributes. These helper methods keep all the important code visible inside each test, prevent hidden state from affecting other tests, and make tests easier to read and maintain.
Original:
c#
private PricingService _pricing; [SetUp] public void Setup() { _pricing = new PricingService(); } [Test] public void GetDiscount_AmountAboveThreshold_ReturnsDiscount() { var result = _pricing.GetDiscount(500m); Assert.AreEqual(50m, result); } |
Apply best practice:
c#
[Test] public void GetDiscount_AmountAboveThreshold_ReturnsDiscount() { var pricing = CreatePricingService(); var result = pricing.GetDiscount(500m); Assert.AreEqual(50m, result); } private PricingService CreatePricingService() => new PricingService(); |
8. Use a Single Act Per Test
Call the method being tested only once in each test. This makes it clear which behavior failed when a test breaks. If a test performs multiple actions, it can be hard to identify which step failed. For similar scenarios, create separate tests or use parameterized inputs.
Original:
c#
[Fact] public void Normalize_EmptyInputs_ReturnEmpty() { var formatter = new TextFormatter(); var first = formatter.Normalize(""); var second = formatter.Normalize(" "); Assert.Equal("", first); Assert.Equal("", second); } |
Apply best practice:
c#
[Theory] [InlineData("")] [InlineData(" ")] public void Normalize_EmptyInput_ReturnsEmpty(string input) { var formatter = new TextFormatter(); var result = formatter.Normalize(input); Assert.Equal("", result); } |
9. Test Public Behavior, Not Private Methods
Write tests against public methods rather than private ones. Private methods are internal implementation details that exist only to support public behavior. So, verifying the public methods will indirectly test them. This keeps your tests focused on what the code does, which makes it easier to refactor the implementation.
c#
public string BuildLabel(string input) { var cleaned = Sanitize(input); return $"Order-{cleaned}"; } private string Sanitize(string input) => input.Trim(); |
c#
[Fact] public void BuildLabel_InputWithSpaces_ReturnsTrimmedLabel() { var generator = new LabelGenerator(); var result = generator.BuildLabel(" A12 "); Assert.Equal("Order-A12", result); } |
10. Replace Static References With Seams
Static calls like DateTime.Now make a method hard to test because you cannot control its output. Introduce a seam by wrapping the dependency in an interface and injecting it, so your test can supply any value it needs.
Original:
c#
public decimal GetWeekendRate(decimal rate) { if (DateTime.Now.DayOfWeek == DayOfWeek.Sunday) { return rate * 1.5m; } return rate; } |
Apply best practice:
c#
public interface IClock { DayOfWeek Today(); } public decimal GetWeekendRate(decimal rate, IClock clock) { if (clock.Today() == DayOfWeek.Sunday) { return rate * 1.5m; } return rate; } |
Popular Unit Testing Frameworks in C#
There are three popular unit testing frameworks for testing C# code:
1. MSTest
MSTest is Microsoft’s own unit testing framework, and its current version (MSTest V2) is open source and works on multiple platforms. It comes built into Visual Studio and the .NET SDK templates, so you can start testing with no extra installation, which makes it a comfortable choice for teams already in the Microsoft toolchain. Tests are organized with attributes such as [TestClass], [TestMethod], [TestInitialize], and [TestCleanup].
Pros:
- Built-in setup: Integrated with Visual Studio, so there is nothing extra to install before you start testing.
- Native integration: Works tightly with the Microsoft ecosystem, including Visual Studio Test Explorer and Azure DevOps.
- Reliable support: Microsoft keeps it updated with each new .NET and Visual Studio release, so long-term updates are dependable.
- Readable structure: The attribute style is clear and easy for newcomers to follow.
2. NUnit
NUnit is one of the oldest and most widely used testing frameworks in the .NET world, trusted by C# developers for many years. It is known for a rich, expressive assertion model and flexible data-driven features that cover most testing needs. Tests use attributes like [TestFixture], [Test], [SetUp], and [TearDown] to define test classes and control what runs before and after each test.
Pros:
- Rich assertions: A broad library such as Assert.AreEqual and Assert.IsTrue allows you to write expressive checks.
- Data-driven testing: With [TestCase] and [TestCaseSource], a single test method can run against many inputs.
- Lifecycle control: Dedicated attributes give you fine control over test initialization and cleanup.
- Mature community: Years of documentation and active community support make problems easy to solve.
3. xUnit
xUnit is the most modern testing framework for .NET, created by one of NUnit’s original authors. It focuses on simplicity, extensibility, and clean idiomatic code. xUnit is a popular choice for modern .NET projects, including .NET Core and later, and reduces much of the extra setup and boilerplate required by older testing frameworks. It replaces the traditional [Test] attribute with [Fact] for single-case tests and [Theory] combined with a data source such as [InlineData] for parameterized ones.
Pros:
- Minimalist style: Tests stay lightweight and focused, requiring very little configuration and boilerplate.
- Strong isolation: A fresh instance of the test class is created for every test, keeping them independent by default.
- Built-in injection: Dependency injection works through the test constructor, fitting modern application design.
- Convention-based discovery: Tests are found automatically by naming convention, so you need fewer attributes.
Setting Up a Unit Testing Environment in C#
Prerequisites
Ensure the following are installed before creating your test project:
- Visual Studio 2022 (any edition) or Visual Studio Code with C#
Dev Kit extension.
- .NET SDK 6.0, 7.0, or 8.0 download from https://dotnet.microsoft.com/download
- A C# project (Class Library or Console App) containing the code you want to test.
1. Creating the Main Project
If you do not already have a project, create a Class Library that will hold the production code:
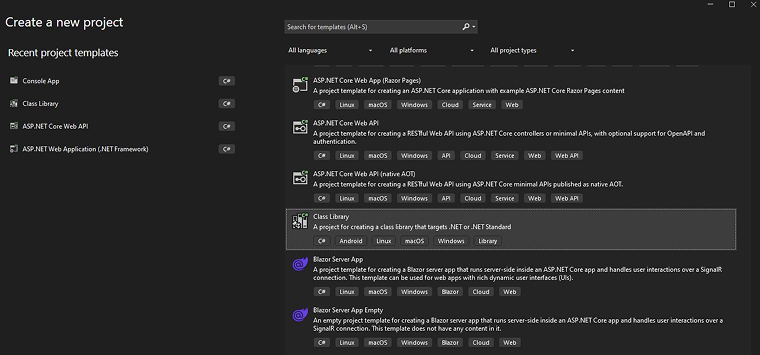
- Open Visual Studio and select Create a new project.
- Search for Class Library (.NET) and select it, then click Next.
- Name the project BankAccountApp and click Create.
- Delete the default Class1.cs file. We will add our own classes.

2. Adding an MSTest Project
MSTest is Microsoft’s built-in testing framework and the easiest to get started with in Visual Studio:
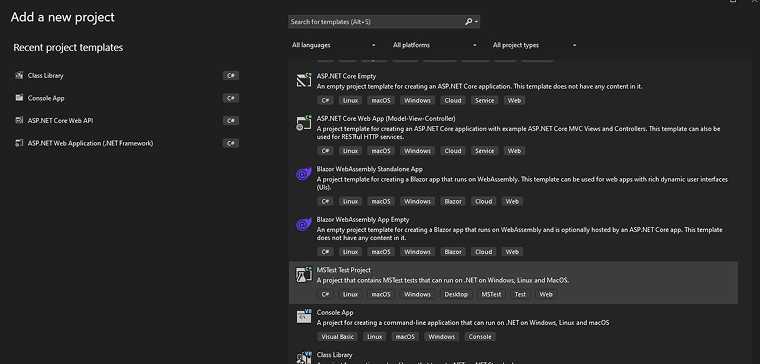
- Right-click the Solution in Solution Explorer and select Add > New Project.
- Search for MSTest Test Project (.NET) and select it, then click Next.
- Name it BankAccountApp.Test and click Create.
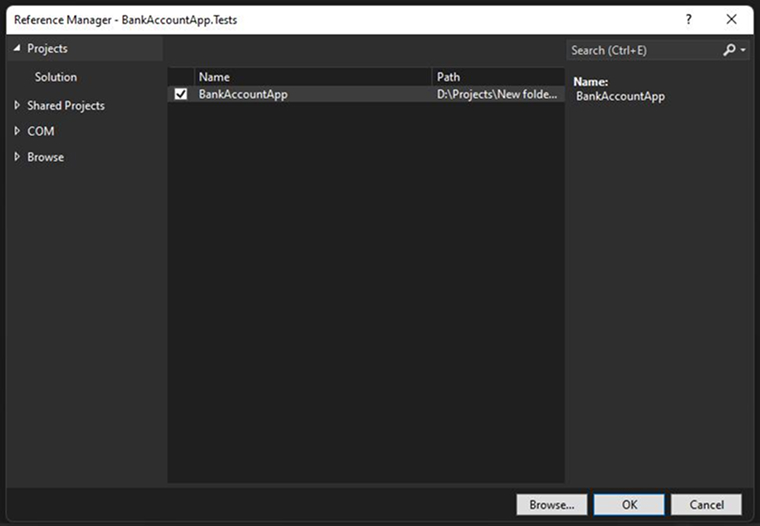
3. Adding a Project Reference
The test project must reference the main project so it can access the classes being tested:
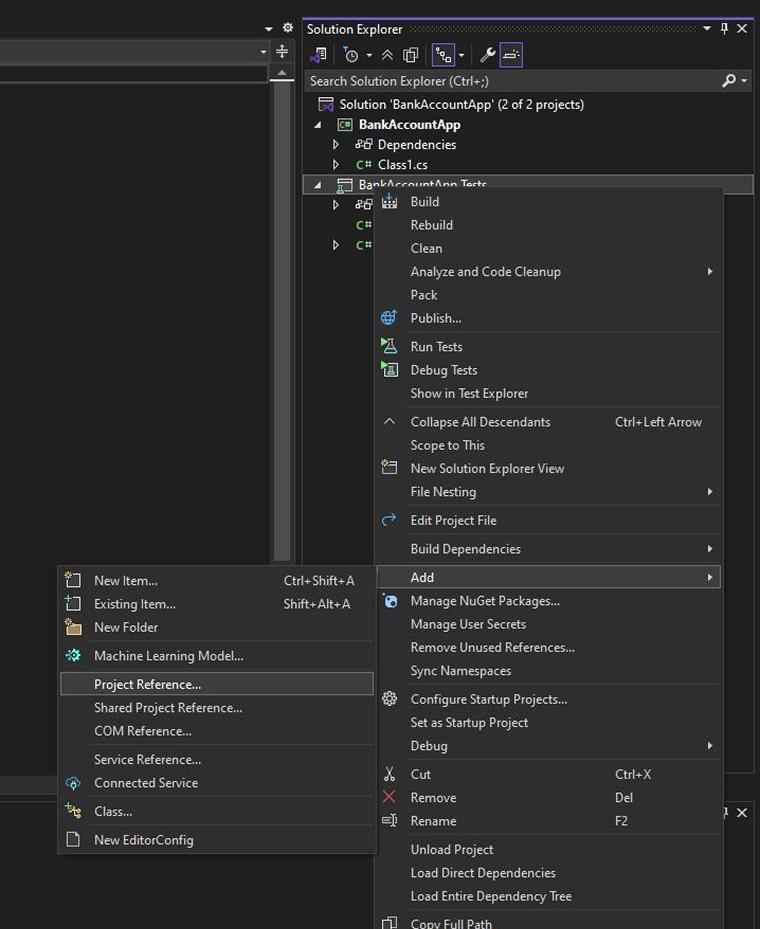
- Right-click Dependencies (or References) under BankAccountApp.Tests in Solution Explorer.
- Select Add Project Reference.
- Tick the checkbox next to BankAccountApp and click OK.
4. Installing MSTest / NUnit / xUnit via NuGet (If Not Auto-included)
If the test project was created from the MSTest template, the required packages are already present. If not, install them via the NuGet Package Manager Console (Tools > NuGet Package Manager > Package Manager Console):
MSUnit
Install-Package MSTest.TestFramework Install-Package MSTest.TestAdapter Install-Package Microsoft.NET.Test.Sdk |
If you prefer NUnit or xUnit, install the packages from the NuGet Package Manager Console:
NUnit
Install-Package NUnit Install-Package NUnit3TestAdapter Install-Package Microsoft.NET.Test.Sdk |
xUnit
Install-Package xunit Install-Package xunit.runner.visualstudio Install-Package Microsoft.NET.Test.Sdk |
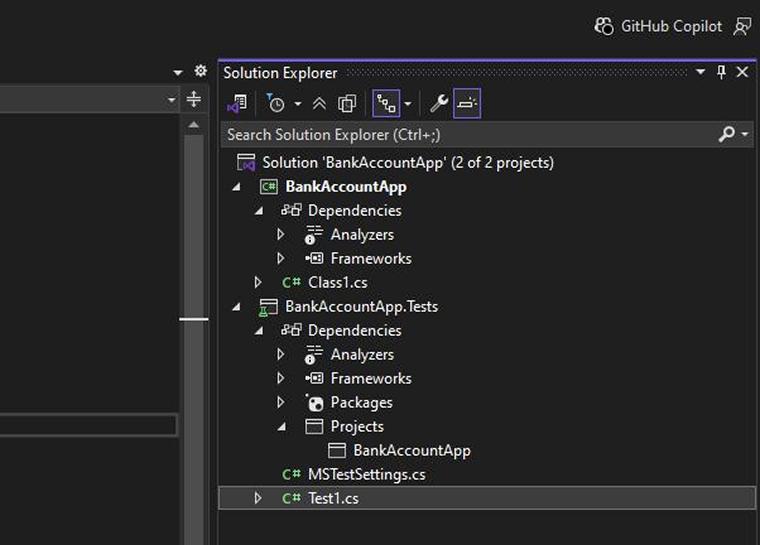
5. Verifying the Setup
After referencing the main project, the test project structure in Solution Explorer should resemble:
Solution 'BankAccountApp' |-- BankAccountApp (main project) | |-- BankAccount.cs | |-- InsufficientFundsException.cs | |-- BankAccountApp.Tests (test project) |-- Dependencies | |-- BankAccountApp <-- reference added |-- BankAccountTests.cs |
Build the solution (Ctrl + Shift + B) to confirm there are no errors before writing any tests.
Writing Your First Unit Test in C# with Example
Let’s understand how to write unit tests in C# with the following class demonstrating operations performed on a bank account.
1. The BankAccount Class
We will test a BankAccount class that models a simple bank account. It supports deposits, withdrawals, and balance enquiries, and throws an exception when a withdrawal would overdraw the account.
BankAccount.cs
namespace BankAccountApp { public class BankAccount { // ── Properties ────────────────────────────────────────── public string AccountHolder { get; private set; } public decimal Balance { get; private set; } // ── Constructor ───────────────────────────────────────── public BankAccount(string accountHolder, decimal initialBalance = 0) { AccountHolder = accountHolder; Balance = initialBalance; } // ── Deposit ───────────────────────────────────────────── public void Deposit(decimal amount) { if (amount <= 0) throw new ArgumentException("Deposit amount must be greater than zero."); Balance += amount; } // ── Withdraw ──────────────────────────────────────────── public void Withdraw(decimal amount) { if (amount <= 0) throw new ArgumentException("Withdrawal amount must be greater than zero."); if (amount > Balance) throw new InsufficientFundsException( $"Cannot withdraw {amount:C}. Current balance is {Balance:C}."); Balance -= amount; } // ── Transfer ──────────────────────────────────────────── public void TransferTo(BankAccount target, decimal amount) { if (target == null) throw new ArgumentNullException(nameof(target)); Withdraw(amount); // reuses existing validation target.Deposit(amount); } } } |
2. The Test Class: BankAccountTests.cs
Create a new file BankAccountTests.cs inside BankAccountApp.Tests. The complete test class is shown below, covering seven distinct scenarios organized in the AAA pattern:
using Microsoft.VisualStudio.TestTools.UnitTesting; using BankAccountApp; namespace BankAccountApp.Tests { [TestClass] public class BankAccountTests { // ── 1. Deposit increases balance ───────────────────────── [TestMethod] public void Deposit_ValidAmount_IncreasesBalance() { // Arrange var account = new BankAccount("Alice", 500m); // Act account.Deposit(200m); // Assert Assert.AreEqual(700m, account.Balance); } // ── 2. Withdraw decreases balance ───────────────────────── [TestMethod] public void Withdraw_ValidAmount_DecreasesBalance() { // Arrange var account = new BankAccount("Bob", 1000m); // Act account.Withdraw(350m); // Assert Assert.AreEqual(650m, account.Balance); } // ── 3. Withdraw exact balance leaves zero ───────────────── [TestMethod] public void Withdraw_ExactBalance_LeavesZeroBalance() { // Arrange var account = new BankAccount("Carol", 300m); // Act account.Withdraw(300m); // Assert Assert.AreEqual(0m, account.Balance); } // ── 4. Overdraft throws InsufficientFundsException ──────── [TestMethod] [ExpectedException(typeof(InsufficientFundsException))] public void Withdraw_AmountExceedsBalance_ThrowsInsufficientFundsException() { // Arrange var account = new BankAccount("Dave", 100m); // Act — expects an exception account.Withdraw(500m); } } } |
3. Test Method Naming Convention
Each test method in the example above follows the recommended naming pattern:
| Segment | Example |
|---|---|
| Method under test | Deposit |
| Scenario/input | ValidAmount |
| Expected outcome | IncreasesBalance |
| Full name | Deposit_ValidAmount_IncreasesBalance |
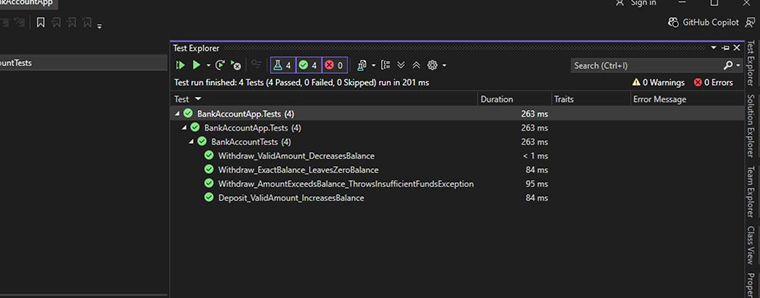
This convention makes failing test names self-explanatory in the Test Explorer. You can identify the broken behavior without opening the source file.
4. Running the Tests in Visual Studio
- Build the solution: Build > Build Solution (Ctrl + Shift + B).
- Open Test Explorer: Test > Test Explorer.
- Click Run All Tests (the double-play icon) or press Ctrl + R, A.
- All seven tests should show a green checkmark.
5. Interpreting a Failing Test
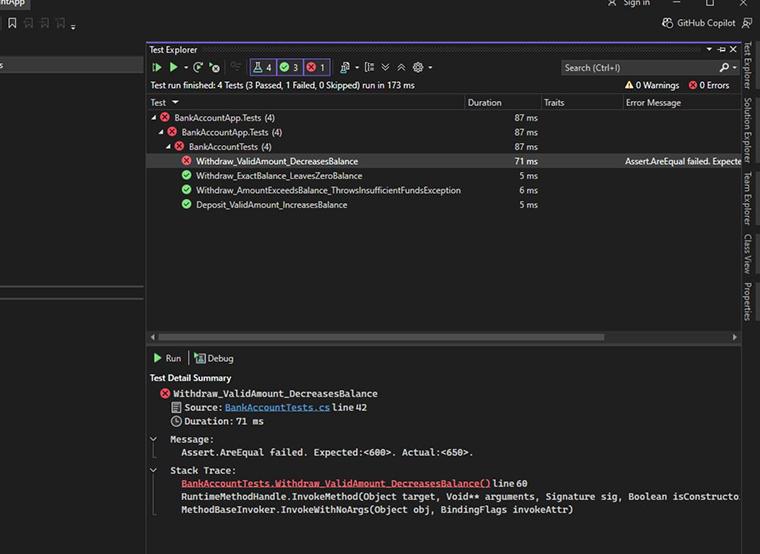
Suppose the Withdraw method contains a bug, for example, it adds instead of subtracts the amount. Running the tests would produce:
Test Name: Withdraw_ValidAmount_DecreasesBalance Test Outcome: Failed Message: Assert.AreEqual failed. Expected: <650> Actual: <600> Stack Trace: at BankAccountApp.Tests.BankAccountTests .Withdraw_ValidAmount_DecreasesBalance() |
The failure message tells you exactly what went wrong: the expected balance after withdrawing 350 from 1000 was 650, but the actual result was 600. Fix the operator in the Withdraw method, rebuild, and re-run to confirm the green bar returns.
Conclusion
Unit testing in C# is one of the most reliable ways to keep an application stable as it grows and changes. By verifying each method and class on its own, you catch bugs early, refactor with confidence, and turn your test suite into living documentation that the whole team can trust.
Once you have written a few tests and watched them catch bugs before release, the initial efforts feel worth it, and unit testing naturally becomes a part of your C# development process.
FAQs
Yes, C# has strong support for unit testing through the .NET ecosystem. You can write and run tests using built-in tools in Visual Studio along with frameworks like MSTest, NUnit, and xUnit. These frameworks let you test individual methods and classes in isolation and view results directly in Visual Studio Test Explorer or from the command line with dotnet test.
There is no definite answer to this question, as the right choice depends on your project and team. xUnit suits modern .NET projects with its clean, minimalist style and strong test isolation, whereas NUnit is a better fit when you want a rich assertion model and flexible data-driven testing through attributes like [TestCase] and [TestCaseSource].
There is no single best framework, only the one that fits your needs. xUnit is often preferred for new .NET projects, NUnit for its expressive and data-driven features, and MSTest for teams that want a native option built into Visual Studio. Since all three integrate cleanly with the .NET ecosystem, the best choice is usually the one your team finds easiest to read and maintain.
You can run unit tests in Visual Studio through the built-in Test Explorer. Open it from the Test menu, then build your solution so Visual Studio discovers all the tests in your project. From there, you can use Run All to execute every test, or right-click individual tests to run them on their own.
The Arrange-Act-Assert pattern is a simple structure that keeps each unit test clear and readable. You arrange the objects and data the test needs, act by calling the method under test, and assert that the result matches what you expected. It is the most common way to organize tests in C# and works the same across MSTest, NUnit, and xUnit.

Rakesh Patel is a technology expert working at TatvaSoft. He is looking after .NET development projects and also work along side with business analyst team. He developed his passion of writing while working and writes whenever he got the time.



Comments
Leave a message...