Angular, as a front-end framework, effectively handles asynchronous operations like HTTP requests, user inputs, and state changes. To ensure that these operations are executed in a specified order, Angular control flow is a built-in mechanism from the framework that also manages the complexities in asynchronous programming. Top Angular development companies leverage such mechanisms to control data flow, allowing the Angular applications to handle asynchronous operations efficiently. Additionally, this also helps manage the overall lifecycle of the components, ensuring a smooth user experience.
The latest version of Angular provides a range of new advanced features, including control flow syntax. This feature brings a more declarative and concise syntax, allowing you to insert the control flow directly into the template. So, you no longer need to use the directive-based control flow, including ngIf, ngFor, and ngSwitch attributes. The new control flow is much easier to use and improves readability. As a result, developers can write cleaner and more maintainable code with better performance.
1. Angular Control Flow Overview
The order in which the statements and directives are executed within a template in an Angular application is known as the control flow. Developers leverage this feature to control the template’s execution and manage the complexities of asynchronous data and dynamic content.
The latest versions of Angular provide built-in structural directives (such as ngIf, ngFor, and ngSwitch) for handling the control flow directly in templates, giving developers better control over the execution flow. These directives follow familiar programming patterns like conditional rendering and looping, and reduce errors when building app views. The templates here don’t require any additional imports to use them in templates.
Angular also offers a refined change detection system to manage control flow and implement the state changes to the view efficiently. As a result, Angular can help developers create modern and interactive web apps.
1.1 Angular Control Flow Features
Following are the Angular control flow features:
- Declarative Syntax: Allows you to write the control flow directly within the template.
- Improved Ergonomics: Improves the visibility of the code structure and overall usability.
- Performance Improvements: Proper execution of the Angular control flow enhances the app’s performance significantly.
- Type-narrowing: Offers improved type-narrowing within @switch’s branches.
- Simpler for Loops: Makes it easy to use the new For Loop syntax.
1.2 Advantages of Angular Control Flow
Executing the Angular control flow renders a long array of advantages, such as:
- Better Type Checking: It’s new syntax allows improved type checking and more efficient type narrowing. The syntax is ergonomic and closer to JavaScript, making it more intuitive.
- Minimized Runtime Footprint: The new syntax results in a very minimal runtime footprint. As a result, the bundle size decreases and your Core Web Vitals score improves.
- Simplified Code: The new syntax simplifies the Angular app code, making it easier to read and maintain.
- Faster Rendering Speed: The new syntax provides faster rendering speed, leading to enhanced app performance.
- Build-time Concept: It allows optimizations during the build phase, improving efficiency before the app runs.
2. If/else Conditions
Let’s consider an example of any platform that requires a user login to access it.
app.component.ts
isLoggedIn = false; |
In real-world scenarios, such data is obtained from API requests, where it may contain requested data or be simply undefined. Therefore, use it conditionally in the template. In the above example, you need to check if the user is logs in or not. The templating languages, like Razor and PHP, are similar to the new syntax.
Starting with the @ symbol, then add a condition to the parentheses. The conditional item is wrapped if the user has logged in.
app.component.html
@if(isLoggedIn){ Welcome back, User!! } @else{ Please login or signup to access the platform } |
It will show the message to log in to the user, as you hardcoded the isLoggedIn flag to false.

To clear it up;
isLoggedIn = true; |
The image below shows the message when the user has completed the login process with the platform.

3. @Switch Case
You can easily evaluate an expression and execute various pieces of code depending on the matching case. This feature helps in managing multiple branching conditions.
The directives like NgSwitch, NgSwitchCase, and NgSwitchDefault are added to the components or modules import array by writing a switch-case in your current Angular version.
Below is an example of a switch based on the logged-in user’s role.
<div [ngSwitch]="userRole"> <div *ngSwitchCase="'admin'">Welcome, Admin!</div> <div *ngSwitchCase="'editor'">Welcome, Editor!</div> <div *ngSwitchDefault>Welcome, Guest!</div> </div> |
After rewriting the above code as per the new syntax, the control flow will look like:
@switch (userRole) { @case ('admin') { <div>Welcome, Admin!</div> } @case ('editor') { <div>Welcome, Editor!</div> } @default { <div>Welcome, Guest!</div> } } |
You can observe that we have used the @switch or *ngSwitch directive in the above code for displaying the welcome message in three ways. The format of display varies according to the user role specified with the help of the @switch or *ngSwitch directive. The three user roles and their respective outputs are as follows:
- ‘admin’: It will display, “Welcome, Admin!”
- ‘editor’: It will display, “Welcome, Editor!”
- Other than the two mentioned above roles, the message will be, “Welcome, Guest!”
Thus, this mechanism allows user to see the message according to their defined role.
4. @For Loop
Every framework offers a directive that shows a list of blocks in the template representing a list of elements. In Angular, the ngFor directive is for the job.
app.component.ts
const clothesList = [ { id: 1, name: "T-shirt", price: 19.99, currency: "$" }, { id: 2, name: "Jeans", price: 49.99, currency: "$" }, { id: 3, name: "Shirt", price: 29.99, currency: "$" } ]; |
app.component.html
<ul> <li *ngFor="let cloth of clothesList; let i = index"> {{ i + 1 }}. {{ cloth.name }} - {{ cloth.currency }}{{ cloth.price }} </li> </ul> |
The *ngFor directive in Angular is used to loop through a list and render each item in the template. In this example, it iterates over clothesList and displays each clothing item with its index, name, and price inside an unordered list.
Code language: HTML
Creating a custom block for every element in the list is possible as the directive provides and uses the necessary information on the elements and local variables.
- index (number): The position of the element in the list.
- count (number): The total number of elements in the list.
- first (boolean): true if the element is the first of the list.
- last (boolean): true if the element is the last of the list.
- even (boolean): true if the element index is even.
- odd (boolean): true if the element index is odd.
As an optional parameter, the ngFor directive accepts a function named trackBy. It offers Angular with a unique identifier for every element on the list.
<ul> <li *ngFor="let cloth of clothesList; let i = index; trackBy: trackById"> {{ i + 1 }}. {{ cloth.name }} - {{ cloth.currency }}{{ cloth.price }} </li> </ul> |
Code language: HTML
trackById(index, cloth) { return cloth.id; } |
Code language: TypeScript
If modifications are applied to the element or the list is replaced, Angular can still optimize app performance, thanks to this tool. The new control flow gives @for to replace the ngFor directive.
<ul> @for (cloth of clothesList; track $index; let i = $index) { <li>{{ i + 1 }}. {{ cloth.name }} - {{ cloth.currency }}{{ cloth.price }}</li> } </ul> |
Code language: HTML
Significant changes happen with the advent of a new syntax. A few of them are as mentioned below:
- Compared to ngFor, the new algorithm implements the @for to improve the performance by 90%.
- The track property replaces the trackBy function to offer an expression, making it easy to write and read the entire code.
- A prefix $ is added to all the local variables.
- We can also gain cleaner syntax without any imports.
Example:
app.component.ts
interface Color { id: number; name: string; } export class AppComponent { colorList: Color[] = [ { id: 1, name: 'Red' }, { id: 2, name: 'Blue' }, { id: 3, name: 'Green' }, { id: 4, name: 'Yellow' } ]; } |
app.component.html
<h2>Color List</h2> <ul> @for (color of colorList; track color.id; let i = $index, o = $odd) { <li> #{{ i + 1 }} - {{ color.name }} | Odd Row: {{ o }} </li> } </ul> |
In the above example, the @for loop displays all the colors present in the colorList with the following three information:
- track color.id: The parameter tracks the list items using their unique id.
- i = $index: It gives you the position of the list item
- o = $odd: It’s a boolean variable that displays true if the current item’s index is an odd number.

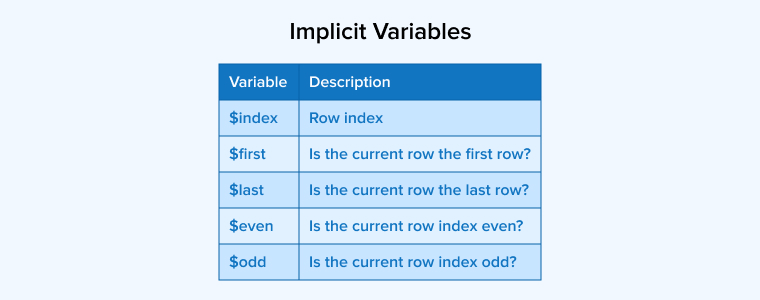
5. Implicit Variables
The for-row view of the new control flow syntax consists of the variables discussed in the image below.

Every variable assigns a specific keyword. You have to use that keyword to access these variables.
app.component.ts
export class AppComponent { programmingLanguages = ['Python', 'JavaScript', 'Java', 'C#', 'Go']; } <ul> @for (language of programmingLanguages; track language; let i = $index; let first = $first; let last = $last; let even = $even; let odd = $odd) { <li> {{ i + 1 }}. {{ language }} | First: {{ first }} | Last: {{ last }} | Even: {{ even }} | Odd: {{ odd }} </li> } </ul> |
The above example explains Angular’s new @for syntax for iterating over a list of programmingLanguages. It renders each language along with useful metadata:
- i: the current index
- first: true if it’s the first item
- last: true if it’s the last item
- even/odd: indicate item position for styling or logic
Output:

6. Empty Block
Let’s understand the @emplty block in Angular’s new control flow syntax with this example. Suppose you want to display the list of programming languages known by a user. Let’s assume what if a user doesn’t know a single programming language? Will the program return an empty list? To avoid this, you can use the @emplty block and print a message, “No programming languages available”.
Here is how you can apply it in practice:
<ul> @for (language of programmingLanguages; track language) { <li>{{ language }}</li> } @empty { <li>No programming languages available.</li> } </ul> |
7. Comparing Built-In Control Flow To NgIf, NgSwitch and NgFor
To make the conditional parts of the app UI more expressive, replace *ngIf with the @if block. Additionally, there are many advantages of replacing ngSwitch with the @switch block. For every branch, the @switch block supports template type checking, including type narrowing. However, it doesn’t need a container element for every conditional template or condition expression.
For iteration, the *ngFor is replaced by @for block, which works quite differently from the structural directive NgFor. To identify unique items from the collection, the @for block needs a tracking expression, whereas the NgFor uses the trackBy function. However, accepting a track expression simplifies the tracking with the @for block.
The @empty block is used to display a message when the collection is empty. When the collection changes, it requires a certain number of DOM operations. The @for block would determine the minimum number of DOM operations using an optimized algorithm.
Meanwhile, NgFor was supporting a custom IterableDiffer implementation. The custom differs are not supported in the @for block.
The trackBy function in the NgFor concept is replaced by the track setting in the @for block. It can offer a better experience than its predecessor because @for comes with built-in support, allowing direct use of the expression to represent the key. Invoke the trackBy function as shown below to migrate from trackBy to track:
@for (color of colors; track colorId($index, color)) { {{ color.name }} } |
When you use NgFor in the absence of trackBy with loops over immutable data, the Angular app is riddled with performance bugs.
8. The Angular Control Flow Migration Schematic
The migration schematic in Angular control flow is useful to update all the existing ngIf, ngSwitch, and ngFor and automatically update them without any hassle.
ng ng g @angular/core:control-flow-migration g @angular/core:control-flow-migration |
Executing this will also help make your code more readable and easily maintainable.
9. Issues in Using Angular Control Flow Syntax
The best trait of Angular is that it allows developers to control the UI directly using HTML tags enhanced with Angular-specific syntax inside its HTML templates. As a result, developers with working knowledge of HTML wouldn’t face any difficulty learning Angular and would be able to create intuitive apps easily.
This approach works perfectly for almost every feature in Angular. However, it starts to break down from relatively simple operations such as conditional rendering or iterating over arrays using *ngFor, which can be more complex to manage within the template syntax.
Angular supports TypeScript, so running these operations is relatively simple and more intuitive than in HTML templates. Let’s see what a conditional operation would look like in TypeScript:
if (booleanCondition){ // if true } else { // if false } |
On the other hand, a similar operation in Angular would look like this:
<div *ngIf="condition">True content</div> <div *ngIf="!condition">False content</div> |
It no longer has that natural flow of conditions like “if this, do that; otherwise, do that”. In its place, developers need to negate the booleanCondition manually to handle the alternative case.
Although Angular provides an option for the else statement, it is inflexible, verbose, and quite challenging to use.
<div *ngIf="condition; else elseBlock">True content</div> <ng-template #elseBlock>False content</ng-template> |
The relationship between the if and the else block is not simply clear. Though the ngIf attribute has a written condition, it still calls out different HTML tags.
When a page finds it difficult to peruse through the HTML code to figure out what needs to be rendered, it can be exacerbated by else…if rendering.
<div *ngIf="isAdmin; then adminBlock else userBlock"></div> <ng-template #adminBlock>Welcome back, Admin!!.</ng-template> <ng-template #userBlock>How are you, User?</ng-template> |
In the scenarios where you have to render something based on elements like an enum, writing a different ng-template is overwhelming. Even after adding the components to the page, tracking everything becomes harder, making it difficult to keep track of everything. Similarly, using large switch-case statements in the template or component code can make maintenance and readability hard.
<div [ngSwitch]="userRole"> <div *ngSwitchCase="Admin'">Welcome back, Admin!!</div> <div *ngSwitchCase="User">Hello, User!!</div> <div *ngSwitchDefault>Login to continue using the application...</div> </div> |
In Angular, the for…of loops suffer from the same issue. The ngFor attribute takes care of iterating and rendering a collection. It is only placed on an HTML node:
<div>All Users List</div> <ul> <li *ngFor="let item of users">{{user.name}}</li> </ul> |
Using the word “let” in an HTML markup feels unusual because let is a TypeScript keyword, not an HTML element or attribute.
This also makes it difficult to read the code, especially when working on large projects, because the template syntax differs from standard TypeScript. The code in the ngFor attribute is a microsyntax, which is not present in the TypeScript code, making it difficult to inspect and refactor the code in the future.
10. Conclusion
With the advent of the new control flow syntax in Angular, managing templates and rendering logic has become quite simple. Migrating to this updated syntax makes your code more performant, readable, and easily maintainable. From the examples we discussed in this article, the changes implemented to the code aren’t just cosmetic but rather functional, improving the efficiency of Angular’s rendering process.


Comments
Leave a message...