
React is one of the most popular front-end JS libraries that can be used by software engineers to create user interfaces as per UI components, most of the newbies want to learn it and make it their career. And to make it easier for every React developer, be it a fresher or an expert, here we will go through various React cheat sheet techniques that help them learn every important concept of this technology.
1. What is React?
React is a very popular, declarative, efficient, and flexible JavaScript library. It is used by app developers to create user interfaces. It is a ‘V’ (View) in Model View Controller (MVC). ReactJS is a component-based open-source front-end app development library that is responsible only for the application’s view layer. React is created and maintained by Facebook.
This technology utilizes a declarative paradigm that makes it very simple and easy to reason about the application and its aim to be flexible and efficient. By following React js best practices you can design simple views for every stage of the app and it efficiently renders and updates the perfect component when the data in the app changes. This means that the declarative view is able to make the code predictable and this makes it easier to debug than ever.
1.1 Features of React
Following are the features of React:
- JSX: JavaScript XML or JSX is a JS syntax extension. ReactJS uses this HTML or XML-like syntax and processes it in the React Framework’s JavaScript calls. To make the JS React code co-exist with the HTML-like text, the ES6 is extended. The use of JSX is not essential anywhere but it is recommended in ReactJS.
- Components: Everything in ReactJS is about components. Various types of components are used to build a ReactJS app. Every component in the app comes with its own controls and logic. All the components are reusable which makes maintaining code easy when you work on large-scale projects.
- One-way Data Binding: ReactJS comes with one-way data binding. So, it only follows unidirectional data flow which gives you better control over the entire app. The components of ReactJS are immutable and the data within is unchangeable. So, in case the data flows in another direction, you would need more features. To keep the data flow unidirectional, you have to use the Flux pattern. It helps make your app more flexible and efficient.
- Virtual DOM: The representation of the original DOM is called Virtual DOM. It functions similarly to one-way data binding. When any changes are made to the web app, the whole user interface is re-rendered in a virtual DOM representation. The differences between the new and old DOM representations are checked and the changes are updated. No memory is wasted and the app becomes a whole lot faster.
- Simplicity: It is easy to code and understand with ReactJs because it uses a JSX file. The framework has adopted a component-based approach. This helps write a reusable code.
- Performance: ReactJS is known for its performance as it is better in comparison to other frameworks out there, thanks to Virtual DOM. it is a cross-platform programming API that handles XHTML, XML, and HTML. The entire DOM is present in the memory. So when a component is created, it is not directly written to the DOM. Instead, virtual components are written that turn into DOM to offer faster and seamless performance.
2. Top React Cheat Sheet
Some of the most popular approaches to React cheat sheet are –
2.1 App Components
Components in React are known as the building blocks for an application. They are functions that are capable of returning an HTML element. Basically, one can say that an app component in React is just like a big HTML block of code that has the capability to independently do a certain type of functionality for the React application. Just like the panels or the navigation bar.
In the React app, the components are structured in such a manner that it looks like a node in the Virtual DOM. These React components will render onto the web browser. And the rendering will be as per the ways we specify them to look like. There are two essential types of React components currently in the market and they are Function component & Class component.
Function Components
Function or functional component is a popular type of React component that enables the developers to return HTML codes. The names in these components must start with capital letters. To understand this in a better way, let us go through an example where we will create Car and Color as functional components in a function app.
import React from "react"; import ReactDOM from "react-dom"; function Car() { return ( <div> <h2>This is my car</h2> <Color/> <!--add child--> </div> ); } function Color() { return ( <div> <h3>White</h3> </div> ); } |
ReactDOM.render(<Car />, document.getElementById("root")); |
This is it. The components work the same way and render the same elements of HTML. But in this, one thing that you must remember is that you don’t require the render() function prior to the return statement.
Class Components
The class component is nothing but the classes that are written in the context of React. The only rule for writing the class components is that its name must start with a capital letter. To make the concept more clear for you, let’s have a look at an example. Here we will write a simple class component, named Car. For this, we will first have to import react-dom and react, then write the class Car, and later on, call the function ReactDOM.render().
import React from 'react' import ReactDOM from 'react-dom' class Car extends React.Component { render() { return ( <div> <h2>This is my car</h2> </div> ) } } //3. ReactDOM.render(<Car />, document.getElementById('root')); |
Now, to take this ahead, we will create class Color and this new class will act as a child component to class Car.
Here we will create a class named Color.
class Color extends React.Component { render() { return ( <div> <h3>White</h3> </div> ) } } |
Now, here we will add the Color class in the Car class. As this makes Color the child class of Car.
class Car extends React.Component { render() { return ( <div> <h2>This is my car</h2> <Color /> <!--here is the Child component--> </div> ) } } |
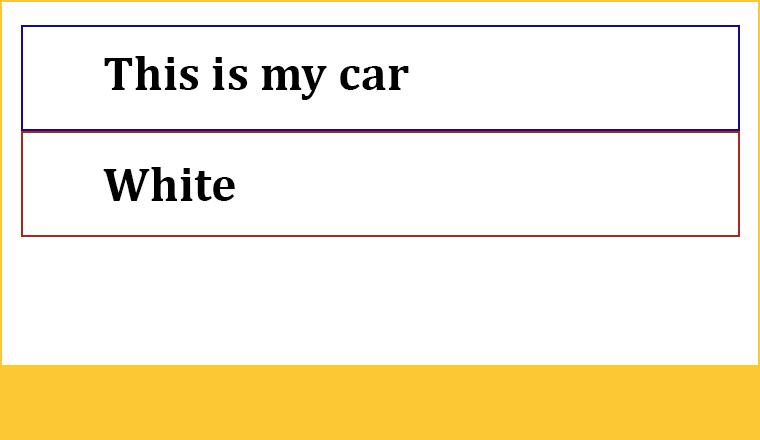
The image below is the outcome that shows what the application will look like in the web browser. Here, both the classes are displayed, and to show that the Color is the child class of Car (parent component class), it is outlined with a red box and is placed inside Car.
2.2 States
The state is nothing but a very simple and plain JavaScript object that can be utilized by the React developers to represent any type of information about the current situation of the React app components. States are managed in the components, just like how any variable of the app is declared in a function. The state is an illustration of React Component Class and it can be easily defined as an object of a set of properties that are observable. These properties are able to control the component’s behavior. Basically, a state is an object that enables the developers to save the property values that are a part of a component. This means that when any state object changes, it will automatically re-render the component.
import React from 'react' class App extends React.Component { constructor(props) { super(props); this.state = { //Initializing state values name: "" } } componentDidMount() { this.setState({ //Updating state values name: "tatvasoft" }) } render() { return( <div> Hello {this.state.name} {/* Using state values */} </div> ) } } export default App; |
2.3 Props
Props or properties are also components but they are read-only immutable ones. Basically, a prop is an object that can store the attribute’s value, and these attributes work just like the ones in HTML. This means that props are immutable components that can offer a way to pass information from one component to another. The properties can pass data in a similar way as arguments are passed to a normal function.
import React from 'react' import ReactDOM from 'react-dom' class App extends React.Component { constructor(props) { super(props); } render() { return( <div> Hello {this.props.name} {/* Using prop values */} </div> ) } } ReactDOM.render( <React.StrictMode> <App name={"tatvasoft"} /> {/* Provide prop values */} </React.StrictMode>, document.getElementById('root') ) |
2.4 Hooks
A Hook is a very special type of function that enables the developers to hook into the features of React applications. For instance, useState, a Hook that enables the React developer to include a React state to function components. To understand it more clearly, let us go through an example and see how to use React Hooks to control the states. For this, let’s have a glance at some of the React Hooks and their examples.
useState()
It is a React Hook that enables the function components to start and update states. For instance –
import React, { useState } from "react"; import ReactDOM from "react-dom"; function Car() { const [color, setColor] = useState("white"); return ( <div> <h2>This is a {color} car</h2> </div> ); } |
In the above code, we have initialized the state as white inside the Hook, useState. Later, the Hook here returns the value of the state and the function that is set with it to update the state. After that, you can simply add a value of the state in the function that returns and at the end, the application will be able to display the state.

useEffect()
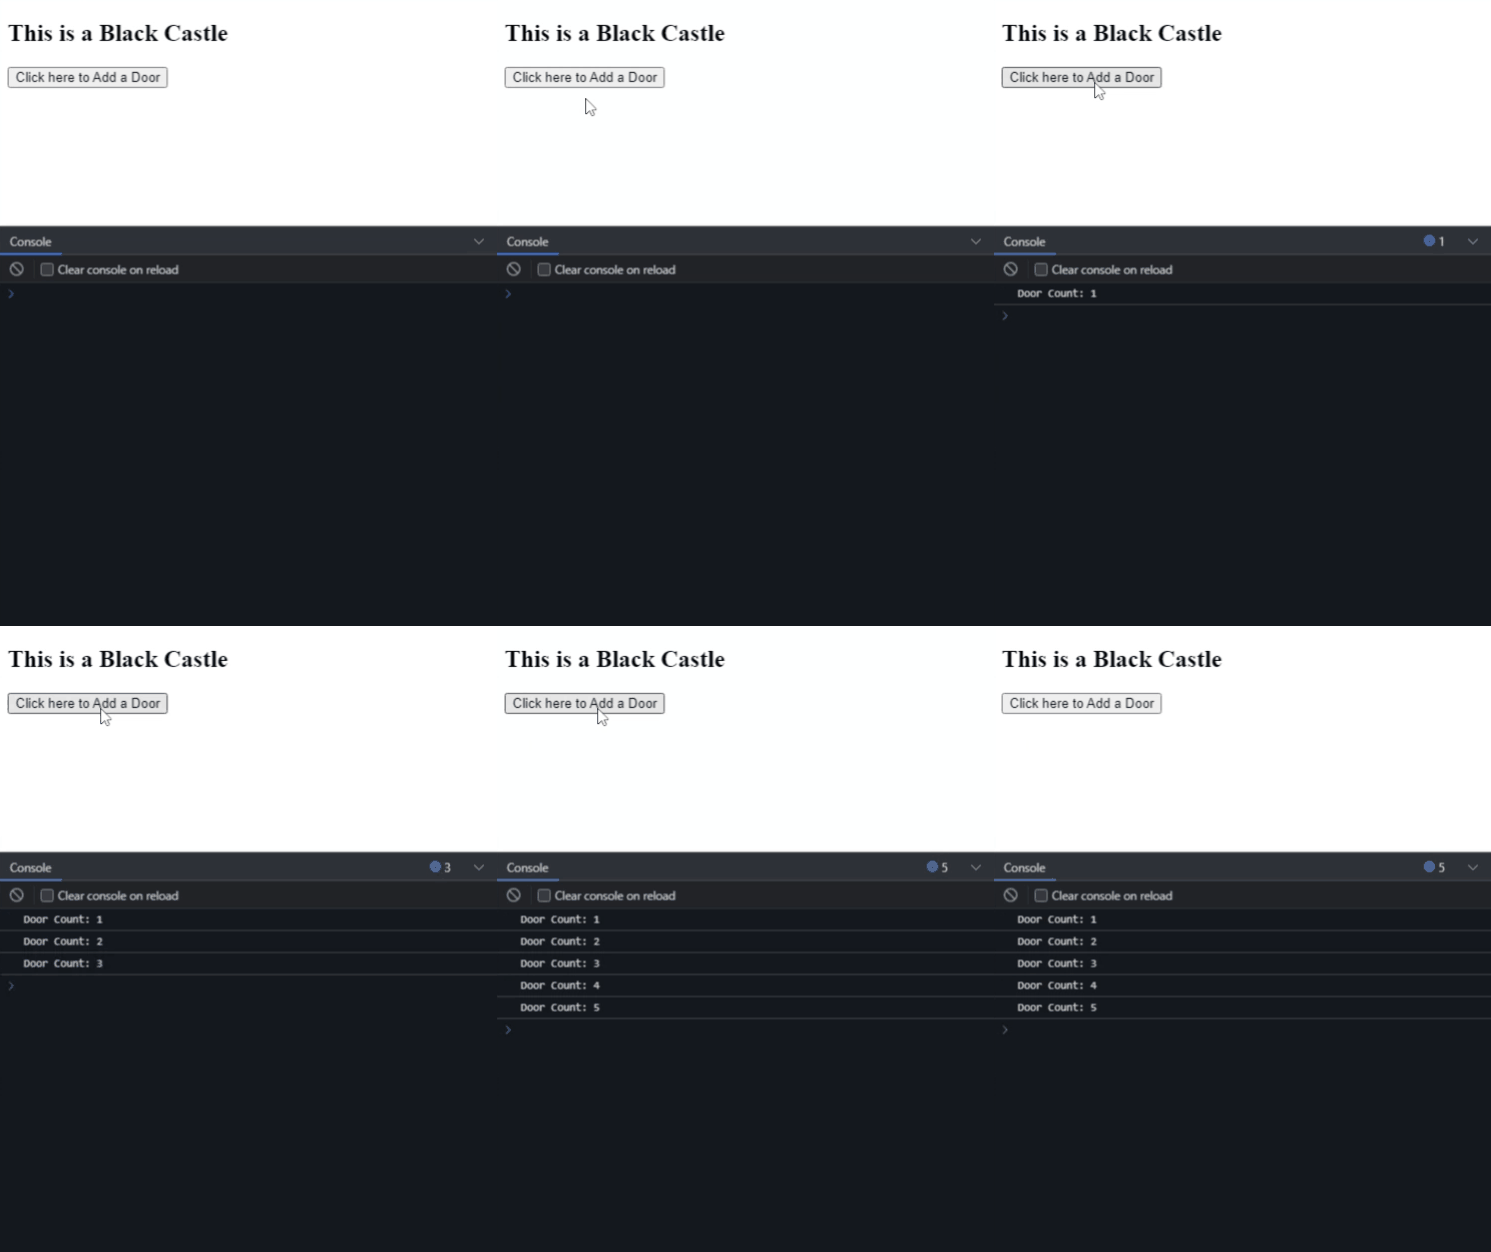
Another useful Hook is the useEffect Hook. This React Hook has the capability to perform a function whenever any particular state changes. If we look at the House component example and add a new variable in it, Door which can help in tracking the number of Doors in the main House component, the useState must be initialized to 0. Later, when a button onClick is initialized, a value is added to increase the value of Door variable by 1. Then, the useEffect Hook will print the total number of doors in the house. And this is done every time the door’s value is updated. You can have a look about it in the below code –
function House() { const [color, setColor] = useState("white"); const [door, setDoor] = useState(0); //initialize door as 0 //add 1 to the current value of door on every button click const addDoor = () => { setDoor(door + 1); }; //finally, trigger the function to print the door value whenever door is updated useEffect(() => { console.log(`Door Count: ${door}`) }, [door]); return ( <div> <h2>This is a {color} Castle house</h2> <button onClick={addDoor}>Click Here to Add a Door</button> </div> ); } |
The result of this code is –
useContext()
Rather than passing the data through props, React uses useContext hook to pass it to the child component in the component tree. The useContext hook also helps the child component directly access the value in the parent component.
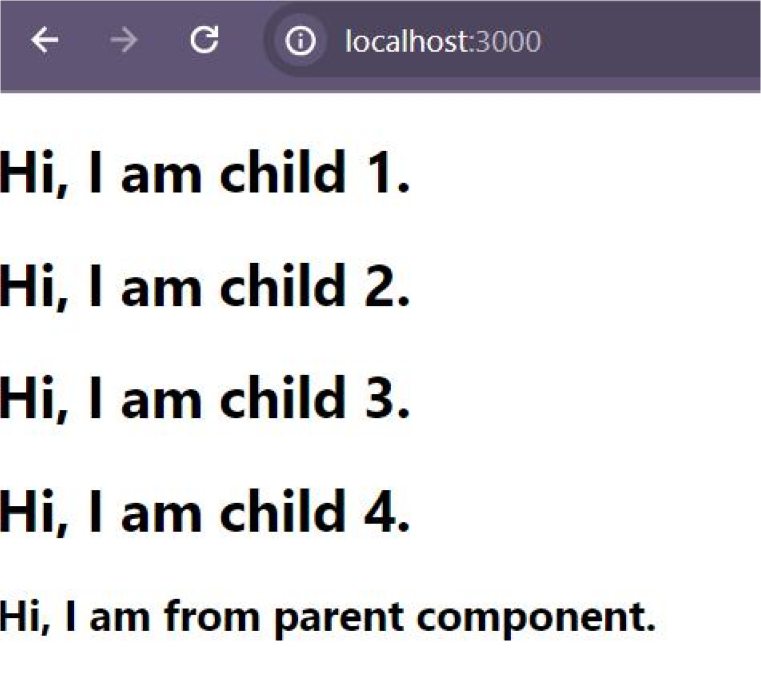
In the App component, the Context.Provider is wrapped around the child components and passes the parentData through it instead of passing it through props in childComponent. Still, you can use the useContext hook to access the parentData in childComponent4. It is shown in the code below:
import { createContext, useContext } from "react"; import "./App.css"; const Context = createContext(); const ChildComponent4 = () => { const context = useContext(Context); return (<><h1>Hi, I am child 4.</h1><h2>{context.parentData}</h2></>); }; const ChildComponent3 = () => { return (<><h1>Hi, I am child 3.</h1><ChildComponent4 /></>); }; const ChildComponent2 = () => { return (<><h1>Hi, I am child 2.</h1><ChildComponent3 /></>); }; const ChildComponent1 = () => { return (<><h1>Hi, I am child 1.</h1><ChildComponent2 /></>); }; const App = () => { return ( <Context.Provider value={{ parentData: "Hi, I am from parent component." }}> <ChildComponent1 /> </Context.Provider> ); }; export default App; |
The result of the code is as below:
useRef()
Using the useRef hook from React helps you maintain values between renders. Its use cases includes:
- useRef Hook can hold the mutable value. It prevents the rerender when updated.
- It gives direct access to the DOM element.
- Helps in monitoring prior state values.
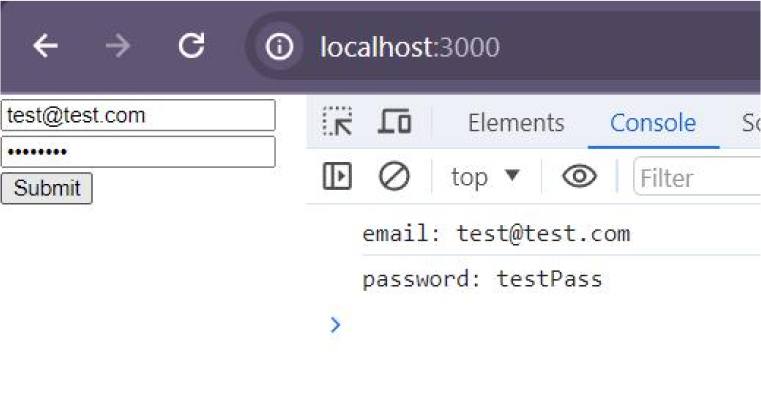
You can use the code given below to access the DOM element value directly using useRef hook.
import { useRef } from "react"; function App() { const emailRef = useRef(); const passwordRef = useRef(); const handleSubmit = () => { console.log("email:",emailRef.current.value); console.log("password:",passwordRef.current.value); }; return ( <> <input type="email" ref={emailRef} /> <input type="password" ref={passwordRef} /> <button onClick={handleSubmit}>Submit</button> </> ); } export default App; |
The result of the code is as below:
useReducer()
The useReducer hook is similar to useState hook. If you need to frequently keep track of various state components depending on the complicated logic then useReducer can come in handy.
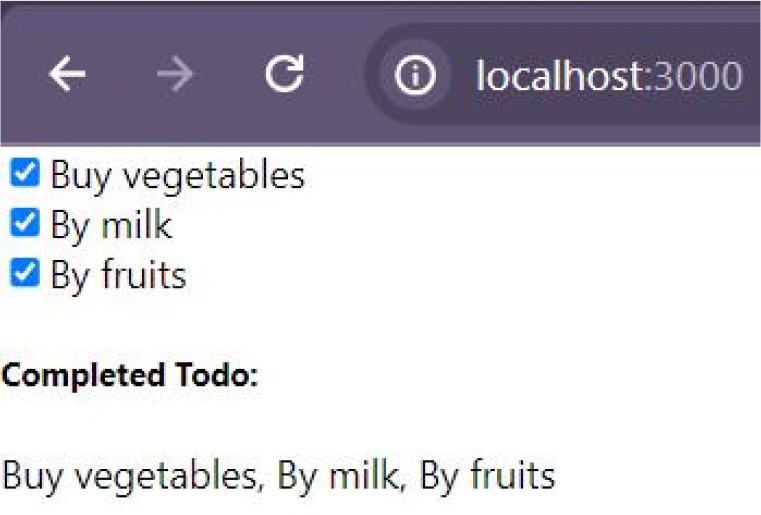
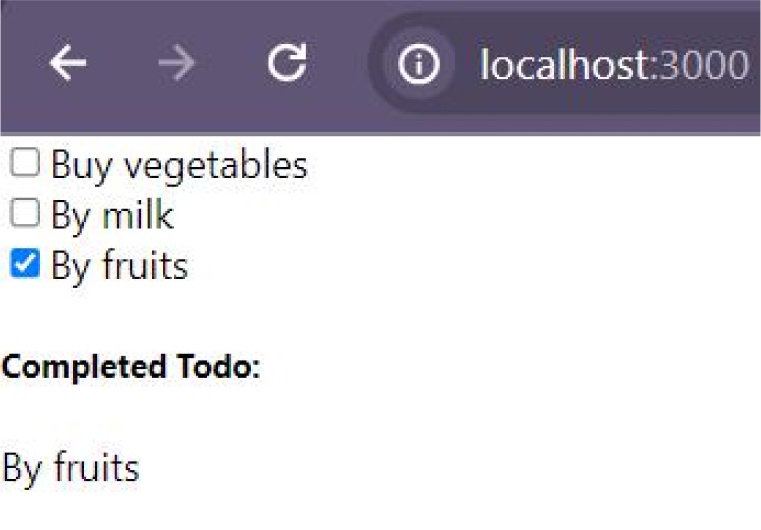
In the code given below, you can see that we used the useReducer hook to maintain the to-do list. You can accomplish it using useState as well. But if you use the useReducer then you can avoid passing on callbacks down through your component’s layers.
Moreover, it also allows you to pass the dispatch function specified by you. It helps the components that initiate deep updates run better.
import { useReducer } from "react"; import "./App.css"; const initialTodoList = [ { todoId: 1, description: "Buy vegetables", isCompleted: false, }, { todoId: 2, description: "By milk", isCompleted: false, }, { todoId: 3, description: "By fruits", isCompleted: false, }, ]; const myTodoReducer = (state, action) => { switch (action.type) { case "TODO_COMPLETED": return state.map((todo) => { if (todo.todoId === action.todoId) { return { ...todo, isCompleted: !todo.isCompleted }; } else { return todo; } }); default: return state; } }; const App = () => { const [todoList, dispatch] = useReducer(myTodoReducer, initialTodoList); const handleComplete = (todo) => { dispatch({ type: "TODO_COMPLETED", todoId: todo.todoId }); }; return ( <> {todoList.map((todoItem) => ( <div key={todoItem.todoId}> <label> <input type="checkbox" checked={todoItem.isCompleted} onChange={() => handleComplete(todoItem)} /> {todoItem.description} </label> </div> ))} <h5>Completed Todo:</h5> <p>{todoList.filter((item) => item.isCompleted).map((todo) => todo.description).join(", ")}</p> </> ); }; export default App; |
The result of the code is as below:
useMemo()
The useMemo hook in React returns the memoized values. When a developer caches a value to avoid recalculating it, the process is called memoization. You can only execute the useMemo hook when one of its dependencies is updated. When the useCallback hook returns the memoized callback function, the useMemo returns a memoized value.
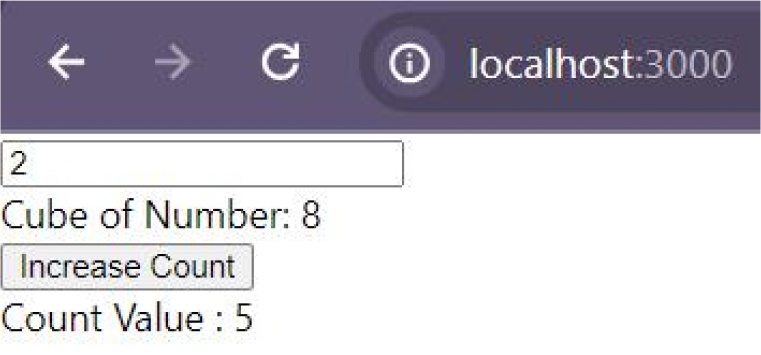
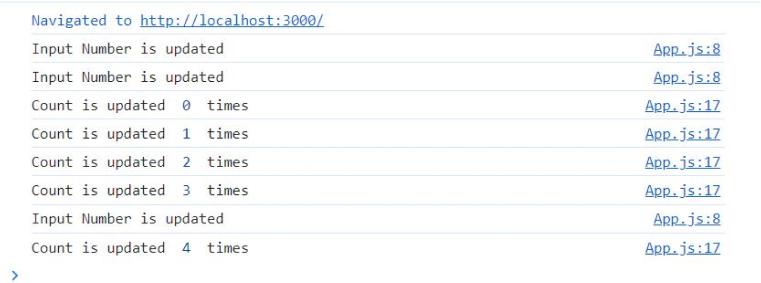
Executing the useMemo is only possible after the dependency changes. If you add the count in the dependency array, the useMemo hook will execute on every change of input number and increment counter click.
import React, { useState, useMemo } from "react"; function App() { const [count, setCount] = useState(0); const [inputNumber, setInputNumber] = useState(0); const cubeOfInputNumber = useMemo(() => { console.log("Input Number is updated") return Math.pow(inputNumber, 3); }, [inputNumber]); const handleNumberChange = (e) => { setInputNumber(e.target.value); }; const handleCountChange = () => { console.log("Count is updated ", count , " times"); setCount(count + 1); }; return ( <div className="App"> <input type="number" placeholder="Enter Number" value={inputNumber} onChange={handleNumberChange} /> <div>Cube of Number: {cubeOfInputNumber}</div> <button onClick={handleCountChange}>Increase Count</button> <div>Count Value : {count}</div> </div> ); } export default App; |
The output is as below:
2.5 Forms
Formik
Formik is a popular open-source framework that enables you to create and manage form data in React apps. Its offerings include a large array of features and components that can enhance form data management in the React applications.
Run the following command in the terminal at the root of the project to install the Formik.
npm install formik --save |
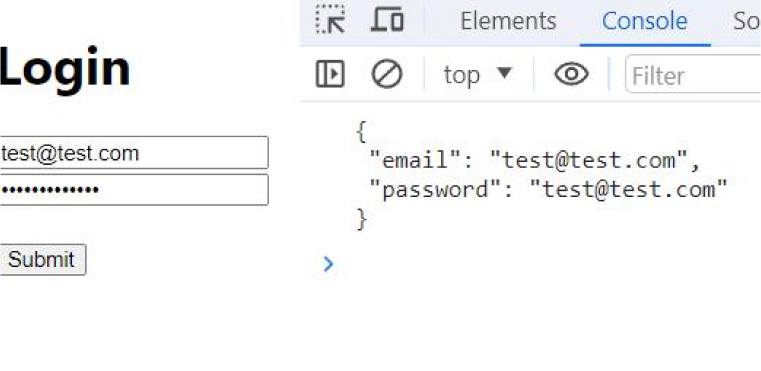
The code given below shows the simple login example using Formik components, managing data during form submissions, and form validation.
import React from "react"; import { Formik, Form, Field, ErrorMessage } from "formik"; function App() { const validationSchema = (values) => { const errors = {}; if (!values.email) { errors.email = "Email is required"; } else if (!/^[A-Z0-9._%+-]+@[A-Z0-9.-]+\.[A-Z]{2,}$/i.test(values.email)) { errors.email = "Invalid email address, Please check"; } if (!values.password) { errors.password = "Password is required"; } return errors; }; const handleSubmit = (values, { setSubmitting }) => { console.log(JSON.stringify(values, null, 1)); setSubmitting(false); }; return ( <div className="App"> <h1>Login</h1> <Formik initialValues={{ email: "", password: "" }} validate={validationSchema} onSubmit={handleSubmit} > {({ isSubmitting }) => ( <Form> <div> <Field type="email" name="email" placeholder="Enter your email" /> <ErrorMessage name="email" component="span" /> </div> <div> <Field type="password" name="password" /> <ErrorMessage name="password" component="span" /> </div> <br/> <button type="submit" disabled={isSubmitting}> Submit </button> </Form> )} </Formik> </div> ); } export default App; |
The output is as below:

React Hook Form
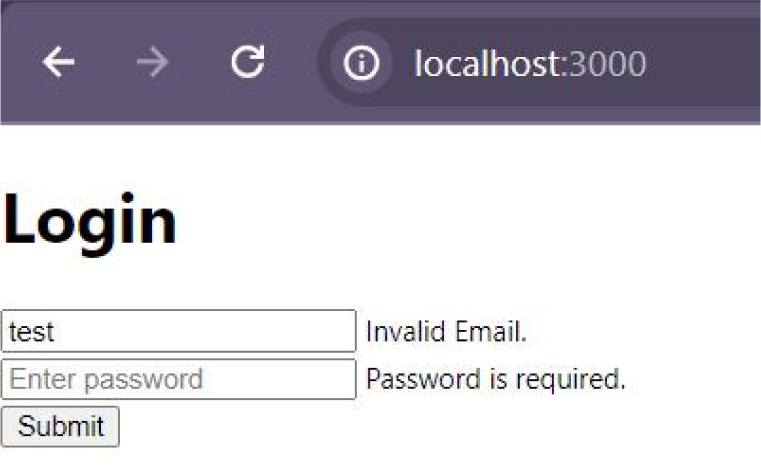
Validating forms in React becomes easy with React Hook Form. Developers only need to write a few lines of code while using this simple yet efficient library in comparison to other form libraries. It’s because React Hook Form doesn’t have any additional databases. We can take the login example given above and rewrite it using the React Hook Form with validation.
import React from "react"; import { useForm } from "react-hook-form"; function App() { const { register, handleSubmit, formState: { errors }, } = useForm({ mode: "onChange", }); const handleLogin = (data) => console.log(data); const handleError = (errors) => {}; return ( <div className="App"> <h1>Login</h1> <form onSubmit={handleSubmit(handleLogin, handleError)}> <div> <input type="email" name="email" placeholder="Enter your email" {...register("email", { required: true, pattern: /^[^@ ]+@[^@ ]+\.[^@ .]{2,}$/, })} /> <small className="text-danger"> {errors.email && errors.email.type === "required" && ( <> Email is required.</> )} {errors.email && errors.email.type === "pattern" && ( <> Invalid Email.</> )} </small> </div> <div> <input type="password" name="password" placeholder="Enter password" {...register("password", { required: true, })} /> <small className="text-danger"> {errors.password && errors.password.type === "required" && ( <> Password is required.</> )} </small> </div> <button>Submit</button> </form> </div> ); } export default App; |
The output is as below:

Yup Validation
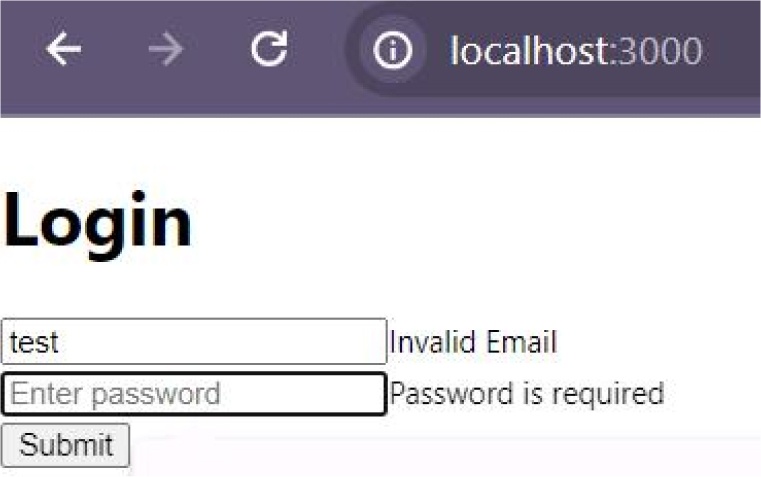
Yup is among one of the most liked ReactJS validation libraries. It helps developers create, and manage form validations as well as improve the code readability. We will rewrite the login example with Yup validation in this section.
But first, you need to enter the following command in your terminal to install Yup.
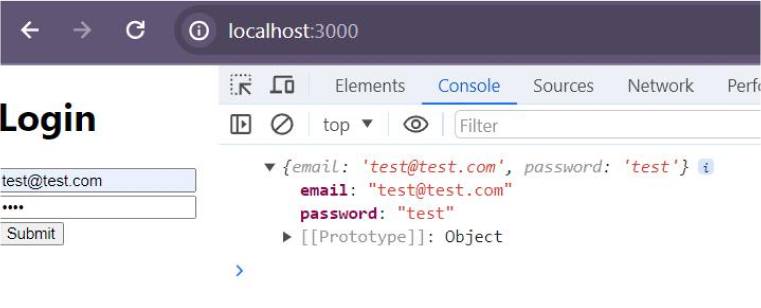
npm i yup @hookform/resolvers import React from "react"; import { useForm } from "react-hook-form"; import { yupResolver } from "@hookform/resolvers/yup"; import * as Yup from "yup"; function App() { const validationSchema = Yup.object().shape({ email: Yup.string().email("Invalid Email").required("Email is required"), password: Yup.string().required("Password is required"), }); const { register, handleSubmit, formState: { errors }, } = useForm({ mode: "onChange", resolver: yupResolver(validationSchema), }); const handleLogin = (data) => console.log(data); const handleError = (errors) => {}; return ( <div className="App"> <h1>Login</h1> <form onSubmit={handleSubmit(handleLogin, handleError)}> <div> <input type="email" name="email" placeholder="Enter your email" {...register("email")} /> <small className="text-danger"> {errors.email && errors.email.message} </small> </div> <div> <input type="password" name="password" placeholder="Enter password" {...register("password")} /> <small className="text-danger"> {errors.password && errors.password.message} </small> </div> <button>Submit</button> </form> </div> ); } export default App; |
The output is as below:
3. Conclusion
As you can see in this blog, there are many important factors to learn about React. This is why every developer goes through the React cheat sheet and understands every React context so that he/she can work properly and effectively on their development project.
More Resources on Cheat Sheet:
Node Cheat Sheet
Angular Cheat Sheet
FAQs
What is constructor in React?
In a class, a technique used to initialize the state of an object is called the constructor. it is called automatically when an object is created in a class. The working of the constructor is the same in the React with a little difference. The constructor is called before mounting the component.
What is hooks in React?
The functions that can hook you into the function component’s lifecycle features and React State are called Hooks. Although hooks don’t work in classes, it is possible to use React without classes. There is no need to rewrite your existing components, you can add hooks in new React components.
What is props in React?
The objects where you can store the tag attribute’s value in ReactJS are called props. The Props is short for properties. The working functionality of props is the same as that of HTML attributes. It is important to note that props are read-only components.
What is render in React?
The process you can utilize to describe the app’s UI based on its props and current state is called rendering. When the app starts, the initial render is run. Re-rendering is done in case changes are made in a state to update the UI.



Comments
Leave a message...