
In the past, JavaScript code was written in a more or less dynamic manner by developers; but, with the rise in JavaScript’s popularity, the language has been adapted for more serious, complicated, interaction-rich programs. It changed, with the help of dynamic Angular development services. However, testing such complicated programs is essential, and automated testing is preferable. Today, let’s discuss JavaScript-based automated unit testing framework or more precisely, automated Angular unit testing written in JavaScript.
In this post, we’ll cover the fundamentals of Angular unit testing. We’ll go over downloading and installing the Angular CLI, then building and unit testing an example project.
1. What is Angular Unit Testing?
Testing individual modules of your Angular app is referred to as “unit testing.” Users benefit from this since they can easily integrate new functionalities into their existing applications without worrying about breaking anything. The Angular apps undergo Unit Testing using the Karma and Jasmine frameworks.
Now that we have everything set up, we can begin our guide on writing unit tests for Angular applications. Therefore, it is imperative that we have Angular installed, as we will require an Angular application. With Angular installation, we shall begin.
1.1 Installing AngularCLI
It might be challenging to set up and oversee an Angular project. As a result, numerous different libraries, frameworks, and other tools exist, all of which aim to address the same issues. For those who are just getting started with the technology, this kind of situation might make for a very steep learning curve.
The Angular team realized this problem and developed the Angular CLI, a command-line interface for working with Angular applications. You’ll need npm and Node for the Angular CLI installation.
If you already have Node installed, you may execute this command:
npm install -g @angular/cli |
The time it takes for the setup to conclude may vary. When it’s finished, you can check the current version of Angular CLI by running:
ng version |
1.2 Creating a Sample Application
Develop an Angular example app now that Angular CLI is set up. It’s time to issue the following command:
ng new sample-app |

You’ll be prompted to include Angular routing after running the script. Enter the letter “y” and proceed with the prompt. At that point, your application’s stylesheet will present you with a few different formatting alternatives.
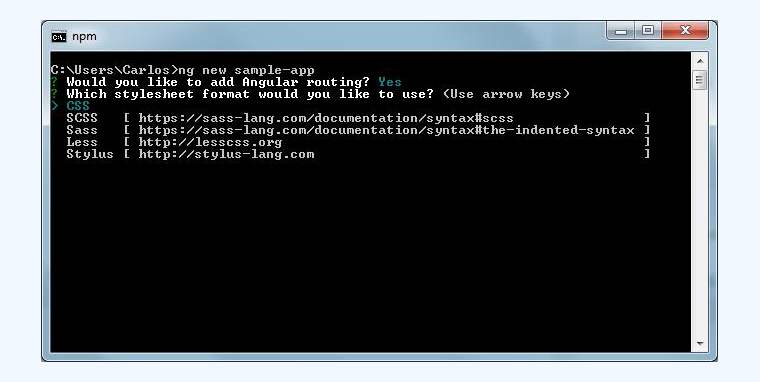
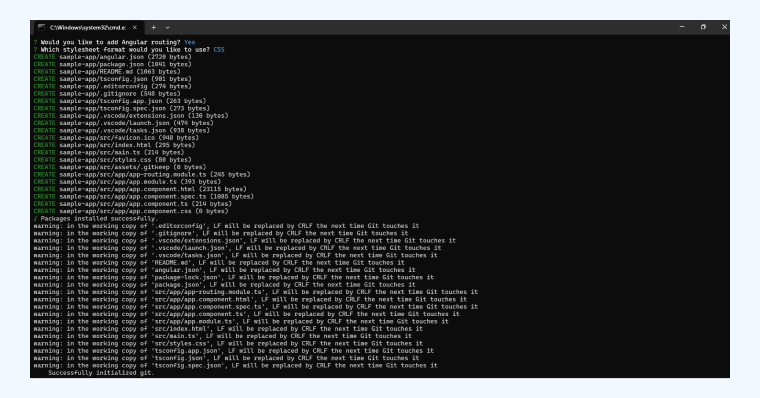
It will be enough to select CSS and press “enter” for the objectives of the mockup app. You can verify the success of the development by changing directories to the sample-app folder and running git log there. Kudos if you can spot even a single changelog entry. Success! You now have an Angular app up and running.
1.3 Testing
Let’s put the sample program through its paces with a single command:
ng test |
After a short while, a new tab or window will appear in your browser displaying the following page:
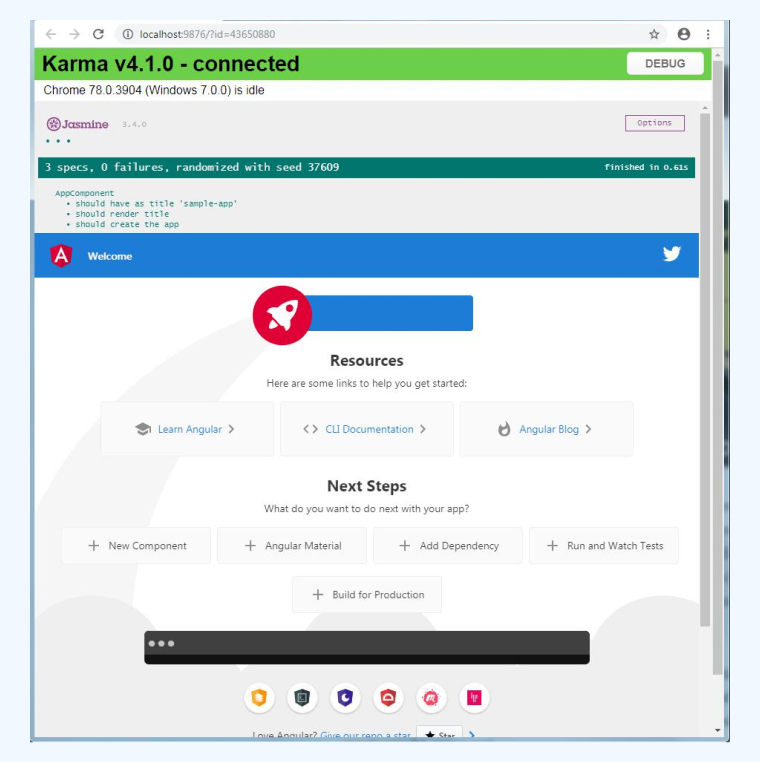
Additionally, your terminal should display the foregoing:

1.4 Why You Should Unit Test Angular Apps
With Angular unit testing, you can check how your app reacts to real-world scenarios. Although it would be time-consuming, wasteful, and unproductive to test all potential behaviors, you may show how your application’s coupling blocks act by developing tests for them.
Creating individual tests for each of these building components is a simple approach to assess their quality. It is not necessary to wait until users are unhappy with the input field’s behavior after clicking the button. Create a unit test for each of your building pieces (components, services, etc.) to quickly identify any malfunctions.
2. Unit Testing Angular Apps with Jasmine and Karma

Jasmine is a Behavior Driven Development (BDD) framework that is both open-source and free to use. It is compatible with any systems that support JavaScript. The goal is to make the test case description understandable by anybody, not only the developers. Jasmine can function without the DOM. Consequently, jasmine-core has minimal maintenance requirements and no third-party dependencies.
By simulating real-world user actions on a website, Jasmine helps to ensure that it functions as intended. To put it simply, it helps a lot with the front-end testing environment. Testing the user interface’s responsiveness across a wide range of devices and screen sizes is a part of this. To further mimic real-world user actions, one may additionally automate their behavior by setting delay and wait times at will. The vast Jasmine community and thorough documentation make it a breeze to implement.
Karma is a test task runner. Using the command line, users may run tests of their Jasmine programs in various real-time browsers. The test results are also shown at this command prompt. When a file is modified, the test suite is immediately re-run. Angular is supported by Karma by default.
3. Angular Demo with Unit Test Cases
The Angular CLI (ng new appName) automatically includes an element and a test file in a single angular project. Any module for a component (service, component) you make with the Angular CLI also generates a test script, which is great if you’re a shortcut seeker.
The following test script, which always has the extension .spec.ts, is included. First, let’s have a peek at app.component.spec.ts, the file that contains the initial test script file:
import { TestBed, async } from '@angular/core/testing'; import { AppComponent } from './app.component'; describe('AppComponent', () => { beforeEach(async(() => { TestBed.configureTestingModule({ declarations: [ AppComponent ], }).compileComponents(); })); it('should create the app', async(() => { const fixture = TestBed.createComponent(AppComponent); const app = fixture.debugElement.componentInstance; expect(app).toBeTruthy(); })); it(`should have as title 'angular-unit-test'`, async(() => { const fixture = TestBed.createComponent(AppComponent); const app = fixture.debugElement.componentInstance; expect(app.title).toEqual('angular-unit-test'); })); it('should render title in a h1 tag', async(() => { const fixture = TestBed.createComponent(AppComponent); fixture.detectChanges(); const compiled = fixture.debugElement.nativeElement; expect(compiled.querySelector('h1').textContent).toContain('Welcome to angular-unit-test!'); })); }); |
Let’s do a quick check with following command to make sure nothing has gone wrong:
ng test |
Create a QuoteComponent. Execute the following command in the command prompt.
ng g c quote |
So, it will create the following sub-directory and files in the app directory.

During Angular unit testing, you insert the services into the QuoteComponent so that the view can use its attributes.
Write the following code in “quote.component.ts”.
import { Component, OnInit } from '@angular/core'; import { QuoteModel } from '../model/quote-model/quotemodel'; import { QuoteService } from '../service/quote.service'; @Component({ selector: 'app-quote', templateUrl: './quote.component.html', styleUrls: ['./quote.component.css'] }) export class QuoteComponent implements OnInit { public quoteList!: QuoteModel[]; public quoteText: string = ""; constructor(private service: QuoteService) { } ngOnInit() { this.quoteList = this.service.getQuote(); } createNewQuote() { let addQuote = { 'text' : this.quoteText, 'timeCreated' : new Date().toString(), } this.service.addNewQuote(addQuote); this.quoteText = ""; } removeQuote(index: number) { this.service.removeQuote(index); } } |
To create the services, execute the following command:
ng g s Quote |
It will create the following sub-directory and files in the app directory.

Create a “quote-model” directory in “model” and “quotemodel” file in “quote-model” directory.

And write the following code in the “quotemodel.ts” file.
export interface QuoteModel { text : string; timeCreated : string; } |
Add the following code in the “quote.service.ts” file.
import { Injectable } from '@angular/core'; import { QuoteModel } from '../model/quote-model/quotemodel'; @Injectable({ providedIn: 'root' }) export class QuoteService { quoteData: QuoteModel[] = []; constructor() { } getQuote() { return this.quoteData; } addNewQuote(text: QuoteModel) { this.quoteData.push(text); } removeQuote(index: number) { this.quoteData.splice(index,1); } } |
Mention the following imports into “AppModule.ts”
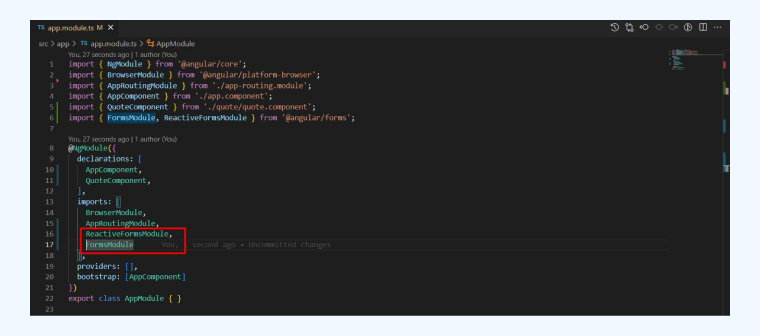
Write this code in the “quote.component.html” file in the “quote” directory.
<div class="container-fluid"> <div class="row"> <div class="col-8 col-sm-8 mb-3 offset-2"> <div class="card"> <div class="card-header"> <h5>Please Write a Quote to Test</h5> </div> <div class="card-body"> <div role="form"> <div class="form-group col-8 offset-2"> <textarea #quote="" class="form-control" rows="10" cols="100" [(ngmodel)]="quoteText" name="quoteText"></textarea> </div> <div class="form-group text-center"> <button class="btn btn-primary" (click)="createNewQuote()" [disabled]="!quoteText">Create a new quote</button> </div> </div> </div> </div> </div> </div> <div class="row"> <div class="card mb-3 col-5 list-card" id="quote-cards" style="max-width: 18rem;" *ngfor="let quote of quoteList; let i = index" (click)="removeQuote(i)"> <div class="card-body"> <h6>{{ quote.text }}</h6> </div> <div class="card-footer text-muted"> <small>Created on {{ quote.timeCreated }}</small> </div> </div> </div> </div> |
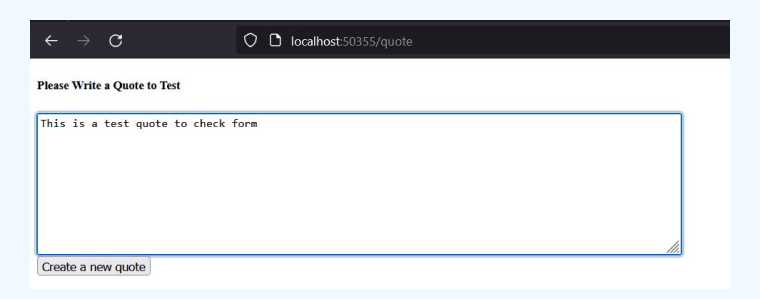
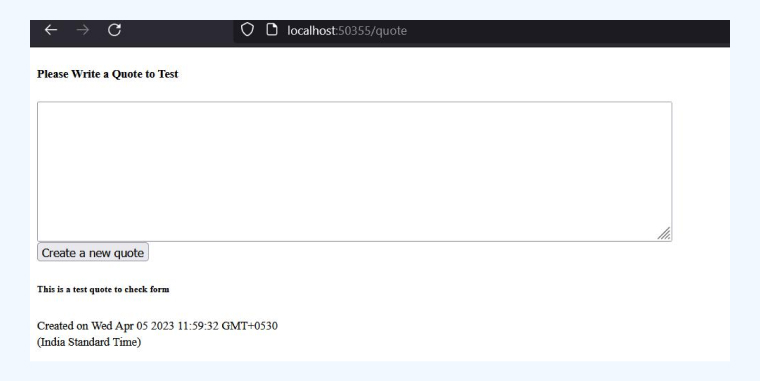
Now run the application. It will give the following output on the localhost. You can also write any quote to test this application.
Now, let’s write the test cases. Write the following code in the “quote.component.spec.ts” file in the “quote” directory.
import { ComponentFixture, TestBed } from '@angular/core/testing'; import { QuoteComponent } from './quote.component'; import { FormsModule } from '@angular/forms'; import { QuoteService } from '../service/quote.service'; import { By } from '@angular/platform-browser'; describe('QuoteComponent', () => { let component: QuoteComponent; let fixture: ComponentFixture<QuoteComponent>; beforeEach(async () => { await TestBed.configureTestingModule({ imports: [FormsModule], // update declarations: [QuoteComponent] }) .compileComponents(); fixture = TestBed.createComponent(QuoteComponent); component = fixture.componentInstance; fixture.detectChanges(); }); }); |
The following function verifies whether the newly generated instance of the component is already in the system:
it('should create Quote component', () => { expect(component).toBeTruthy(); }); |
Every action is managed by the injected service (add, remove, fetch). The injected service is stored in the quoteService variable. Rendering of the component will not occur until the detectChanges function is invoked.
it("should use the quoteList from the service", () => { const quoteService = fixture.debugElement.injector.get(QuoteService); fixture.detectChanges(); expect(quoteService.getQuote()).toEqual(component.quoteList); }); |
Let’s see if we can create a post by trying it out. As soon as the element is instantiated, its attributes become available for use, allowing the displayed component to pick up on any changes made to the quoteText model.
Since the nativeElement object provides accessibility to the rendered HTML component, verifying that the quoted text is included in the rendered content is a breeze.
it("should create a new post", () => { component.quoteText = "test123"; fixture.detectChanges(); const compiled = fixture.debugElement.nativeElement; expect(compiled.innerHTML).toContain("test123"); }); |
You may acquire an element not only by its HTML content but also by its CSS attribute. It’s standard practice to deactivate the button if the quoteText model contains nothing or is null.
it("should disable the button when textArea is empty", () => { fixture.detectChanges(); const button = fixture.debugElement.query(By.css("button")); expect(button.nativeElement.disabled).toBeTruthy(); }); it("should enable button when textArea is not empty", () => { component.quoteText = "test123"; fixture.detectChanges(); const button = fixture.debugElement.query(By.css("button")); expect(button.nativeElement.disabled).toBeFalsy(); }); |
Any element may be accessed in the same way, either by its CSS attribute or its class name. You may use it to retrieve many classes at once, as so: By.css(‘.className.className’).
In order to imitate button clicks, the triggerEventHandler function is used. In this example, click is the event type that must be supplied. A quotation presented is meant to be erased from the quoteList when clicked on:
it("should remove post upon card click", () => { component.quoteText = "This is a fresh post"; fixture.detectChanges(); fixture.debugElement .query(By.css(".row")) .query(By.css(".card")) .triggerEventHandler("click", null); const compiled = fixture.debugElement.nativeElement; expect(compiled.innerHTML).toContain("This is a fresh post"); }); |
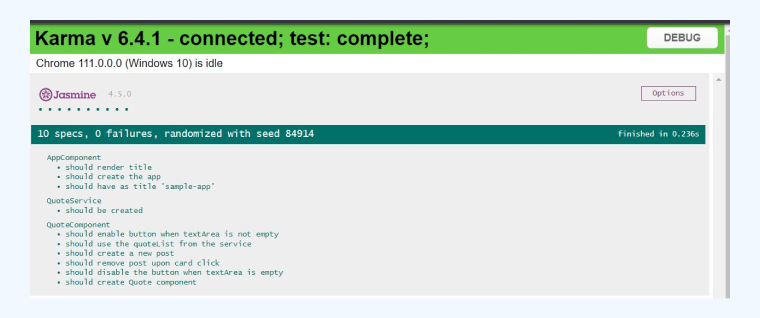
Once all tests runs successfully, you will be able to see the following screen on Jasmin dashboard:
4. Conclusion
Software development cannot proceed without testing. Both unit testing and end-to-end testing are important, and there are a variety of tools available to conduct both. This post has covered some of the most useful approaches to testing with Angular. You can use whichever of these fits your needs best.




Thank you for sharing such a great article. Do you have recommendations for certain unit testing frameworks or modules that perform well with Angular, for example? Karma and Jasmine have both received positive feedback, but I'm not sure which one is the best suit for my project.
Thank you for sharing this informative article. I found the section on configuring the Angular CLI to be really useful as a software developer. In addition, I've found that involving personal experiences in scenarios for unit testing has proven quite helpful for me at work.