JavaScript is a popular, dynamic programming language with an evolving ecosystem that adapts to modern requirements and changing market trends. It serves as the foundation for many modern web solutions and the tools used to build them.
In this discussion, we focus on a popular web development rivalry: Next.js vs React. Generally, we choose a top React development company when we need to build interactive UIs and dynamic web apps. But now, NextJS has emerged as a tough contender to React. It is built upon React and offers more functionalities, quickly becoming a preferred option for many web developers.
This blog provides a detailed comparison between React and Next.js, discussing their features, advantages, disadvantages, use cases, and key differences to help you choose the right option for your project.
1. What is React?
React is a JavaScript-based open-source library that allows developers to create simple, fast, and scalable user interfaces for single-page applications (SPAs) and multi-page web apps. The front-end library follows a reactive approach, supports functional programming, and provides various features for routing and state management through complementary libraries.
Providing the ability to build reusable UI components, React helps create component-based apps and manage updates to the user interface. It also introduces virtual DOM for performance improvement by minimizing direct interactions with the actual DOM. Traditionally, when changes are detected in the data, the entire page requires reloading. For example, clicking a button that changes the state leads to a web page reload. This is slow, inefficient, and overwhelms users with unnecessary content reloads.
React resolves this issue with its Virtual DOM, a lightweight copy of the actual DOM, where updates are first applied instead of directly modifying the actual DOM. If everything works correctly, only then are the changes reflected in the actual DOM; otherwise, they are discarded. Moreover, React components can be stateless, re-rendering only when their props change, or stateful, re-rendering when their internal state changes.
1.1 React Features
As a frontend library, React offers a wide range of features that help build interfaces for web solutions ranging from SPAs to large enterprise-grade apps.
- JSX: JSX or JavaScript XML allows developers to write HTML-like syntax directly within JavaScript code. Using this syntax, developers can embed JavaScript objects within HTML elements. Writing and visualizing UI components becomes easy. However, browsers don’t support JSX natively, so tools like the Babel compiler are used to transcompile the code into JavaScript. It improves the code readability and maintainability.
- Virtual DOM: React uses Virtual DOM for UI updates. It replicates the DOM, applies the changes to this virtual representation first. After comparing the updated virtual DOM with the previous version, React only updates the changed parts. As a result, the DOM manipulation can be minimized and performance to be enhanced.
- One-way Data Binding: React has a unidirectional data flow, where the data only flows from parent components to child components using props. The properties in the child component can communicate with the parent components about the modifications of the state based on the inputs, but it can’t return any data. This makes it easy to understand data changes across the application.
- Component-Based Architecture: This UI library has adopted a component-based architecture, where it breaks down the interface into different reusable components. Each UI component would have its own state and logic, which makes designing and maintaining complex user interfaces easy.
- Hooks: There is no need to write class components for using state and other features in React, thanks to its hooks. It allows React developers to reuse logic between components and helps them keep code concise and readable.
1.2 React Advantages
After understanding the features, it’s time to know the benefits of using the React library.
- Easy to Code: Because it uses JavaScript, coding has been easy with React. It allows you to easily create a dynamic app with fewer lines of code and within a smaller time frame.
- Community: React has the support of a large and strong community that actively provides support and necessary resources to help you learn and complete your project successfully.
- Customization: Though React comes with a large array of functionalities, the library allows you to extend them using other tools such as Redux.
- Performance Optimization: React helps increase the speed and response time of your application. Features such as lazy loading and Virtual DOM allow for efficient rendering and updates. It comprises many more features whose proper implementation can lead to increased performance.
1.3 React Disadvantages
It’s not just all sunshine when working with React. It comes with its own set of challenges as well.
- Focused on UI: React is a UI library that can only help design interfaces for your software solutions. So, you will be required to use other tools, frameworks, and libraries for full-stack development. Using React alone is not enough to produce a fully functional application.
- Outdated Documentation: React has a strong community support that can guide you through your projects. But the library lacks proper documentation. Due to its short development cycle, the documentation quickly becomes outdated, and new versions aren’t produced or made available soon enough. React developers also have to relearn the features that are newly released or updated on their own.
- Relies on Third-Party Tools: Since React is just a UI library and not a framework, it doesn’t come with the necessary development features. For that, you have to rely on third-party tools. React allows you to integrate with preferred solutions, increasing the dependency, which might lead to some serious issues.
1.4 React Use Cases
Considering the strengths and weaknesses of our library, React can be useful in the following instances:
- Interactive and Responsive Applications: Virtual DOM from React helps dynamically update the content without having to reload the web page. This allows you to build responsive and interactive applications that deliver native-like experiences.
- Progressive Web Apps (PWAs): The component-based architecture of React and its state management features make it an ideal option for building Progressive Web Apps.
- CSR Projects: Since it’s a front-end library, React can come in handy when working on projects that need client-side rendering.
2. What is Next.js?
NextJS is a JavaScript-based framework built on top of NodeJS and React. Although Vercel created this framework, it has always been open source. NextJS is useful in developing static and server-side websites, user-friendly web apps, and fast applications with React.
NextJS is lightweight in nature and offers innovative solutions to render React components on the server side. It is one of those rare web development frameworks that has the capability to build both static and dynamic web solutions.
Because it was built on top of React and NodeJS, NextJS is a feature-rich framework providing automatic build size optimization, faster compilation, pre-rendering, preview mode, and static export. React was just useful for building UIs, whereas NextJS is all you need to develop an application. Its popularity is increasing day by day, and it also has excellent documentation.
2.1 NextJS Features
NextJS is rich in terms of features, and here are the most popular ones:
- Server Rendering: Next supports server-side rendering, where it renders React components on the server and then sends them to the client-side browser. So whenever a user visits the Next-based website or application, they see fully rendered content. SSR improves performance and SEO.
- Static-Site Generation (SSG): Having SSG capabilities means you can generate HTML files during the build phase and then serve them as static files to the client. Static site generation doesn’t require server-side processing because every page and its content is already pre-rendered for instant access. This feature is useful for content-heavy websites or pages, such as documentation and blogs, that don’t require dynamic generation.
- Prefetching: Built into the custom link component, Prefetching concerns the routing and navigation system of your application. NextJS loads the resources on the route automatically once the route is inside the viewport. So, when the user clicks on a prefetched route, it’s already available and hence will load quickly.
- Automatic Code Splitting: This feature breaks down your code into small and easily manageable components. It bundles and serves every import in the code with each page to prevent unnecessary code from loading on the page. When an import is served on a specific page, other pages won’t load its library, which makes your app lightweight, leading to reduced initial load time.
- Routing: This NextJS feature simplifies the process of defining routes in React apps. Once you create pages in the pages directory, this framework generates relevant routes based on the given files. This eliminates the need to carry out route configuration. With the file-based routing system, it’s easy to manage and create complex routing configurations in NextJS.
2.2 NextJS Advantages
There are reasons why developers prefer to use this framework for web development. Here are a few of its benefits:
- SEO-Friendly: Next can perform server-side rendering, which helps websites and web apps with search engine optimization. Thanks to SSR, search engines can easily crawl and index web content, which can lead to better rankings and increased organic traffic.
- Faster Rendering: Any changes made to the file are instantly reflected on the web page. The React component is immediately rendered post-change without refreshing the whole page. This also makes it easier to track all the changes or edits on your site.
- Built-in CSS: Next offers built-in support for CSS. This means you can import CSS styles from a JavaScript file to the framework to ensure faster rendering.
- Improved Image Optimization: NextJS provides different types of formats to resize the images and serve them on the page in the best possible manner. It also allows you to configure pictures so they can be easily displayed in small viewports.
- ESLint Compatible: NextJS supports ESLint through “scripts”: { “lint”: “next lint”}, making it easy for developers to use ESLint.
2.3 NextJS Disadvantages
Although there are many advantages of using the NextJS framework, it is still relatively new and immature compared to traditional web development frameworks with a fully grown ecosystem. So, there ought to be some limitations to its use:
- No Built-in State Management: NextJS lacks a built-in state management solution. So, it has to rely on third-party libraries such as Jotai and MobX to provide state management capabilities. You have to configure these libraries and integrate the framework and other resources with them to fulfill your project requirements, which complicates the development process.
- File-Based Routing: NextJS has a routing system, but it is file-based, which is not sufficient in projects that require you to create dynamic routes. For that, NextJS developers have to learn to use NodeJS.
- Smaller Community: Next is still a growing web framework. So, in comparison to other options such as React, NodeJS, and Angular, the availability of expertise and required resources is less. That is why many developers prefer to go with more conventional options. So, if you use NextJS for your project, it’s difficult to get detailed documentation, online support, etc, that could guide your website or web app to success.
2.4 NextJS Use Cases
After understanding the strengths and limitations of the framework, it’s time to understand where it is most useful.
- E-commerce Websites: NextJS offers improved SEO and app performance, which can be of great help in bringing and converting more organic visitors to happy customers.
- Marketing Websites and Landing Pages: NextJS supports SSR, which is helpful in continuously publishing new content or updating existing ones. It also allows you to use several third-party plugins or libraries, like Google Tag Manager, to track different analytics. For these reasons, NextJS is an ideal option for developing landing pages and marketing websites.
- Single Page Application (SPAs): The file-based routing system of NextJS is useful in creating SPAs. It simplifies the process of defining the routes, which makes it easy to map URL paths and manage React components.
3. React vs Next.js: A Comprehensive Comparison
Though both React and Next.js help with modern web app development, both are designed for different purposes. What we have here is a JavaScript library for creating user interfaces and a full-stack framework with advanced features. Look at the detailed distinctions between them in the section below:
3.1 Performance
When it comes to performance, Next.js apps are quite fast, thanks to their server-side rendering, static destinations, image optimization, and other performance optimization features. So, using NextJS for web development will automatically provide code splitting, server-side rendering, and other capabilities that ensure enhanced performance.
Meanwhile, React only supports client-side rendering, which is not equally effective as SSR for offering better performance.
3.2 Learning Curve
The learning curve of React is low, especially if the developers are familiar with JavaScript. This UI library isn’t opinionated. So, you have complete control over how you want to design your app. However, React is only focused on UI. So, you will need to add other tools to your stack for full-stack development, increasing the complexities and learning curve.
Since Next.js is already a full-stack framework, it consists of all the advanced concepts, such as static site generation, API routes, and server-side rendering. Therefore, the learning curve here is a little steep.
The robust features it offers are indeed helpful, but they make learning the framework difficult. Moreover, NextJS is also an opinionated framework, forcing you to adhere to specific ways of developing and optimizing the NextJS application.
3.3 Documentation
Good documentation, tutorials, and informational articles are available for both React and Next.js. While tutorials of NextJS are walk-through materials that help you learn by actually doing it, React documentation comes with introductory activities, explain the fundamentals.
3.4 Configuration
React uses Create React Apps to build React applications. So, all configurations are manual and require React developers to be skilled in utilizing Webpack and Babel. Meanwhile, NextJS follows a minimal configuration philosophy.
Customizing or making changes to the project is complex with CRA without ejecting. The eject process creates all the configuration files, which gives you complete control but also exposes all the configurations. Moreover, you can’t go back after ejecting and have to manually handle configurations and updates.
React neither forces you to follow a specific folder structure nor adheres to any method for handling CSS. Although this flexibility is beneficial, we need to decide on a consistent structure and CSS solutions to ensure stability. Every method for the same would require deep configurations.
The reason NextJS stands out from other web development frameworks is because of its “zero config” approach. So, Next.js works well without any configuration, but sometimes developers have to configure the behavior to meet their preferences or project requirements.
Any minimal default configurations you need to make in your projects come prepared in the next.config.js file. Just place the file at the root of your project, and you can configure different aspects of Next.js, ranging from environmental setup to Webpack and Babel customizations.
If you are using TypeScript instead of JavaScript, then Next also provides a tsconfig.json file with built-in TypeScript support. Adding the file would allow you to configure TypeScript. Next.js also allows integration with different CSS modules, etc.
3.5 Rendering
React and Next.js handle rendering differently. React offers client-side rendering, whereas Next.js provides static site generation and server-side rendering.
As a front-end library, React renders components directly in the browser. So, the JS files are already loaded when you visit the React app, and the DOM elements are generated spontaneously. This enables React to update the UI depending on the changes happening in the state of the application to provide real-time updates. However, the client-side content is rendered after the initial page load, hurting app performance as well as SEO. Client-side rendering in React works as shown below:
import React, { useState } from 'react'; import ReactDOM from 'react-dom/client'; function App() { const [name, setName] = useState('World'); return ( <div> <h1>Hello, {name}!</h1> <input type="text" placeholder="Enter your name" value={name} onChange={(e) => setName(e.target.value)} /> </div> ); } const root = ReactDOM.createRoot(document.getElementById('root')); root.render(<App />); |
On the contrary, Next.js generates HTML for every single page on the server and then sends it to the browser before any JavaScript execution. So, during the initial page load, the required content is readily available, which helps enhance app performance and SEO.
The server sends a fully rendered HTML document to the browser in server-side rendering.
To make it interactive, React then attaches the document with event listeners. It is an ideal approach for content-heavy websites in need of better search engine ranks. Next.js carries out SSR in the following way:
export default function Page({ time }) { return ( <div> <h1>Server-Side Rendering Example</h1> <p>The current server time is: {time}</p> </div> ); } export async function getServerSideProps() { const currentTime = new Date().toLocaleString(); return { props: { time: currentTime, }, }; } |
3.6 Developer Community
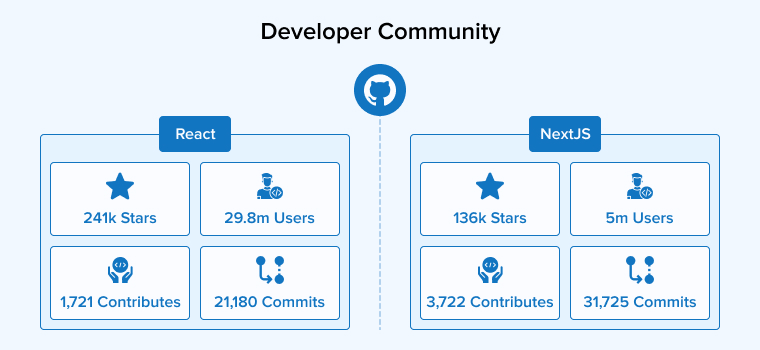
In this age when technology is continuously evolving, it is not enough to pick certain tools to build a successful project. You have to rely on its community to help navigate through the complexities of the project. The more active community and online support you have, the better. It helps cope with the latest trends and solve new issues.
React has an active community, and proper documentation can be found on Stack Overflow. Meanwhile, NextJS lacks the traditional and organized form of documentation but gives support through different discussions on GitHub. NextJS is open-source and has a growing community around the world.
3.7 Routing
React doesn’t come with a built-in routing solution, but a third-party library such as React Router can help you add routing to the React app. React Router is a robust tool that handles page navigation. However, it needs some manual configuration and setup. Setting up the basic routing through React Router in React would look like:
export default function App() { return ( <BrowserRouter> <Routes> <Route path="/" element={<Layout />}> <Route index element={<Home />} /> <Route path="about" element={<About />} /> <Route path=”profile” element={<Profile/>} /> </Route> </Routes> </BrowserRouter> ); } |
React Router is certainly helpful, flexible, and gives you total control over navigation, but it requires additional setup in your project.
On the other hand, NextJS offers file-based routing to simplify the routing process. Your app routes will be automatically defined by the file structure in the page directory. No additional libraries or configuration code is required. Creating a new page in NextJS is as simple as creating a new file:
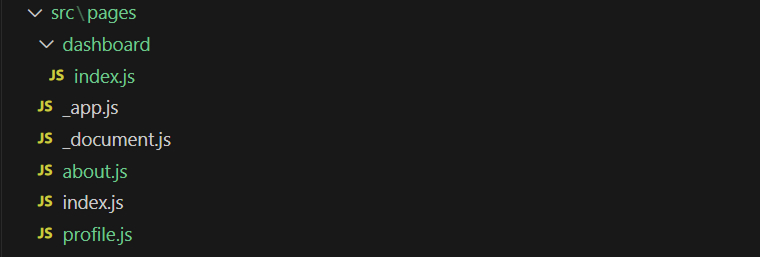
/pages index.js → / about.js → /about profile.js → /profile dashboard/index.js → /dashboard |
The file-based routing system is intuitive and helps organize your project. Next.js’s built-in routing system is useful if you prefer convention over configuration. But if you need more flexibility in structuring your app’s routes, then React is an ideal choice.
3.8 SEO
React is a client-side library, which means it renders the components and content directly on the browser by running JavaScript. The JavaScript-based content is harder to index, so search engines face difficulty, making your entire app or site less SEO friendly.
Meanwhile, Next.js supports server-side rendering, which provides fully rendered HTML, making it easy for search engines to index the site or application.
3.9 Scalability and Project Complexity
NextJS is considered more scalable than React because of its built-in features, such as static site generation and server-side rendering for better SEO and performance, API routes for generating serverless functions, and file-based routing for organizing projects, especially larger ones.
However, if you use React, you will be responsible for setting up and maintaining the app structure. It will be up to you to make the project scalable because React lacks the required features and is focused on UI. You need to add state management libraries like Recoil and Redux, and routing libraries like React Router to address scalability issues. However, adding all these tools would increase the overhead as well as efforts to set up and handle the app, increasing the project complexity.
3.10 Static Site Generation (SSG)
You won’t find static site generation features in React, but you can add functionality for the same by integrating it with a suitable tool such as Gatsby.js. It should help you generate static sites from React components. Static site generation comes by default in Next.js, enabling developers to generate static HTML files during build time and serve them without a server.
3.11 Sample App Development
1. React
Prerequisites: The presence of Node.js and React is required in the system.
Step 1: Create a React app with the following command.
npx create-react-app |
Step 2: Now, we will create components for our Todo application.
- Create a Todo Component which contains logic to list down the to-do items.
- Create a Form component that contains logic to add a new task.
- Create a TodoList component that contains logic for Listing, Mark as Complete, and Delete the task.
Now, create a Todo.js file in components and write the following code in the same.
import React from "react"; const Todo = ({ text, todo, completeHandler, deleteHandler }) => { return ( <div className="todo"> <li className={`todo-item ${todo.completed ? "completed" : ""}`}> {text} </li> <button className="complete-btn" onClick={() => completeHandler(todo.id)}> {todo.completed ? ( <i className="fas fa-times"></i> ) : ( <i className="fas fa-check"></i> )} </button> <button className="trash-btn" onClick={() => deleteHandler(todo.id)}> <i className="fas fa-trash"></i> </button> </div> ); }; export default Todo; |
Then create a Form.js file in components and write the following code in the same.
import React, { useState } from "react"; const Form = ({ todos, setTodos }) => { const [todoText, setTodoText] = useState(""); const handleSubmit = (e) => { e.preventDefault(); setTodos([ ...todos, { text: todoText, completed: false, id: Math.random() * 1000 }, ]); setTodoText(""); }; return ( <form> <input type="text" className="todo-input" value={todoText} onChange={(e) => setTodoText(e.target.value)} /> <button className="todo-button" type="submit" onClick={handleSubmit}> <i className="fas fa-plus-square"></i> </button> </form> ); }; export default Form; |
Let’s create a TodoList.js file in components and write the following code in the same.
import React from "react"; import Todo from "./Todo"; const TodoList = ({ todos, setTodos }) => { const deleteHandler = (id) => { setTodos(todos.filter((el) => el.id !== id)); }; const completeHandler = (id) => { setTodos( todos.map((item) => { if (item.id === id) { return { ...item, completed: !item.completed, }; } return item; }) ); }; return ( <div className="todo-container"> <ul className="todo-list"> {todos.map((todo) => ( <Todo key={todo.id} text={todo.text} todo={todo} deleteHandler={deleteHandler} completeHandler={completeHandler} /> ))} </ul> </div> ); }; export default TodoList; |
Step 3: Now, open app.js file in src folder and Write the following code in the same.
import React, { useState } from "react"; import "./App.css"; import Form from "./components/Form"; import TodoList from "./components/TodoList"; const App = () => { const [todos, setTodos] = useState([]); return ( <div> <header>To-do List</header> <Form todos={todos} setTodos={setTodos} /> <TodoList todos={todos} setTodos={setTodos} /> </div> ); }; export default App; |
Step 4: Now add some CSS. Create an App.css file in the src folder and write the code to include CSS.
* { margin: 0; padding: 0; box-sizing: border-box; } body { background-image: linear-gradient(120deg, #f6d365 0%, #fda085 100%); color: white; font-family: "Poppins", sans-serif; min-height: 100vh; } header { font-size: 3rem; padding-top: 4rem; font-weight: 600; } header, form { min-height: 15vh; display: flex; justify-content: center; align-items: center; } form input, form button { padding: 0.5rem; font-size: 2rem; border: none; background: white; } form input:focus { outline: none; } form button { color: #ff6f47; background: #f7fffe; cursor: pointer; transition: all 0.3s ease; } form button:hover { background: #ff6f47; color: white; } .todo-container { display: flex; justify-content: center; align-items: center; } .todo-list { min-width: 30%; list-style: none; } .todo { margin: 0.5rem; background: white; font-size: 1.5rem; color: black; display: flex; justify-content: space-between; align-items: center; transition: all 1s ease; } .todo li { flex: 1; } .trash-btn, .complete-btn, .edit-btn { background: rgb(212, 11, 14) ; color: white; border: none; padding: 1rem; cursor: pointer; font-size: 1rem; width: 48px; } .complete-btn { background: #ff6f47 ; } .edit-btn { background: rgb(11, 212, 162); } .todo-item { padding: 0rem 0.5rem; } .fa-trash, .fa-check, .fa-times { pointer-events: none; } .fall { transform: translateY(10rem) rotateZ(20deg); opacity: 0; } .completed { text-decoration: line-through; opacity: 0.5; } .fa-pen { font-size: 25px; } |
Step 5: Update the index.js and index.css files as per the mentioned repository.
Step 6: Update index.html file of public folder as per the mentioned repository.
<link rel="preconnect" href="https://fonts.gstatic.com"> <link href="https://fonts.googleapis.com/css2?family=Poppins:wght@400;600;700&display=swap" rel="stylesheet"> <link rel="stylesheet" href="https://cdnjs.cloudflare.com/ajax/libs/font-awesome/5.12.1/css/all.min.css" integrity="sha256-mmgLkCYLUQbXn0B1SRqzHar6dCnv9oZFPEC1g1cwlkk=" crossorigin="anonymous" /> |
Step 7: Run the application using the following command.
npm start |
Step 8: A new window in the browser will pop up. Add a few tasks here.


Folder Structure

2. NextJS
Prerequisites: Presence of Node.js and Next JS is required in the system.
Step 1: Create a next app with the following command.
npx create-next-app |
Step 2: Now, we will create components for our Todo application.
Create a TodoList component which contains logic for listing,Complete and Delete Task.
export default function TodoList({ todos, onToggle, onDelete }) { return ( <ul className="todo-list"> {todos.map((todo) => ( <li key={todo.id} className={todo.completed ? "completed" : ""}> <span>{todo.text}</span> <div className="action-buttons"> <button className="complete-btn" onClick={() => onToggle(todo.id)}> {todo.completed ? "Undo" : "Complete"} </button> <button className="delete-btn" onClick={() => onDelete(todo.id)}> Delete </button> </div> </li> ))} </ul> ); } |
Create an AddTodoForm component which contains logic to add a new Task.
import { useState } from "react"; export default function AddTodoForm({ onAdd }) { const [task, setTask] = useState(""); const handleSubmit = (e) => { e.preventDefault(); if (task.trim() === "") return; onAdd(task); setTask(""); }; return ( <form className="input-section" onSubmit={handleSubmit}> <input type="text" placeholder="Enter a task..." value={task} onChange={(e) => setTask(e.target.value)} /> <button type="submit">Add</button> </form> ); } |
Step 3: Now, open index.js file in the pages folder and Write the following code in the same.
import { useState } from "react"; import AddTodoForm from "../components/AddTodoForm"; import TodoList from "../components/TodoList"; export default function Home() { const [todos, setTodos] = useState([]); const addTodo = (text) => { setTodos([...todos, { id: Date.now(), text, completed: false }]); }; const toggleTodo = (id) => { setTodos( todos.map((todo) => todo.id === id ? { ...todo, completed: !todo.completed } : todo ) ); }; const deleteTodo = (id) => { setTodos(todos.filter((todo) => todo.id !== id)); }; return ( <div className="app-container"> <h1 className="title">Next.js Todo App</h1> <AddTodoForm onAdd={addTodo} /> <TodoList todos={todos} onToggle={toggleTodo} onDelete={deleteTodo} /> </div> ); } |
Step 4: Now Add some CSS. Open globals.css which should be inside the styles folder or If not any such files then you can create it. Add below code in the file.
body { font-family: Arial, sans-serif; background-color: #f7f8fc; margin: 0; padding: 0; } .app-container { max-width: 500px; margin: 60px auto; padding: 30px; background: #a7eaf3; border-radius: 10px; } .title { text-align: center; margin-bottom: 20px; color: #333; } .input-section { display: flex; gap: 10px; margin-bottom: 20px; } .input-section input { flex: 1; padding: 10px; font-size: 16px; border: 1px solid #ccc; border-radius: 4px; } .input-section button { padding: 10px 20px; background: #0070f3; color: #fff; border: none; font-weight: bold; cursor: pointer; border-radius: 4px; } .input-section button:hover { background: #0056c1; } .todo-list { list-style: none; padding: 0; } .todo-list li { display: flex; justify-content: space-between; align-items: center; padding: 12px; background: #f0f0f0; margin-bottom: 10px; border-radius: 6px; } .todo-list li span { flex: 1; } .todo-list li .action-buttons { display: flex; gap: 10px; } .todo-list li .complete-btn { background: #2a9d8f; border: none; color: white; padding: 6px 10px; cursor: pointer; border-radius: 4px; } .todo-list li .complete-btn:hover { background: #21867a; } .todo-list li .delete-btn { background: #e63946; border: none; color: white; padding: 6px 10px; cursor: pointer; border-radius: 4px; } .todo-list li .delete-btn:hover { background: #c5303f; } .todo-list li.completed span { text-decoration: line-through; color: #999; } |
Step 5: Open _app.js file which is inside the pages folder and give reference of globals.css file like below.
import "@/styles/globals.css"; |
Step 6: Run the application using the following command.
npm start |
Step 7: A new window in the browser will pop up. Add a few tasks here.

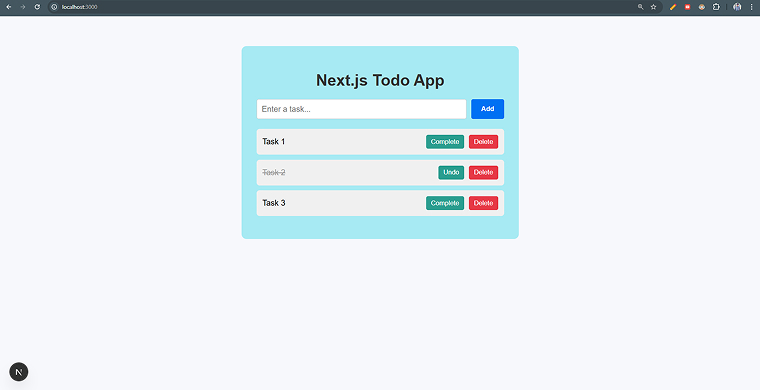
Folder Structure
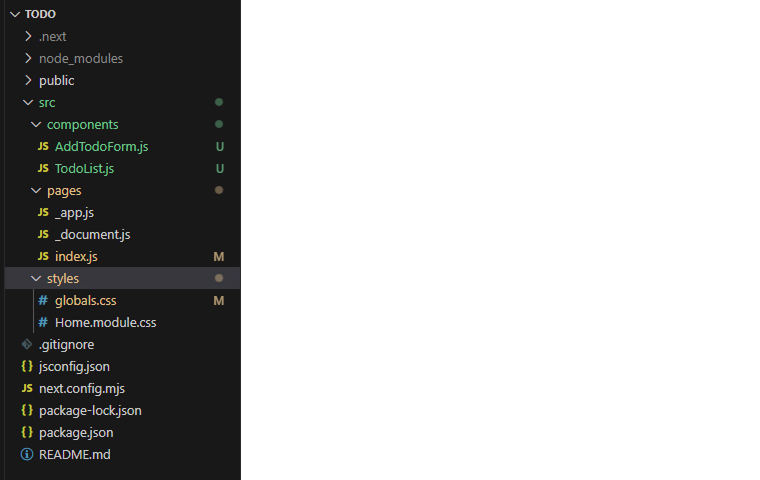
4. Difference between NextJS and React
After discussing the key differences between React and NextJS in detail, this section provides a comparison at a glance for Next.js vs React.
| Parameter | React | NextJS |
|---|---|---|
| Purpose and Use | React is a JavaScript library focused on building user interfaces. | NextJS is a framework built upon React for full-stack web app development. |
| Learning Curve | Easier to learn in comparison to Next.js. | Very difficult to learn especially if you are not familiar with React. |
| Offline Support | Need offline support. | Doesn’t need offline support. |
| Speed and Performance | React apps are slower. | Next.js applications are faster than React apps. |
| Rendering | Supports client-side rendering. | Offers server-side rendering. |
| Routing | Doesn’t have a built-in routing system. Uses third-party solutions such as React Router. | Provides a file-based routing system that simplifies the process and project organization. |
5. When to Use React Over Next.js?
React is a JavaScript-based UI library that can be useful for the following scenarios:
- To Build Highly Interactive Apps: The library has a component-based architecture, making it easy to create reusable components to improve code modularity and maintainability. This helps build interactive and high-performing user interfaces.
- For Projects Requiring Offline Support: React uses virtual DOM to support data binding. Its CSR capabilities allow React to handle large sets of data and ensure reliability even without an internet connection.
- For Open-Source Projects: If your project requires significant community support, including detailed documentation and expert guidance through development issues, then React is the right choice. The library is open-source, popular, and widely used across the world. So, naturally, it has a strong and active community.
6. When to Use NextJS Over React?
Next.js is a better option than React in the following use cases:
- Single Stack Development: NextJS can easily handle both frontend and backend development, allowing you to carry out full-stack web application development.
- High-Performance and SEO-Friendly Apps: Next supports server-side rendering, which makes it easy for search engines to index the web page and its content. Effective implementation of SSR also leads to enhanced app performance.
- Static and Dynamic Sites: Next.js supports static site generation by default. Blending it with SSR will allow you to create sites with dynamic elements. This helps create content-heavy sites such as blogs and documentation etc.
7. Conclusion
After exploring features, pros, cons, use cases, and the differences between Next.js and React, one thing is certain: both are robust tools, but built for different purposes. React is a UI library, whereas Next.js is an opinionated framework.
The library helps build intuitive interfaces but comes with limited functionalities and needs third-party integrations for full-stack development. Meanwhile, the framework is opinionated and provides rich features for server-side rendering and performance optimization.
So, you need to consider different factors when picking an appropriate tool, such as the nature of your app, specific project requirements, development team’s preferences, and more. The differences we discussed in this blog would help you make an informed decision.






Comments
Leave a message...