
Migrating from Jest to Vitest is becoming a popular choice among modern JavaScript developers, especially those working with Vue.js. As projects grow and performance becomes a top priority, many teams, including those at a Vue.js development company, are looking to convert Jest to Vitest for faster, more efficient testing tools. Vitest, built on top of Vite, offers a fast and developer-friendly testing experience with seamless integration into modern front-end workflows
This article is a comprehensive, step-by-step migration guide designed to help you convert your existing Jest setup to Vitest with minimal hassle. Whether you want to speed up test runs, simplify configuration, or stay aligned with the latest tools in the Vue ecosystem, this migration guide will walk you through everything you need to know for a smooth transition.
But before going ahead, you can take a look at the trend comparison between Jest and Vitest in the last 5 years, taken from npmtrends.

1. Jest Overview
Jest is a JavaScript testing framework developed by Meta (formerly Facebook). It was basically designed to test React applications, but developers also widely use it for other JavaScript projects. Jest provides a detailed and easy-to-use solution for writing unit tests, integration tests, and snapshot tests. It is commonly used to test components and applications built with JavaScript, such as web apps rendered in browsers. Jest stands out among other popular testing frameworks because it does not rely on third-party apps and software.
Jest remains popular with 44.8k stars, 6.5k forks, and 1,578 contributors on GitHub.

1.1 Features of Jest
The following are the features of Jest.
- Zero Configuration: Jest works out of the box with minimal setup, especially for React projects.
- Fast and Parallel Testing: Jest can handle large codebases efficiently, as tests are executed simultaneously instead of sequentially.
- Snapshot Testing: It tracks changes in a component’s output over time. It compares the current output to a previously saved snapshot during future test runs to detect any unexpected changes.
- Mocking Support: Jest simplifies testing by allowing you to mock functions, modules, and timers. This allows you to isolate the part of the code you’re testing without relying on real external systems like APIs or databases.
- Code Coverage Reports: Jest can generate comprehensive reports that show the portions of your code tested, making it easier to identify areas that haven’t been covered.
- Watch Mode: Watch mode in Jest automatically re-runs tests related to files you’ve changed, without restarting the entire test suite.
- Built-in Assertions: Jest includes a complete set of built-in matchers, so you don’t need any external assertion libraries to verify expected results in your tests.
1.2 Setting up Jest
Following are the steps to setting up jest:
Step 1. Install Jest.
- For JavaScript projects:
Command:npm install --save-dev jest
- For TypeScript projects, also install:
Command:npm install --save-dev jest ts-jest @types/jest
Step 2. Initialize Jest Config.
Command:
npx jest --init |
This creates a jest.config.js file that allows you to adjust various settings, such as the testing environment, code coverage options, and other configuration preferences. If you’re using TypeScript, update your configuration with the following settings.
// jest.config.js module.exports = { preset: "ts-jest", testEnvironment: "node", }; |
Step 3. Add a Test Script in package.json.
"scripts": { "test": "jest", }, |
Step 4. Write a test file.
Create a file arithmetic.ts.
const addition = (num1, num2) => num1 + num2; const subtraction = (num1, num2) => num1 - num2; const product = (num1, num2) => num1 * num2; const divide = (num1, num2) => num1 / num2; module.exports = { addition, subtraction, product, divide, }; Now create an arithmetic.test.js const { addition, subtraction, product, divide } = require("./arithmetic"); test("10 + 15 = 25", () => { expect(addition(10, 15)).toBe(25); }); test("20 - 15 = 5", () => { expect(subtraction(20, 15)).toBe(5); }); test("2 * 3 = 6", () => { expect(product(2, 3)).toBe(6); }); test("27 / 3 = 9", () => { expect(divide(27, 3)).toBe(9); }); |
Step 5. Run the Tests.
Now you can run the following command to test your code.
Command:
npm test |
Or:
Command:
npm run test |
After the command completes successfully, you’ll receive an output similar to the example shown below.

1.2.1 Using Babel with Jest
To enable Jest to process modern JavaScript (ES6+) or JSX syntax, you need to configure Babel to transpile the code properly during testing.
Steps to Set Up Babel with Jest:
Step 1. Install the Necessary Packages.
Command:
npm install --save-dev jest babel-jest @babel/core @babel/preset-env |
If you’re working with React, make sure to install the necessary packages as well:
Command:
npm install --save-dev @babel/preset-react |
Step 2. Create a Babel Configuration File.
At the root level of your project, create a file called babel.config.js.
// For plain JavaScript module.exports = { presets: ['@babel/preset-env'], }; // For React projects module.exports = { presets: ['@babel/preset-env', '@babel/preset-react'], }; |
Step 3. Include a test script in the package.json file (if it isn’t already there).
Step 4. Create and Execute Your Tests.
You can now write your code and test files using ES6+ syntax or JSX, and Jest will process them correctly with the help of Babel.
1.3 Advantages of Jest
The following are the advantages of Jest:
- Fast Execution: Jest runs tests simultaneously and re-tests only the files that have changed, which speeds up the development and testing process.
- Rich APIs and Matchers: Jest provides a rich set of APIs and matchers that make writing and reading tests more expressive and intuitive. This helps developers clearly define expectations and catch errors with precise, readable assertions.
- Support for Asynchronous Testing: Jest fully supports asynchronous testing using callbacks, promises, and async/await. This allows developers to reliably test code that involves API calls, timers, or other asynchronous operations.
- All-in-One Testing Framework: Jest includes a test runner, assertion library, mocking support, and code coverage tools, so you don’t need to install multiple libraries.
- Active Community and Support: Being widely used and maintained by Meta, Jest benefits from strong community support and regular updates.
1.4 Disadvantages of Jest
The following are the disadvantages of Jest:
- Limited for Non-JavaScript Ecosystems: Jest is primarily designed for JavaScript and TypeScript. It may not integrate well with projects involving other languages or tools outside the JavaScript ecosystem.
- Unsuitable for Backend testing: Jest has features like built-in DOM-like behavior, which are suitable for UI testing; therefore, libraries not involving the DOM increase unnecessary overhead.
- Verbose Error Messages: In some cases, especially with complex mocks or test failures, Jest’s error messages can be long and difficult to interpret.
2. Vitest Overview
Vitest is a modern, blazing-fast testing framework built for the Vite ecosystem. Designed as a lightweight alternative to Jest, it offers a similar API and developer experience, but with significantly faster performance thanks to native ES modules and Vite’s hot module replacement (HMR).
Vitest continues to be popular, boasting 14.4k stars, 1.4k forks, and 602 contributors on GitHub.

2.1 Features of Vitest
The following are the features of Vitest:
- Modern JavaScript Support: Vitest fully supports modern JavaScript features, including ES modules, TypeScript, and JSX, without requiring additional configuration. This makes it highly suitable for today’s web development environments.
- Built-in Coverage: Vitest offers built-in code coverage reporting, allowing developers to track how much of their code is tested easily, ensuring that tests cover all critical parts of the application.
- Mocking and Spying: Vitest provides built-in support for mocking modules, functions, and timers, similar to Jest. This feature allows you to isolate tests by replacing dependencies with mock implementations.
- Unified Configuration: Vitest uses Vite’s configuration and plugins, allowing you to use the same setup for both your application and tests to maintain consistency and simplify the overall development process.
- Multi-threading: Tinypool enables multi-threading in Vitest, allowing tests to run concurrently across multiple threads. This significantly speeds up test execution, especially in large codebases.
2.2 Setting up Vitest
Following are the steps to setting up Vitest:
Step 1. Install Vitest.
- Using npm:
Command:
npm install --save-dev vitest
- Using yarn:
Command:
yarn add vitest --dev
Step 2. Configure Vitest in vite.config.js.
// vite.config.js import { defineConfig } from "vite"; export default defineConfig({ test: { globals: true, environment: "jsdom", // use 'node' for backend coverage: { reporter: ["text", "html"], }, }, }); |
Step 3. Add a Script in package.json.
"scripts": { "test": "vitest" } |
Step 4. Create a Test File.
Create a file string.ts.
const Counter = (string) => string.length; const Palindrome = (string) => string == string.split("").reverse().join(""); module.exports = { Counter, Palindrome }; |
Now, create a string.test.js file.
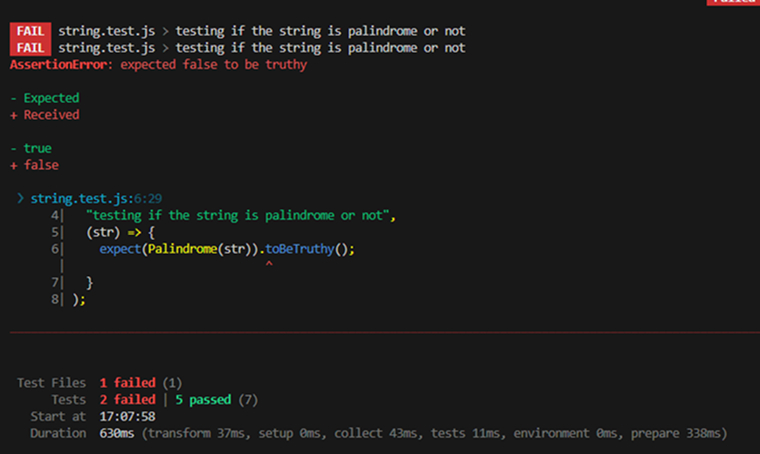
import { Counter, Palindrome } from "./string"; test.each(["aad", "ese", "legal", "hannah"])( "testing if the string is palindrome or not", (str) => { expect(Palindrome(str)).toBeTruthy(); } ); test.each(["cde", "efg", "lmno"])( "testing if strings lengths are correct or not", (word) => { expect(Counter(word)).toBe(word.length); } ); |
Step 5. Run Tests.
Command:
npm run test |
After the command executes successfully, you should see an output similar to the one shown below:

2.3 Advantages of Vitest
The following are the advantages of Vitest:
- Modern API: Vitest offers a simple, modern API that closely resembles Jest, making it easy for developers switching from other test tools to adopt. Its familiar structure makes writing and understanding tests straightforward.
- Compatibility with Vite: Vitest works seamlessly with Vite, using the same configurations and plugins, which simplifies setup. If your project already uses Vite, adding Vitest requires minimal changes.
- Modern Syntax Compatibility: Vitest supports the latest JavaScript and TypeScript characteristics out of the box, allowing you to use modern syntax for writing test cases. There’s no need for extra setup or plugins to use ES modules, async/await, or other current language features.
- Customization Flexibility: Vitest allows developers to tailor their testing environment to meet specific project requirements. This flexibility makes it easy to adapt the setup for various use cases and workflows.
- Community and Ecosystem: Vitest is rapidly gaining popularity within the developer community, with increasing contributions and support for various plugins and integrations. Its expanding ecosystem makes it an appealing choice for modern testing needs.
2.4 Disadvantages of Vitest
The following are the disadvantages of Vitest:
- Relatively New: Vitest is a newer framework, so it may not yet have as many advanced features or community plugins as more established tools like Jest. This can limit its flexibility in certain use cases or ecosystems.
- Limited Browser Testing: Vitest supports DOM testing using jsdom but does not provide native browser testing capabilities. Integrate Vitest with the Cypress framework or the Playwright library for end-to-end (E2E) testing.
- Dependence: Vitest depends on Vite and is optimized for projects that use it. However, it is still evolving and may not be as stable or feature-rich as Jest or well-established testing frameworks.
3. Why Migrate to Vitest?
Migrating from Jest to Vitest offers several benefits, especially for modern front-end projects. Here are the key reasons why developers consider making the switch:
- Faster Test Execution: Vitest is built on Vite and esbuild, providing significantly faster test startup and execution times compared to Jest.
- Lightweight and Actively Maintained: Vitest is actively maintained by the Vite team, ensuring it’s optimized for speed and modern development needs.
- Seamless TypeScript Integration: Vitest requires no extra setup for TypeScript support.
- Better Frontend Tooling Compatibility: Vitest integrates seamlessly with modern frontend tools, ensuring fast and efficient testing in projects built with modern JavaScript frameworks. Its tight integration reduces configuration complexity and improves overall compatibility with frontend workflows.
- Improved Developer Experience: With built-in hot module replacement (HMR) and instant feedback, Vitest provides a smoother and more efficient testing workflow.
- Optional UI Mode: Vitest offers an optional browser-based UI that allows you to view and debug tests in an interactive environment, providing a more visual and intuitive way to work with your tests.
4. Prerequisites for the Migration
Following are the prerequisites for the migration:
- Existing Jest Test Suite: Make sure you have an existing project that uses Jest for testing(with the describe, test, and expect functions).
- Project Using Vite: Vitest works most efficiently when used with Vite, so ensure your project is already set up with Vite, or be prepared to switch to it for optimal compatibility and performance.
- Node.js Installed: Ensure your system has Node.js installed, with version 14.18 or higher, or version 16 and above.
- Clear Project Structure: Maintain a consistent naming pattern for your test files (like .test.js or .spec.ts), and ensure that your tests do not rely heavily on features or mocks that are unique to Jest.
- Familiarity with Jest Syntax: Because Vitest uses syntax similar to Jest, understanding how your existing tests are written makes it easier to identify any necessary adjustments during migration.
- TypeScript Setup (if applicable): If you’re using TypeScript in your project, ensure that your tsconfig.json file is properly configured. Specifically includes “vitest/globals” in the types array to enable Vitest’s global types.
5. Migration Steps from Jest to Vitest
Following are the migration steps from Jest to Vitest:
Step 1: To set up Vitest in your project, you first need to install Vitest and its associated dependencies.
Run this in your Vite project:
Command:
npm install-- save-dev vitest |
Step 2: Add a vitest.config.ts file to the main directory of your project.
Place a vitest.config.ts file in the root directory of your project. This file is used to set up your testing environment, configure test coverage options, and specify any global settings for your tests.
// vite.config.js import { defineConfig } from "vite"; export default defineConfig({ test: { globals: true, environment: "jsdom", // use 'node' for backend coverage: { reporter: ["text", "html"], }, }, }); |
Step 3: Update package.json Test Scripts.
Update the package.json scripts by removing any commands that run Jest, and replace them with equivalent Vitest commands.
"scripts": { "test": "vitest", } |
Your tests are now ready to be executed with the following command:
Default:
npm run test |
Step 4: Migrate Jest-Specific Code And Handle API Differences.
Vitest is largely compatible with Jest’s API, but some adjustments are necessary to ensure everything works correctly.
Mock Functions:
//jest const mockFn = jest.fn(); //vitest const mockFn = vi.fn(); |
Mocking Modules:
//jest jest.mock("axios"); //vitest vi.mock("axios"); |
Suppose your project contains many instances of jest. calls, you can speed things up by using a simple find-and-replace operation.
- Replace all jest. → vi.
- Replace all jest.fn() → vi.fn(), and so on.
Example:
//greet.js function greet(getName) { return `Hello, ${getName()}!`; } module.exports = { greet }; |
- Jest Version
//greet.test.js
const { greet } = require("./greet");


test("greet calls the name function and returns greeting", () => {
  const mockGetName = jest.fn(() => "Alice");
  const result = greet(mockGetName);


  expect(mockGetName).toHaveBeenCalled();
  expect(result).toBe("Hello, Alice!");
});
- Converted Vitest Test
import { vi, test, expect } from "vitest";
import { greet } from "./greet.js";


test("greet calls the name function and returns greeting", () => {
  const mockGetName = vi.fn(() => "Alice");
  const result = greet(mockGetName);


  expect(mockGetName).toHaveBeenCalled();
  expect(result).toBe("Hello, Alice!");
});
Step 5: Run and Validate Tests.
Run the tests using:
Command:
npm run test |
Review the test results and fix any issues caused by mismatched mock setups or configuration settings. Many migration problems occur due to slight changes in APIs or differences in the test environment.
Output:

Step 6: Update Your CI/CD Pipeline.
Old Jest Step

New Vitest Step

For Coverage (optional, if used):

These are the essential updates required for your CI/CD pipeline.
Step 7: Remove Jest Dependencies.
After you’ve successfully set up your pipeline with Vitest:
Default:
npm uninstall jest babel-jest @types/jest ts-jest |
6. Final Words
Migrating from Jest to Vitest can significantly improve your testing experience, especially if you’re working within a Vite-powered development environment. This guide has walked you through the key steps from setting up Vitest, updating configuration files, and rewriting test syntax, handling API differences, and replacing Jest-specific utilities. While the transition may seem daunting at first, especially for larger codebases, the performance benefits and improved developer experience make it well worth the effort. By following a structured migration approach and leveraging community tools or plugins when needed, you can ensure a smooth and efficient switch.


Comments
Leave a message...